Flow Admin Center - Do a spring cleaning of your Flows

I spewed coffee all over my screen.

flow-admin-quota.png

Each user in Office 365 gets 2000 Flow runs pooled.  This is my personal playground tenant, I've got 10 users licenses but it's really just me running around sending Flows to myself, and I.

So, I'm looking around Flow Admin center.  I see a tab Quotas.  I clicked on it and sees oh it's got a bar telling me how many runs left.  That's good.

Then I see the number: 6500+ runs.

I chocked.  What.  I run a number of Flows but really NOT that many.  Is that lifetime total?  It's per month.  OK.  We need to interrupt everything and sort this out.

So hmm, it does look peculiar.  (BTW, I don't know how 8000+4000 = 6500)

But I do want to go into these two examples:

First Bad Thing: Scheduled Recurrence

flow-recurrence-trigger.png

Sometimes, I use a Recurrence trigger to test something - and it default to 1 per minute.  I had changed this to 5, but this was way too often.  

TIP: Always run test Flows via a HTTP Request Trigger - poke it with Postman instead.


Second Bad Thing: Infinity Loops

This one is can be in different forms.  But the idea is simple - you trigger from a SharePoint list item, and you update that same item.

The more tricker version to spot is if the update was hidden within a Conditional Block, so it only "sometimes" trigger, but not all the time.  The problem is, that sometimes started happening, and now it's looping endlessly without telling you about it.

You get the idea.  This second one was worse than the first problem - this one clocked in 8000 runs on its own.

Only you can save Yourself (and your Free runs)

I'm sure Flow product team will be thrilled if you don't check your Flows.

But you might not be.  So you need to proactively do the next step.

We create a new recurring monthly Flow that creates a TODO task to review the Flow Admin Quotas.

This logic is perfect*
If you see the error, let me know in the comments ;-)


I've been working on an epic Flow story and that's gonna take some time.  But this short episode was too good not to write up.  It is now Friday 7 PM so I'm signing off have a great weekend everyone.

Serverless connect-the-dots: MP3 to WAV via ffmpeg.exe in AzureFunctions, for PowerApps and Flow

There's no good title to this post, there's just too many pieces we are connecting.  

So, a problem was in my todo list for a while - I'll try to describe the problem quickly, and get into the solution.

  • PowerApps Microphone control records MP3 files
  • Cognitive Speech to Text wants to turn WAV files into JSON
  • Even with Flow, we can't convert the audio file formats. 
  • We need an Azure Function to gluethis one step
  • After a bit of research, it looks like FFMPEG, a popular free utility can be used to do the conversion

Azure Functions and FFMPEG

So my initial thought is that well, I'll just run this utility exe file through PowerShell.  But then I remembered that PowerShell don't handle binary input and output that well.  A quick search nets me several implementations in C# one of them catches my eye: 

Jordan Knight is one of our Australian DX Microsoftie - so of course I start with his code

It actually was really quick to get going, but because Jordan's code is triggered from blob storage - the Azure Functions binding for blob storage has waiting time that I want to shrink, so I rewrite the input and output bindings to turn the whole conversion function into an input/output HTTP request.

https://github.com/johnnliu/function-ffmpeg-mp3-to-wav/blob/master/run.csx

#r "Microsoft.WindowsAzure.Storage"

using Microsoft.WindowsAzure.Storage.Blob;
using System.Diagnostics;
using System.IO;
using System.Net;
using System.Net.Http.Headers;

public static HttpResponseMessage Run(Stream req, TraceWriter log)
{

    var temp = Path.GetTempFileName() + ".mp3";
    var tempOut = Path.GetTempFileName() + ".wav";
    var tempPath = Path.Combine(Path.GetTempPath(), Guid.NewGuid().ToString());

    Directory.CreateDirectory(tempPath);

    using (var ms = new MemoryStream())
    {
        req.CopyTo(ms);
        File.WriteAllBytes(temp, ms.ToArray());
    }

    var bs = File.ReadAllBytes(temp);
    log.Info($"Renc Length: {bs.Length}");


    var psi = new ProcessStartInfo();
    psi.FileName = @"D:\home\site\wwwroot\mp3-to-wave\ffmpeg.exe";
    psi.Arguments = $"-i \"{temp}\" \"{tempOut}\"";
    psi.RedirectStandardOutput = true;
    psi.RedirectStandardError = true;
    psi.UseShellExecute = false;
    
    log.Info($"Args: {psi.Arguments}");
    var process = Process.Start(psi);
    process.WaitForExit((int)TimeSpan.FromSeconds(60).TotalMilliseconds);


    var bytes = File.ReadAllBytes(tempOut);
    log.Info($"Renc Length: {bytes.Length}");


    var response = new HttpResponseMessage(HttpStatusCode.OK);
    response.Content = new StreamContent(new MemoryStream(bytes));
    response.Content.Headers.ContentType = new MediaTypeHeaderValue("audio/wav");

    File.Delete(tempOut);
    File.Delete(temp);
    Directory.Delete(tempPath, true);    

    return response;
}
Trick: You can upload ffmpeg.exe and run them inside an Azure Function

https://github.com/johnnliu/function-ffmpeg-mp3-to-wav/blob/master/function.json

{
  "bindings": [
    {
      "type": "httpTrigger",
      "name": "req",
      "authLevel": "function",
      "methods": [
        "post"
      ],
      "direction": "in"
    },
    {
      "type": "http",
      "name": "$return",
      "direction": "out"
    }
  ],
  "disabled": false
}

Azure Functions Custom Binding

Ling Toh (of Azure Functions) reached out and tells me I can try the new Azure Functions custom bindings for Cognitive Services directly.  But I wanted to try this with Flow.  I need to come back to custom bindings in the future.

https://twitter.com/ling_toh/status/919891283400724482

Set up Cognitive Services - Speech

In Azure Portal, create Cognitive Services for Speech

Need to copy one of the Keys for later

Flow

Take the binary Multipart Body send to this Flow and send that to the Azure Function

base64ToBinary(triggerMultipartBody(0)?['$content'])

Take the binary returned from the Function and send that to Bing Speech API

Flow returns the result from Speech to text which I force into a JSON

json(body('HTTP_Cognitive_Speech'))

Try it:

Swagger

Need this for PowerApps to call Flow
I despise Swagger so much I don't even want to talk about it (the Swagger file takes 4 hours the most problematic part of the whole exercise)

{
  "swagger": "2.0",
  "info": {
    "description": "speech to text",
    "version": "1.0.0",
    "title": "speech-api"
  },
  "host": "prod-03.australiasoutheast.logic.azure.com",
  "basePath": "/workflows",
  "schemes": [
    "https"
  ],
  "paths": {
    "/xxxxxxxxxxxxxxxxxxxxxxxxxxxxxxxx/triggers/manual/paths/invoke": {
      "post": {
        "summary": "speech to text",
        "description": "speech to text",
        "operationId": "Speech-to-text",
        "consumes": [
          "multipart/form-data"
        ],
        "parameters": [
          {
            "name": "api-version",
            "in": "query",
            "default": "2016-06-01",
            "required": true,
            "type": "string",
            "x-ms-visibility": "internal"
          },
          {
            "name": "sp",
            "in": "query",
            "default": "/triggers/manual/run",
            "required": true,
            "type": "string",
            "x-ms-visibility": "internal"
          },
          {
            "name": "sv",
            "in": "query",
            "default": "1.0",
            "required": true,
            "type": "string",
            "x-ms-visibility": "internal"
          },
          {
            "name": "sig",
            "in": "query",
            "default": "4h5rHrIm1VyQhwFYtbTDSM_EtcHLyWC2OMLqPkZ31tc",
            "required": true,
            "type": "string",
            "x-ms-visibility": "internal"
          },
          {
            "name": "file",
            "in": "formData",
            "description": "file to upload",
            "required": true,
            "type": "file"
          }
        ],
        "produces": [
          "application/json; charset=utf-8"
        ],
        "responses": {
          "200": {
            "description": "OK",
            "schema": {
              "description": "",
              "type": "object",
              "properties": {
                "RecognitionStatus": {
                  "type": "string"
                },
                "DisplayText": {
                  "type": "string"
                },
                "Offset": {
                  "type": "number"
                },
                "Duration": {
                  "type": "number"
                }
              },
              "required": [
                "RecognitionStatus",
                "DisplayText",
                "Offset",
                "Duration"
              ]            
            }
          }
        }
      }
    }
  }
}

Power Apps

Result

Summary

I expect a few outcomes from this blog post.

  1. ffmpeg.exe is very powerful and can convert multiple audio and video datatypes.  I'm pretty certain we will be using it a lot more for many purposes.
  2. Cognitive Speech API doesn't have a Flow action yet.  I'm sure we will see it soon.
  3. PowerApps or Flow may need a native way of converting audio file formats.  Until such an action is available, we will need to rely on ffmpeg within an Azure Function
  4. The problem of converting MP3 to WAV was raised by Paul Culmsee - the rest of the blog post is just to connect the dots and make sure it works.  I was also blocked on an error on the output of my original swagger file, which I fixed only after Paul sent me a working Swagger file he used for another service - thank you!


Generate Any PDF Documents from HTML with Flow

This is a crazy one, and if you have read ALL my Microsoft Flow blog posts, you'll be familiar with all these pieces.

We are going to connect them a different way though, and the result is still awesome.  Lets begin.

In this blog post:

  • Try to convert image files to PDF
  • Use a workaround to convert image files to PDF
  • Ultimate power: create Any HTML and convert to PDF. 
  • Effectively, we arrive at PDF-gen with templating.

Try to convert Image Files to PDF with Flow

  • Get File Content (Binary) from SharePoint. 
  • Write to OneDrive for Business
  • Use Convert to PDF to convert JPG to PDF.

This doesn't actually work.  But it's good to try and see the error.  Not Acceptable.

This isn't the end though, we have workarounds.

Use a workaround to convert image files to PDF

So even though Convert File doesn't work on image files directly, it does work on HTML.  And this is the heart of our workaround.

Remember several blog posts ago we used dataUriToBinary() to convert PowerApps camera image to a Binary file to store into SharePoint?

Today, we are going backwards.  We are taking a SharePoint image (as Binary), and converting that to dataUri format.  Lets put that in a variable dataUriJPG

We then create another string for <img src=variable(dataUriJPG) />.  You'll need concat() expression to combine the string and variable.

concat('<img src="', variable('dataUriJPG'), '" />')

See, browsers can render images with dataUri directly embedded.  Lets write that to a HTML file (pic.html)

  1. Get File Content from SharePoint
  2. Convert to dataUri string
  3. Concat within an HTML IMG tag
  4. Write to a HTML file
  5. Convert File from HTML to PDF

And hit it again with convert-file to PDF

Ta-da!

jpg-to-pdf-around-result.png


End with the ultimate power: create Any HTML and convert to PDF. 

  1. Try multiple headings,
  2. And repeat that image twice.
concat('<html>', '<h1>heading 1</h1>', variables('html'), '<h1>heading 2</h1>', variables('html'), '</html>')

Read and include some live data.

  1. Use SharePoint List Folder action and get a list of all the files
  2. Use Data Operations - Select to remap just the Path and Size properties (this is the same as Array.Map)
  3. Create HTML Table - with automatic columns.  We only have two fields.
  4. Concat into our HTML


Effectively, PDF-gen with templating

In this blog post, we covered some new and old techniques:

  • DataUri is our friend again
  • Convert-File to PDF
  • Select, Create HTML table

I leave the last example as a thought exercise for you, the reader.

  1. Store the HTML template in a HTML file.  You really don't want to be typing HTML in concat within a tiny formula box.
  2. Use Replace expression to replace REPLACE_ME words with values you plan to fill from a live data source.
  3. Insert images as DataUri strings to easily get your logo, headers into the PDF report.
  4. Consider using PDF to snapshot list item upon workflow completion, and then email that as PDF attachment to the manager.

Thank you for reading

I have a favour to ask.  See, I told @paulculmsee sneak peek about this post and he's like oh that's it?
If you think gosh this one's awesome, please tell him he's wrong :-)


Two ways to convert SharePoint files to PDF via Flow

This blog post is divided into three sections: The easy, The Auth and The Complete parts.

Microsoft Flow released a new power to Convert Files to PDF.  This made my October.  So of course we have to play with this.

Part 1. The Easy

Now this work well, but raises a few questions: 

  1. Why do I have to copy to OneDrive for Business?
    Because the Convert File action is also available for OneDrive for consumer, but not SharePoint
     
  2. Can I do this without copying to OneDrive for Business
    Not with the default Actions for now.  There's no Convert File for SharePoint Connector.  And SharePoint Connector's Get File Content action doesn't allow a format parameter.
convert-file-actions.png

And this is the simplest solution.

Warning: Next be dragons (Auth and API)

We are going to dive in to see what API this uses.  And whether we can call the same API on SharePoint library document directly without copying the file to OneDrive first.

This next part is good for you.  But it is heavy and will look complicated.  Brace yourselves.

...So what API does this use?

https://docs.microsoft.com/en-us/onedrive/developer/rest-api/api/driveitem_get_content_format

GET /drive/items/{item-id}/content?format={format}
GET /drive/root:/{path and filename}:/content?format={format}

Specifically, this uses the Microsoft Graph

Part 2. The Auth

Disclaimer - OAuth looks familiar, but steps are always tricky.  Easy to mess up.  So if you are following this through, walk carefully.

For the next part, we need to connect to MS Graph with AppOnly permissions

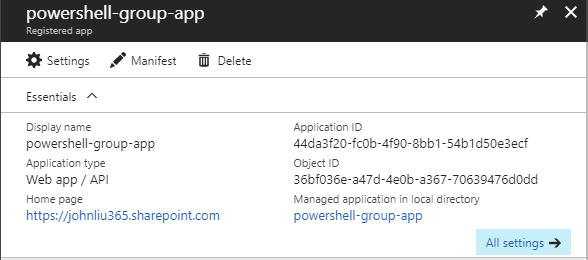
In Azure Portal - under Azure AD - create an App Registeration (I'm reusing a powershell-group-app one I had previously baked)

client-id.png

We will be accessing files - so make sure Application Permissions for read files is granted.  This requires admin consent.

client-perms.png

Via the Azure AD portal - hit Grant Permissions to perform admin consent directly.

client-grant.png

Now we are going to write the Flow with HTTP requests

hit the token endpoint for our tenant with a POST message.  The Body must be grant_type=client_credential with client_id, client_secret and the resource is https://graph.microsoft.com

this request if successful will give us back a JSON.  Parse JSON with this schema:

{
    "type": "object",
    "properties": {
        "token_type": {
            "type": "string"
        },
        "expires_in": {
            "type": "string"
        },
        "ext_expires_in": {
            "type": "string"
        },
        "expires_on": {
            "type": "string"
        },
        "not_before": {
            "type": "string"
        },
        "resource": {
            "type": "string"
        },
        "access_token": {
            "type": "string"
        }
    }
}

This gives Flow a variable for access_token for the remainder of the steps to use to call Microsoft Graph

Test this by calling the MS Graph endpoint for SharePoint site

token-test.png

This HTTP request with the Bearer access_token successfully returns SharePoint site data from Microsoft Graph.


Part 3.  The Complete Solution to fetch SharePoint document as PDF

Call /content?format=PDF

get-content-format-redirect.png

A few things going on in this result.  

  1. Flow thinks this request has failed - because it doesn't return a 2xx status.  It returns a 302 redirect.
  2. The Response header contains the Location of the redirect, which is where the PDF file is

Parse JSON again on the Response header.  

{
    "type": "object",
    "properties": {
        "Transfer-Encoding": {
            "type": "string"
        },
        "request-id": {
            "type": "string"
        },
        "client-request-id": {
            "type": "string"
        },
        "x-ms-ags-diagnostic": {
            "type": "string"
        },
        "Duration": {
            "type": "string"
        },
        "Cache-Control": {
            "type": "string"
        },
        "Date": {
            "type": "string"
        },
        "Location": {
            "type": "string"
        },
        "Content-Type": {
            "type": "string"
        },
        "Content-Length": {
            "type": "string"
        }
    }
}

We just want Location.  We also need to configure Continue on previous HTTP error.

redirect-continue.png

And finally, retrieve the file via GET again

fetch-return.png


When ran, the flow looks like this:

run.png


Summary

The complete solution uses HTTP to call MS Graph directly and pulls back the PDF file after a 302 Response.  This is a fairly complex example so please evaluate whether you want the Correct Way or the Easy Way.

Note also that Microsoft Flow has a Premium connector for Azure AD Requests - which will negate the middle part of this blog post re: Auth and let you dive right into MS Graph REST endpoints without worrying about access_tokens.  

Call this Flow request and it downloads the PDF file, converted from a DOCX document in SharePoint team site.


Review Special Techniques Invoked:

  • MS Graph Auth
  • The Continue on Error configuration
  • Parse JSON on Response Header


Angular 4, SharePoint On-Premises, localhost development and SP-REST-Proxy

We've been running Angular 4 (via ng-cli) on our SharePoint On-Premises environment for a while, I wanted to just take a short time and jog down our battle notes. 

Especially, as a thank you to @AndrewKoltyakov who built https://github.com/koltyakov/sp-rest-proxy

If there are areas that are unclear, let me know in the comments and I'll try to clarify.

package.json

  "scripts": {
    "ng": "ng",
    "hmr": "ng serve --hmr --environment=hmr --verbose --proxy=proxy.conf.json",
    "debug": "ng serve --environment=hmr --verbose --proxy=proxy.conf.json",
    "prod": "ng serve --env=prod --verbose --proxy=proxy.conf.json",
    "serve": "ng serve -e=source --verbose --proxy=proxy.conf.json",
    "build": "ng build --env=prod --aot ",
    "bundle-report": "webpack-bundle-analyzer dist/stats.json"
  },

We added additional scripts to our package.json.  This just means we can easily switch to different modes without forgetting which arguments we messed up.

"serve" was the basic one that says run localhost.  We don't use this one now as much, as we love hot module reloading (hmr).

We use "--proxy" to set up Angular/Webpack-Dev-Server's proxy settings via a separate proxy.conf.json file.

https://github.com/angular/angular-cli/blob/master/docs/documentation/stories/proxy.md

"debug" was the same as "prod" except it doesn't have Angular's production flag.  This makes things faster somehow.  In reality, if you want Angular to be blinding fast, use --aot

"hmr" is nearly the same as "serve, and runs out of localhost".  Use the Angular --proxy 

"build" compiles everything with --prod and --aot.  Does not run locally.

We use different Angular environment settings to set up mock proxies, and apply a slightly different header CSS so we know at a glance which environment we are in.

I'm going to hear the question: Why so many different variations?!  That's so confusing.

Well, they are all different.  And nobody can decide which one is the best for which scenario.  So we keep writing new ones!  

Deal with it :-)

environment.ts

A quick note on our Angular environment, before we get into the proxy configurations.

// environment.hmr.ts
export const environment = {
  production: false,
  source: true,
  hmr: true,
  mock: require("../app/core/testData.json"),
  jquery: require("jquery")  
};

Depending on which --env=hmr is used, the corresponding environments/environment.hmr.ts is loaded.  

We put variables that affect different code execution in this environment file.  We also find this to be a good place to load big mock json files.

Sometimes you want to run the application locally and you aren't in office, so even the proxy won't work - we will then fall back to local mock json data sources.

hot module reloading (HMR)

HMR needs a separate blog post to describe it.  We followed this:

https://medium.com/@beeman/tutorial-enable-hrm-in-angular-cli-apps-1b0d13b80130#.2p0n6oo34

// main.ts
const bootstrap = () => {
  return platformBrowserDynamic().bootstrapModule(AppModule);
};

if (environment.hmr) {
  if (module['hot']) {
    hmrBootstrap(module, bootstrap);
  } 
  else {
    console.error('HMR is not enabled for webpack-dev-server!');
    console.log('Are you using the --hmr flag for ng serve?');
  }
} 
else {
  bootstrap();
}

When HMR is enabled via environment variable, we have a slightly different bootstrap mechanism.

proxy.conf.json

{
    "*/_api/**": {
        "target": "http://localhost:8080",
        "secure": false,
        "changeOrigin": true
    },
    "/style%20library/**": {
        "target": "http://localhost:8080",
        "secure": false,
        "changeOrigin": true
    },
    "/Style%20Library/**": {
        "target": "http://localhost:8080",
        "secure": false,
        "changeOrigin": true
    },
    "*/sp2016/**": {
        "target": "http://localhost:8080",
        "secure": false,
        "changeOrigin": true
    }
}

We re-route several localhost calls in Webpack-Dev-Server to the SP-REST-Proxy  
We also send relative URL asset requests through SP-REST-Proxy.

SP-REST-Proxy

// serve.js
const RestProxy = require('sp-rest-proxy');
const path = require('path');
const settings = {
    configPathpath.join(__dirname'/_private.conf.json'), // Location for SharePoint instance mapping and credentials 
    port8080,                                              // Local server port 
    staticRootpath.join(__dirname'/static')                 // Root folder for static content 
};
 
const restProxy = new RestProxy(settings);
restProxy.serve();

This is the main starting server.js 

{
    "siteUrl": "http://sp2016",
    "domain": "SPG",
    "username": "jliu",
    "password": "********" 
}

This is _private.conf.json, everything is routed to SharePoint On-Premises as me.

Images and CSS we place in a static subfolder which mirrors the SharePoint root web style library.

\static
    \style library
        \cloud.jpg
        \main.css
\server.js
\_private.conf.json

Start SP-REST-Proxy and it will bind all localhost:8080 calls over to SharePoint, or to its static file system.

localhost development

And that's pretty much how we set up Angular 4, WebPack-Dev-Server (with --proxy), SP-REST-Proxy, various different environment variables and wire everything to different npm run scripts.

Our main favourites:

npm run hmr
This option runs localhost, with SP-REST-PROXY to real on-premises server.

npm serve
This option runs localhost with mock data.  Also uses SP-REST-PROXY for static resources.  But Angular data services does not make real calls - just mock ones.

npm build
This option builds with -production and --aot
We chain this with SP-SAVE to upload this into our on-premises development environment.

npm run bundle-report
This runs a bundle report check and is fun eye candy to help us understand what the hell got webpacked.