Building a 2013 No Code webpart for XKCD.com/now

Last week, XKCD (of nerd comic fame) produced this most excellent comic http://xkcd.com/now/

Now


This complex looking image describes essentially an outer ring and an inner ring.  The outer ring is the current time on your machine.  The inner ring is the regions of the world.  The chart tells you quickly what time it is for someone living in another part of the world.

Being the SharePoint lover that I am, you know what I'm thinking.

Time for a fun toy Web Part

Step 0.  Environment.
Step 1.  Create a SharePoint Sandbox Solution, add Client Web Part (Host Web)
Step 2.  Create the assets (images, HTML and CSS)
Step 3.  Plug in the javascript code.
Step 4.  Permissions.
Step 5.  Create a test page.  Add the App Part to play.  Change web.regional settings - see webpart change.


Step 0.  Environment

My Environment setup is very simple:

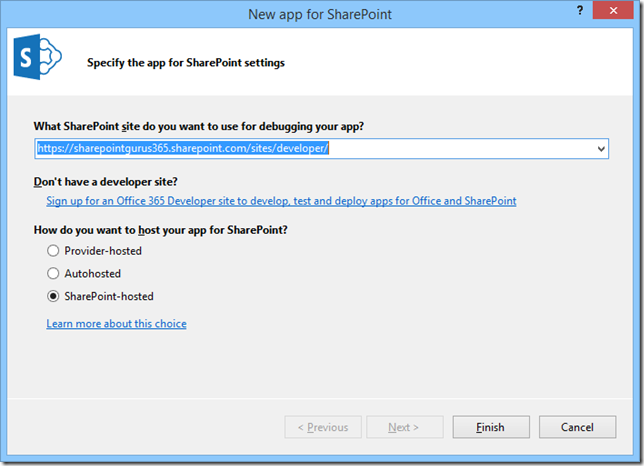
  • Office 365 with Developer site, at: https://sharepointgurus365.sharepoint.com/sites/Developer/
  • Visual Studio 2013
  • Running on Windows 8.1
  • I do not have SharePoint installed on this client PC
  • I have a paint program Paint.NET which is an excellent developer's tool when you don't have Photoshop


Step 1. Create a SharePoint Sandbox Solution, add Client Web Part (Host Web)


image

Select SharePoint-Hosted.  This App Part will be hosted by Office 365.


image


Step 2.  Create the images.

imageimage


I split the image into two layers.  Because I want to rotate them separately.  I also change the text labels for the time 6PM, Midnight and 6AM on the Time-Ring.  Since when it's upside down it still needs to be readable.

I add these to the Project, under Images

image

I also modify the App Part html

image

I added CSS for the two rings.  Position:fixed so that they overlap. 

<body>
    <style>
        .timezone-ring {
            background: url(../Images/xkcd-now-land.png) no-repeat top left;
            width:706px;
            height:705px;
            position:fixed;
            top:0px;
            left:0px;
        }
        .time-ring {
            background: url(../Images/xkcd-now-time.png) no-repeat top left;
            width: 706px;
            height: 705px;
            position:fixed;
            top: 0px;
            left: 0px;
        }
    </style>
    <div style="position:relative;">
        <div class="timezone-ring">
        </div>

        <div class="time-ring">
        </div>
    </div>
</body>

image

<ClientWebPart Name="xkcd-clock" Title="xkcd-clock" Description="Clock based on xkcd.com/now the outer ring rotates to current machine time.  The inner ring rotates to web region." DefaultWidth="720" DefaultHeight="720">

  • Note: tidy up the ClientWebPart definition.  Set the default width and height.


Step 3.  Plug in the javascript code.


There is very little JavaScript,  So I wrote them inline.  In practice, this made the debugging a lot more difficult.  I recommend always writing your Javascript in a separate file.


<script type="text/javascript">
    //'use strict';  // have to turn off 'use strict' because I use eval() later :-P

    // Set the style of the client web part page to be consistent with the host web.
    (function () {
        var hostUrl = '';
        if (document.URL.indexOf('?') != -1) {
            var params = document.URL.split('?')[1].split('&');
            for (var i = 0; i < params.length; i++) {
                var p = decodeURIComponent(params[i]);
                if (/^SPHostUrl=/i.test(p)) {
                    hostUrl = p.split('=')[1];
                    document.write('<link rel="stylesheet" href="' + hostUrl + '/_layouts/15/defaultcss.ashx" />');
                    break;
                }
            }
        }
        if (hostUrl == '') {
            document.write('<link rel="stylesheet" href="/_layouts/15/1033/styles/themable/corev15.css" />');
        }

/*** John's code starts here ***/

        function turn() {
            var hour = (new Date()).getHours() + 12; // clock faces up so need 12hr offset
            var degrees = -((hour % 24) * 15); // turn anti-clockwise so negative
            var rotate = "rotate(" + degrees + "deg)";

            $(".time-ring").css("transform", rotate);

            setTimeout(turn, 1000 * 60 * 15); // 15mins
        }

        var ctx = SP.ClientContext.get_current();
        var hostCtx = new SP.AppContextSite(ctx, hostUrl);
        var timezone = hostCtx.get_web().get_regionalSettings().get_timeZone();
        ctx.load(timezone);
        ctx.executeQueryAsync(function () {
            // has current timezone

            var description = timezone.get_description();
            var m = /UTC(.*\d+):/.exec(description);
            if (m) {
                var offset = eval(m[1]) -2;
                // map is aligned with Egypt (UTC+2) so need a 2hr offset.

                var degrees = -(offset * 15); // turn anti-clockwise so negative
                var rotate = "rotate(" + degrees + "deg)";

                $(".timezone-ring").css("transform", rotate);
            }

            turn();  // call turn

        }, function () {
            // failed.
        })

/*** JOHN'S CODE ENDS HERE ***/

    })();
</script>


Few quick notes here:

  • turn() function calculates the rotation degree for the outer ring, based on the current machine time.  See comments for all the offsets.
  • the clientContext query needs to get the App Host Web settting.  Otherwise it will return you the regional setting for the App Web which would be pretty pointless.
  • finally, once we have the timezone information from the regional setting, it looks like (UTC+10: Sydney).  I take the +10 and do more offset for the inner ring.
  • I only request region information once on page load.  But I put turn() on a timeout call every 15minutes.  So if you leave the webpart on a screen it'll keep checking and turn every 15mins.


Step 4.  Permissions.


image

By default, the App has no permissions to read from the Host Web.  We need to set up the permission to Read from the Host Web.

image

When deployed via VS.NET you'll see this pop up in the browser.  You'll also get this when you activate the App.


Step 5.  Create a test page.  Add the App Part to play. 


image


Results


image

I'm in Australia (AEST UTC+10).  Which is pointing up.  My current time is 11:40pm

image

Change the Host Web's region to (Pacific Time UTC-8).

image

Web Part still shows 11.45PM - that's my current time.  But the map has rotated to point to the West Coast.


Downloads

I did not test this on any other machine but it should work.  Let me know if it works for you.

And if you really enjoy using this in your company, please buy something from the XKCD gift shop.
Using SharePoint Designer 2013 Workflow to copy file via REST on Office 365

This is a bit of trial and error, but works very well at the end, so I want to publish this and share the syntax.


Related References:


I will tackle the next step.  How do you call a POST REST service, with the CopyTo function on SPFile.  http://msdn.microsoft.com/en-us/library/ms455020.aspx

The flexibility is that you can easily tweak the urls and essentially allow your workflow to copy files anywhere.


Step 1.  Understand the correct URL


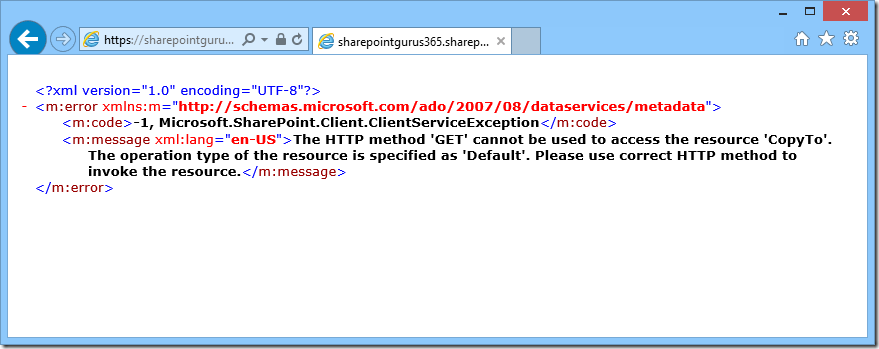
Put this into your browser's address bar (this executes a GET request):

image

No good.  Need POST.


Step 2.  Make that SharePoint Designer 2013 Workflow


  1. First step, with the POST call, we need to add a Request Header for Accept: application/json; odata=verbose
    Put this in a dictionary variable.

    image
  2. Second step.  Call Web Service!
    image

    You need to set up Request Headers as well.  This has to be done via the Properties, since it's not a link that's shown.  Set this to the dictionary created in the previous step.
    This step is the same as mentioned in Adrian Fiechter's blog.

    image
  3. You should capture the ResponseContent, and add an additional action to log it to History
    The Stage ends.  Go to End of Workflow.

    image

  4. The whole thing, in 3 lines:

    image

Step 3.  Run it.


image

Here's me starting the workflow on the top1.png file.


image

The top1.png is copied to top2.png!  Interestingly, it's copied the Call Workflow "workflow status" column.  Both links (which is a lookup field) go to the same workflow.


image

This is the workflow history. 

Notice that the CopyTo method returned void (null) in this case.  Should there be an error, you'll see it logged here.


That's all!  Hope you find these steps useful.

InfoPath's future and what everyone's saying

dontpanic


Andrew Connell

  • "the future is unclear at best, realistically pessimistic and a dead-end at worst"
  • "I do not use InfoPath any more & I do not recommend people use InfoPath going forward"

http://www.andrewconnell.com/blog/now-infopath-is-dead-rip-infopath-but-now-what

http://www.andrewconnell.com/blog/my-thoughts-infopath-2013-the-future-of-infopath


Mark Rackley

http://forms7.codeplex.com/


Corey Roth

  • Lists a great list of feature sets for the future Forms solution
  • Suggest: wait and see SPC348

http://www.dotnetmafia.com/blogs/dotnettipoftheday/archive/2014/01/31/what-a-developer-wants-in-a-post-infopath-world.aspx


Jeremy Thakes

  • "I  found that if  you used InfoPath in your Organization to empower Information Workers to build their own forms, a lot of the times they’d hit the 80/20 rule and then hand it off to developers who would have to fix them or complete them."
  • Suggest: ISV Nintex Forms

http://www.jeremythake.com/2014/01/microsoft-confirm-infopath-2013-is-last-release-of-the-product/


Microsoft

  • InfoPath is dead.
  • Long live Forms:

http://www.sharepointconference.com/content/sessions/SPC348


Patrick Halstead

I like Patrick's coverage the best, probably because this is his bread and butter.  He has been thinking about this and planning for a while. 

His upcoming webinar series will cover the various approaches to deal with the data that's currently in the forms:

  • Status Quo: keep same format (XML): Formotus, ServBus, Qdabra eForm Viewer
  • Hybrid (SharePoint List): move the form's data into SharePoint Lists, then use SharePoint list forms
  • Convert to ISV: Nintex, K2, Adobe, Salesforce
  • Custom development (database): extract data into database, then build pages and use full set of controls

http://www.youtube.com/watch?v=Z_rhNrFx5D8 [After InfoPath: Planning your Form's Future] 


I say: Please Don't panic.

I'm waiting to see:

  • Qdabra eForm Viewer (cheap /  free / open source?  does the user need to do anything?)
  • Nintex Forms (roadmap, feature compatibility)
  • Microsoft's SPC348 (upgrade roadmap?  future support?  feature compatibility? could be the most expensive path)

I'm sure everyone will have a lot to say in time for the SharePoint Conference.  Stay tuned.

Building No-Code Sandbox WebParts for the past, present and the future [Proposed Session Outline]


[Previous Working Title: Build amazing web parts using only JavaScript and evolving your code with any version of SharePoint]

I've modified the session title based on recent events.  Namely, this big one: http://blogs.msdn.com/b/sharepointdev/archive/2014/01/14/deprecation-of-custom-code-in-sandboxed-solutions.aspx 


In this session I really want to talk about investing in a safe, new technology (JavaScript) that isn't going away anytime soon, and have it being useful for you, today, regardless of whether you have/are/won't migrate to SharePoint 2013 anytime soon.  I want this to be a talk about the timelessness of the technology, but also the ever-changing landscape.  I hope I can get us there.  I think it is awesome.


Session Description

SharePoint is an evolving platform: in 2007, we were all building farm web parts. Then in 2010, we were introduced with sandbox web parts, with the beginnings of the client side object model. In 2013, we are looking at the evolved app model, with a super-charged REST service.

As developers, while it is great to learn about what's coming down the pike, it feels extremely frustrating not knowing what to learn, or attend a session and learn a technology that you can’t put to use because you don’t use the latest and the most cutting edge in your organization.

Let’s take a step back, let’s look at how to build a web part using only JavaScript. Let’s separate the UX from the logic. Then let’s plug in different types of CRUD code to work with different versions of SharePoint, across different data sources: lists, search or user profile.

This session is about learning how to use JavaScript to build amazing web parts, regardless of what version of SharePoint you have.


Session Outline


  • What is in a little WebPart
  • Where do you run your code
    • Running the code on the Server (.NET)
    • Running the code on the browser (JavaScript)
  • Choices:
    • SPServices
    • CSOM
    • REST (listdata.svc)
    • REST (_app)
  • Platforms
    • SP2007
    • SP2010
    • SP2013
    • Office 365
  • Framework Considerations:
    • Plain JQuery
    • KnockoutJS
    • AngularJS
  • Adding Value:
    • TypeScript (Syntax, Intelli-Sense)
    • Jasmine (Unit Testing)
  • Where are we, where are we going
    • Where should we be?
  • Demo
    • Can't possibly cover everything and still have a working demo, can I?  Though I do love having demos to show people at the end of a session.


This is a session in ongoing development.  But I wanted to throw out the outlines and get some feedback on what do you want to see?  And what do you NOT want to see.

Let me know below!

Using spservices to create discussion and reply in a Discussion List

This updated blog post describes how I go about building a threaded, inline comments system for any page, using a SharePoint Discussion List as the backend storage for threaded data.

I choose to use SPServices because originally, the webpart is built for a SharePoint 2007 environment.  

I've rebuilt the webpart using the JavaScript code and confirm it runs happily in SharePoint 2013, and this time, with much better screenshots!
In SharePoint 2010 and 2013, you should be able to talk directly to the REST endpoint to perform read and updates.

Enter the Discussion List


Many users have a love-hate relationship with SharePoint's Discussion list.  Perhaps more hate.  The main culprit is the inflexible UI.  Lack of many modern forum needs:

  • Can't show all discussions and show threaded replies together
  • Can't do inline new discussion
  • Can't do inline replies
  • Poor support cross browsers
  • Can't easily filter for a subset

But still, the list itself is very functional.

  • Does support threaded discussions
  • Calculates total replies and last discussion updated
  • Has email notification through SharePoint alerts
  • Has tweaked permission model where users can create but not modify their own posts, or can edit.


Image888

Figure: A basic SharePoint Discussion List


Let's ignore the problems with the native Discussion List UI, and build our own with JavaScript

Read from the Discussion List


/*
This code queries using SPServices' GetListItems on list and populates a UL.discussions dom element on the page
*/
var $ul = $("ul.discussions");
var list = "My Discussions";

function getDiscussionList(list, $ul) {
var promise = $().SPServices({
  operation: "GetListItems",
  listName: list,
  CAMLViewFields: "<ViewFields><FieldRef Name='Title' /><FieldRef Name='Body' /><FieldRef Name='Author' /><FieldRef Name='Modified' /><FieldRef Name='DiscussionLastUpdated' /><FieldRef Name='ItemChildCount' /></ViewFields>",
  CAMLQuery: "<Query><OrderBy><FieldRef  Name='DiscussionLastUpdated' Ascending='FALSE' /></OrderBy></Query>"
});

promise.done(function(){
  var items = $(promise.responseXML).SPFilterNode("z:row").SPXmlToJson({
    mapping: {},
    includeAllAttrs: true,
    removeOws: true
  });
  $ul.empty(); // clear old list

  $.each(items, function(index, item) {
    // render each discussion
    var $li = $("<li class=discussion' />");
    $li.append(item.Title);
    $li.append(item.Body);
    $li.append(item.Author);
    $li.append(item.Modified);
    $li.append(item.DiscussionLastUpdated);
    $li.append(item.ItemChildCount);
    $li.append(item.FileRef);
    $li.append("<div class='replies'>replies</div>");
    $ul.append($li);

  });  // end items.each
}); // end promise done
promise.fail(function(xhr, status, error) {
  alert(xhr.responseText);
}); // end promise fail

} // end getDiscussionList


Key points:

  • List.asmx - GetListItems
  • This returns the top level items in the list, which are Discussions


Figure out the threaded discussions


In SharePoint discussion lists, the top level "Discussion" items are folders.  The subsequent "Message" reply items are list items within that folder.
So to query for the replies to a discussion, we query the list with the filepath of the top level Discussion item as the query filter.

/*
This second function figure out the threaded replies when you expand one discussion
*/

Note: The FileRef usually has a value that looks like this:
// 15;#Company/Site1/Web1/Lists/My Discussions/15_.000
You need to clean the URL and use only the file path:

function getFilePath(fileRef) {
  if (!fileRef) return;
  var m = /;#(.*)$/.exec(fileRef);
  if (m) {
    return m[1];
  }
}

This will give you:
Company/Site1/Web1/Lists/My Discussions/15_.000

function getDiscussionReplies(list, filepath) {
var options = {
  operation: "GetListItems",
  listName: list,
  CAMLViewFields: "<ViewFields><FieldRef Name='Title' /><FieldRef Name='Body' /><FieldRef Name='Author' /><FieldRef Name='Modified' /><FieldRef Name='DiscussionLastUpdated' /><FieldRef Name='ItemChildCount' /></ViewFields>",
  CAMLQueryOptions: "<QueryOptions><ViewAttributes Scope='RecursiveAll' IncludeRootFolder='True' /></QueryOptions>",
  CAMLQuery: "<Query><Where><Contains><FieldRef Name='FileRef' /><Value Type='Text'>" + filepath + "</Value></Contains></Where><OrderBy><FieldRef  Name='FileRef' Ascending='TRUE' /></OrderBy></Query>"
};
var promise = $().SPServices(options);

promise.done(function(){
  var items = $(promise.responseXML).SPFilterNode("z:row").SPXmlToJson({
    mapping: {},
    includeAllAttrs: true,
    removeOws: true
  });

  $.each(items, function(index, item) {
    // render each reply
    // snipped

  });  // end items.each
}); // end promise done

} // end getDiscussionReplies


Key points:

  • Use CAMLQueryOptions for RecursiveAll
  • Use FileRef contains FilePath to find all threaded (Message) replies

Create a Discussion in the Discussion List

To create a new discussion, you just need to create a new item in the Discussion List

var list = "My Discussions";
var title = $("input.title").text();
var body = $("textarea.body").text();

function newDiscussion(list, title, body) {

var promise = $().SPServices({
  operation: "UpdateListItems",
  batchCmd: "New",
  listName: "Team Discussion",
  updates: "<Batch OnError='Continue' >" +
       "<Method ID='1' Cmd='New'>" +
        "<Field Name='ContentType'>Discussion</Field>" +
       "<Field Name='FSObjType'>1</Field>" +   // Important: FSObjType = 1 means that this is a folder.  If this isn't specified SharePoint sometimes create the wrong root level item.
        "<Field Name='Title'>" + escapeColumnValue(title) + "</Field>" +
        "<Field Name='Body'>" + escapeColumnValue(body) + "</Field>" +
       "</Method>" +
      "</Batch>"
});
   
promise.done(function(){
  var $ul = $("ul.discussions");
  getDiscussionList(list, $ul);

}); // end promise done

}


Image893

Figure: Start a new discussion inline

Key points:

  • List.asmx - UpdateListItems
  • Set FSObjType = 1, this is necessary or there were head-scratching bugs


(Optional) Filter a Discussion List to only related item


In the Discussion List settings, you can add a lookup column RelatedItem to an external List (or Document Library).
Then when you use the JavaScript above, you can filter your CAML Queries so that they only return elements that are related to the current page.

For getDiscussionList:

CAMLQuery: "<Query><Where><Eq><FieldRef Name='RelatedItem' /><Value Type='Number'>" + related + "</Value></Eq></Where><OrderBy><FieldRef  Name='DiscussionLastUpdated' Ascending='FALSE' /></OrderBy></Query>"

And for creating discussion threads:

updates: "<Batch OnError='Continue' >" +
     "<Method ID='1' Cmd='New'>" +
      "<Field Name='ContentType'>Discussion</Field>" +
      "<Field Name='FSObjType'>1</Field>" +
      "<Field Name='Title'>" + escapeColumnValue(title) + "</Field>" +
      "<Field Name='Body'>" + escapeColumnValue(body) + "</Field>" +
      "<Field Name='RelatedItem'>" + related + "</Field>" +
     "</Method>" +
    "</Batch>"


In my project, I linked my discussion list to a Video Library, and each Video has an area for creating comments and reply to threaded discussions.  All the conversation are saved in one single Discussions List, but filtered on each page as required.

Understand the nested format for Discussion List items

In a SharePoint Discussion List:

  • Discussion (content type) is a Folder.  FSObjType = 1
  • Message (content type) is a List Item.  FSObjType = 0


Reply in a Discussion List.


var list = "My Discussions";
var filepath = "Company/Site1/Web1/Lists/My Discussions/15_.000";
var body = $("textarea.body").text();

function replyDiscussion(list, filepath, body) {

// RootFolder needs to start with /

var promise = $().SPServices({
  operation: "UpdateListItems",
  batchCmd: "New",
  listName: list,
  updates: "<Batch OnError='Continue' RootFolder='" + "/" + filepath + "'>" +  // RootFolder needs to start with /
     "<Method ID='1' Cmd='New'>" +
      "<Field Name='ContentType'>Message</Field>" +
      "<Field Name='FSObjType'>0</Field>" +
      "<Field Name='Body'>" + escapeColumnValue(body) + "</Field>" +
     "</Method>" +
    "</Batch>"
});
promise.fail(function(xhr, status, error) {
  alert(xhr.responseText);
});
promise.done(function(){
  getDiscussionReplies(list, filepath);
});

} // end replyDiscussion


Image882

Figure: Threaded Discussions, with inline reply.


Key points:

  • List.asmx - UpdateListItems
  • Set FSObjType = 0 (for List Item), this is necessary or there were head-scratching bugs
  • Set RootFolder to the Filepath of the parent Discussion (folder) item.  This way, UpdateListItems creates a new list item within that folder.


Conclusion: here we are.  Threaded, inline, replies.


Combine everything together, the javascript lets me now do:

  • Tie a Discussion List to a Picture Library
  • Start one or more discussion threads on any Picture
  • See replies inline in one single UI.
  • Inline comment-creation
  • Inline comment-reply


  • Inline Edit and Inline Delete is possible, but the end-user will need to follow SharePoint permission settings on the Discussion List.  I have not written code to do those operations.