InfoPath FormServer - initial view and parameters via URL


Form Server provides quite a few very interesting Query parameters to allow us to influence how it will behave when rendering the form in browser.

The MSDN article is awesome and a great resource: How to: Use Query Parameters to Invoke Browser-Enabled InfoPath Forms

A really useful feature would be to allow the Query Parameter to control the initial view that the form opens in.  This allows us to control based on various stages of the form to render to different users different form "links" that takes them to different parts of the form.


Code Behind

MSDN has another great resource: InfoPath InputParameters Property

So if we add the InputParameters to the Form's load event, we can now specify the default view to open in.


public void FormEvents_Loading(object sender, LoadingEventArgs e)
{
    try
    {
        string view = "";

        if (e.InputParameters.ContainsKey("View"))
        {
            view = e.InputParameters["View"];
            e.SetDefaultView(view);
        }

    }
    catch (Exception ex)
    {
        SetValue("/my:myFields/my:FormSettings/my:ErrorLog", ex.Message + ex.StackTrace);
    }

}


Form Server URL

New Forms

http://server/_layouts/FormServer.aspx?XsnLocation=/FormServerTemplates/ProjectForm.xsn&SaveLocation=/Projects&Source=/Projects&OpenIn=Browser&View=Debug

Form Server URL query parameters not recognized by Form Server are passed to the form as Input Parameters

Existing Forms

http://server/_layouts/FormServer.aspx?XmlLocation=/Projects/413.xml&Source=/Projects&OpenIn=Browser&View=Debug


ViewInfos.SwitchView is not good

If you try to use ViewInfos.SwitchView - you'll probably get this error:

InfoPath cannot execute any view-related object model calls. The view is not ready

Hence, use the SetDefaultView method on the Load event args.


That's all, have fun!

Rich and Reach - plenty of other successful ways


Having established that you need Silverlight to have a richer UX, let's look at how you can support other platforms.

Cross-platform compilers

Firstly, let's get this out of the way.  You can use cross-platform-compilers and achieve a great result.  Your limitation here is time.  But it is still far cheaper than writing from scratch.


Provide a Public API

Silverlight requires a service based API to talk to the server and get stuff done.  If you have done this already, why not clean it up and publish your API's and let the public write the application for you?

It worked for Twitter, FourSquare.

Take a game like World of Warcraft, or a gaming service like Xbox Live.  Even with it's super slick built-in UI, there are always people who want the raw data feed, so they can parse it, make charts, compare different people, catch cheaters etc. etc.


Write the basic minimum

I see the top priorities in this order

  1. Build a REST based service tier
  2. Build a rich client application with Silverlight
  3. (Optional) Build a AJAX-based fall-back browser experience
  4. (Optional) Build targeted rich applications for iOS and Android
  5. (Optional) Reach out to the community and see if there are people out there who would like to build a richer app for you


Does your "Reach" include "Support"

I don't really know if people's definition of "Reach" includes support on that browser.  Or whether it just means "It will probably work".  Google Chrome updates every week - do we want to support it properly?  Or do we just assume "it will probably work"?  Do you support the Google Chromium beta builds?

In my opinion, it might be better to support targeted environments rather than "any HTML5-compatible browser".  The browser scenario seems somewhat risky and open-ended.

I like the published API idea because that's the line where your support contract ends.  You support the Silverlight client and the REST service (which you need to do anyway for your Silverlight client to work).

If you build more than two clients (Silverlight, unit-tests, or AJAX web frontend) - these effectively prove whether a problem is at the client level, or at the service level.

SharePoint - Improve EditView Column Reordering with JQuery

This is a fun exercise to apply some simple Javascript DOM manipulation with JQuery to improve the reordering columns experience in SharePoint's Edit View.


Problem

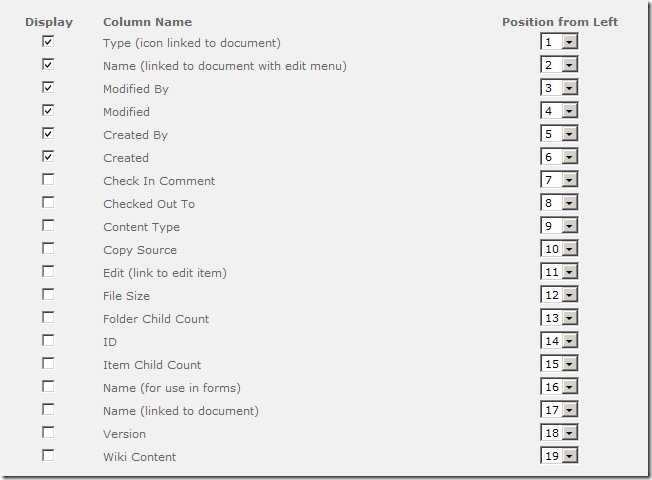
Exhibit A:
image

Figure: SharePoint OOTB Edit View | Columns ordering

We should be familiar with SharePoint's out of the box edit view columns screen.  Lots of checkboxes and lots of drop down lists.  Checkboxes are fine, but what happens when you try to re-order?

image

Figure: SharePoint OOTB javascript renumbers the position ordering, but leaves it in an unreadable mess

Out of the box, SharePoint does attempt to fix the positioning numbers so there are no duplicates.  Unfortunately, it makes the list into a crazy unreadable mess.


Improvement

The proposed fix is actually quite simple:

  1. After the SharePoint javascript has re-numbered the order, in this case changed 2 to 5, and renumbered 3 (to 2), 4 (to 3), and 5 (to 4).
  2. Run our javascript to pick up the entire 2nd (now number 5) TR row, and move it between the 4th and the 6th row.

image

Figure: This magic diagram explains what I want to do!

The SharePoint Javascript function is called Reorder.  IE will tell you what it does.

image

Figure: The Reorder javascript function

In my case, I don't really care what it does, I do care that the first argument is the select control.  I'll need this later.

There are two functions in my Javascript.


Improved Javascript - Rewiring Reorder

First, we need to re-wire the existing Reorder function and add our function after it.  I do this via a function wrapper.


$(function(){
    // verify we're on the right page
    if ($("#tbodyViewColumns").length == 0 || typeof(Reorder) != "function") {
        return;   
    }
    // rewire SharePoint OOTB Reorder javascript function
    var SP_Reorder = Reorder;
    Reorder = function(e,i, n){   
        SP_Reorder(e,i,n);       
        JL_ViewColumns_Reorder($(e));
    };
});


  • Check the page contains a tbodyViewColumns element, and check the Reorder function exists.
  • Set the Reorder function to a variable, then create a new function for Reorder and call the old one first, then call our function JL_ViewColumns_Reorder.
  • I pass in the JQuery-wrapped current select element  $(e)


Improved Javascript - Reorder

This is my JQuery move function, takes an argument of the current select element.


function JL_ViewColumns_Reorder($select){

    var order = $("option:selected", $select).text();
    var $tr = $select.parents("tr:first");
   
    if (order == 1) {
        // move before 2
        var $sibling = $("tr:has( td.ms-authoringcontrols select option:selected[value^=2_] )", $tr.parents("table:first"));
        $sibling.before($tr);
    }
    else {
        // move behind previous sibling
        var $sibling = $("tr:has( td.ms-authoringcontrols select option:selected[value^=" + (order-1) + "_] )", $tr.parents("table:first"));
        $sibling.after($tr);
    }
}

  • Find the current position order (since our function runs after the re-numbering, this is the new order)
  • Find the current row
  • If we're 1st, then find the 2nd row and move before
  • Otherwise, find the previous row and move after
  • JQuery selectors are detailed here: http://api.jquery.com/category/selectors/


Summary

  1. Reference JQuery
  2. Add this one file https://static1.squarespace.com/static/5527bff2e4b0b430660b0d10/5527c30de4b030eeeef09715/5527c30fe4b030eeeef09f45/1304952950957/JL_ViewColumns_Reorder.js
  3. You should reference both in your masterpage since the EditView page is a system page

Enjoy!

image

Figure: Automatically moved after renumbering.  Note, I don't tick the Display checkbox automatically.

SharePoint 2010 - Simple LightBox effect for large images


First of all, I know this solution exists.

My particular attempt is to provide a much simpler solution

  • Address large-image blowing up your page layout problem
  • Lets your Content Editors tag images with the LightBox style easily
  • Re-use SP.UI.ModalDialog.showModalDialog to perform the LightBox effect
  • Requires JQuery, which I hope you already have loaded
  • Uses as little files as possible


Add a CSS style for Images

.ms-rteImage-LightBox {
    -ms-name: "LightBox";
    width: 650px;   
    cursor: pointer;
    border: 1px solid #385b83;
}


You can add this to any existing css file that you are already including in your SharePoint site:

  • Create a CSS override file and add this in it.
  • Or add this to the master page
  • Or add this to the Page layout for your article

The "width" is a restriction - so images that are too large will be resized down to that value by default.  The pointer sets the cursor to a hand when it is over the image, and the border is just personal preference.

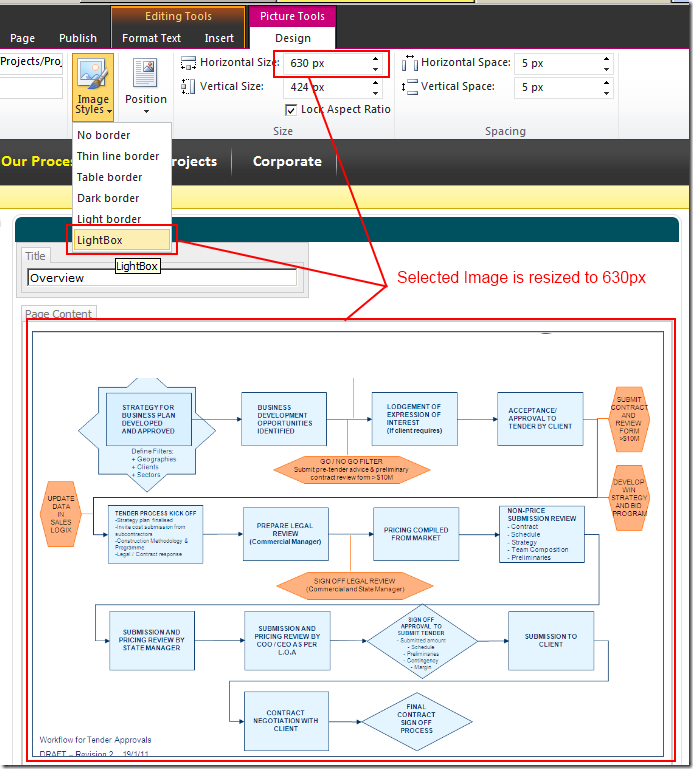
image

Figure: Content Editor can select the LightBox image style from the ribbon directly

The DOM looks like this once your content editor has tagged the image with the LightBox image style.

image

Figure: The HTML includes the lightbox css class

The included class ms-rteImage-LightBox will allow JQuery to hook in the javascript magic.

Adding the JavaScript


Next step is to add the JavaScript magic.

$("img.ms-rteImage-LightBox").click(function(){        
    SP.UI.ModalDialog.showModalDialog({
        url: $(this).attr("src"),
        title: $(this).attr("alt")
    });
});


JQuery basically looks at the page and look for any image elements tagged with .ms-rteImage-LightBox, and attach a click event handler function.

The function calls the SP.UI.ModalDialog.showModalDialog function that already exists within SharePoint 2010, and pass the image's URL and alt text (for a description).

Result:


image

Figure: On click, SharePoint modal dialog opens showing the image in full size.


In addition, the Content Editor is free to apply other image sizes, and use the ALT property to describe the image.


Summary

Minimal modifications:

  • Add 1 CSS style
  • Add JQuery reference (if you don't already have it)
  • Add 1 JavaScript call.
  • No additional script reference, or CSS files, or pictures

InfoPath rule based repeating section date validation

A question was asked in the SharePoint 2010 Infopath forums:

"I am using Infopath2010 and developing a form where there are multiple sections. In each section I have a from date and to date controls.My requirement is to takecare the same date range should not fall in anyother sections."

I went crazy and decided to took on the challenge, I started with 2 tips:


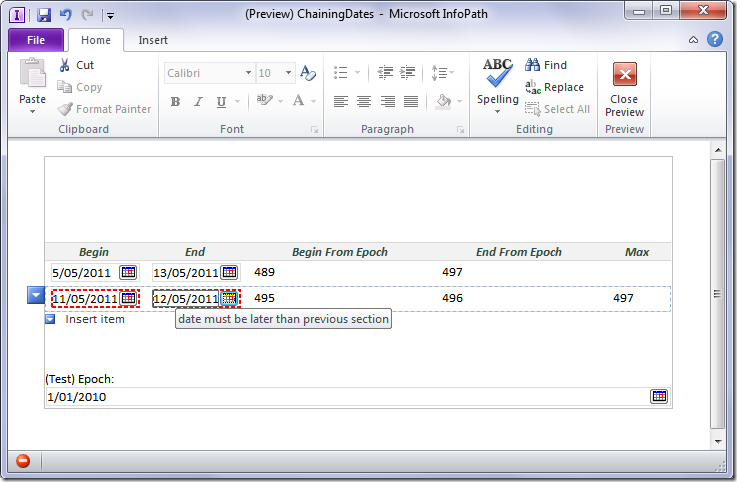
The result:

image

The XSN template is here:

https://static1.squarespace.com/static/5527bff2e4b0b430660b0d10/5527c30de4b030eeeef09715/5527c30fe4b030eeeef09e86/1304524623397/ChainingDates.xsn


Summary Steps

  1. Use DateDiff - calculate date difference between Begin & Epoch
  2. Again for End & Epoch
  3. Use Preceding rule to calculate max date difference in previous "End From Epoch"
  4. Validation rules kick off when datediff for the current section is less than the max from previous section

Have fun!