Setting up a draft save location for InfoPath web forms


This is a quick description of how you can set up a draft Forms Library for letting your users save their InfoPath web forms quickly.

  1. Create an InfoPath 2010 form, set compatibility level to web browser forms
  2. Create an external secondary connection for submitting to your primary Form library.  /My Project/My Forms/
  3. Add some required fields and set them to "Can't be blank"
  4. Add a button to call the submit connection. 
  5. Publish the form to the forms library.
  6. When you click Submit - the submit will fail - because you have fields that has failed the validation.

Because you probably have workflows listening on the Form library, to keep things simple, you should create a second Form library for draft forms.

  1. Create a second Form library. /My Project/My Draft Forms/
  2. In Form Options, enable Save or Save As for web browser forms
  3. Publish the form template again.

Trick

The trick is to provide Forms Server the hint that /My Draft Forms/ is the destination for temporary draft saves.

The MSDN article is here: http://msdn.microsoft.com/en-us/library/ms772417.aspx

The URL for new forms should be:

https://server/applications/My Project/_layouts/FormServer.aspx?XsnLocation=~sitecollection/My Project/My Forms/Forms/template.xsn&SaveLocation=~sitecollection/My Project/My Draft Forms&Source=~sitecollection/My Project/My Forms&DefaultItemOpen=1

This URL uses /My Project/My Draft Forms as the SaveLocation.

Fire up the web form from this URL

Try saving the form from the save button on the ribbon.

clip_image002

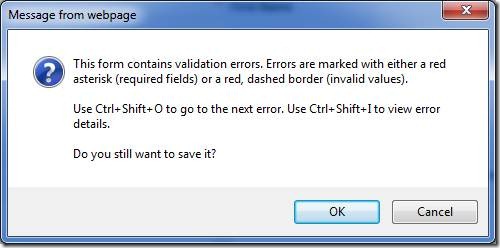
Figure: Forms Server asks if you want to skip the error and save.

image

Figure: Forms Server asks the user to give a name to the draft form.

image

Figure: Forms saved to the separate Draft forms library.


Result


  1. Creating new form using the modified URL.
    1. Can save to /My Draft Forms/ - will be prompted form name
    2. Can submit to /My Forms/
  2. Opening draft form from /My Draft Forms/
    1. Can save back to /My Draft Forms/
    2. Can submit to /My Forms/
    3. CON: Leaves old draft form file
  3. Opening existing submitted form from /My Forms/
    1. Can save to /My Forms/

Adding a warm-up step to your SharePoint project deploy action


VS.NET 2010 allows a lot of awesome control over the exact steps that occurs when you deploy your project to your development environment.

image

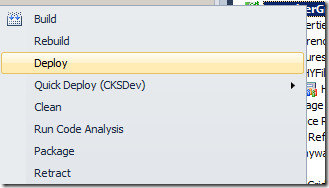
Figure: VS.NET 2010 Deploy


When you are deploying farm solutions however, it does an IIS Reset, which means when VS.NET says it's done, and you go into your browser to test the site, it sits there for a few minutes warming up.  Sad smile

Fortunately, VS.NET is very extensible, and the community is awesome and has already added many useful extensions.

Grab CKS DEV

To fix this, first grab CKS extensions here: http://cksdev.codeplex.com/


SharePoint Project Properties | SharePoint

You can't edit any of the default configurations, so make your own and add the actions you want.

image

CKS provides a deployment step "Warm up SharePoint Site (CKSDev)" which will send a request to warm up the SharePoint site that the project deploys to.  (see #1 below)

image

The problem with the CKSDev warm-up step is that the action doesn't actually wait for the site to tell us it's ready, so VS.NET will say "Done", but when you open the browser, it's still not ready Sad smile

So we add another CKS step "Run PowerShell Script (CKSDev)".  See #2 above.


Using a PowerShell step to make sure it is REALLY READY

You then need to look at the properties of the project to see a new property under Deployment. 

Point that to a ps1 file in your project directory.

image


The contents of the ps1 file can be very simple, in 3 lines:


$WebClient = New-Object System.Net.WebClient
$WebClient.UseDefaultCredentials = $true
$Results = $WebClient.DownloadString("http://colt-sp2010/sites/Home/SitePages/default.aspx")

When you deploy now, it will run until the PowerShell step returns.  Smile

Activate Features:
  Activating feature 'Grid Feature' ...
Run Post-Deployment Command:
  Skipping deployment step because a post-deployment command is not specified.
Warm up SharePoint Site (CKSDev):
Run PowerShell Script (CKSDev):
  --Executing PowerShell Script #1 'D:\Temp\Grid\warmupsite.ps1'...
 
  --Script 'D:\Temp\Grid\warmupsite.ps1' successfully executed
========== Build: 1 succeeded or up-to-date, 0 failed, 0 skipped ==========
========== Deploy: 1 succeeded, 0 failed, 0 skipped ==========

Updating VS.NET 2008 Professional to use TFS 2010

We have some old virtual machines with VS.NET 2008 installed, used to build and maintain packages for WSS3 / MOSS 2007.  Now that we have a nice new TFS 2010 installed, I go about fixing them up and making sure the various projects lying around are properly checked into TFS.


Getting an unpatched VS.NET 2008 to talk to TFS 2010 involves:

  1. Installing VS.NET 2008 Team Explorer - this allow VS.NET 2008 to be able to talk to TFS as a source control system.
    http://www.microsoft.com/downloads/en/confirmation.aspx?FamilyID=0ed12659-3d41-4420-bbb0-a46e51bfca86&displaylang=en
  2. Installing VS.NET 2008 Service Pack 1
    http://www.microsoft.com/downloads/en/details.aspx?FamilyID=27673C47-B3B5-4C67-BD99-84E525B5CE61
  3. Installing VS.NET 2008 Forward Compatibility Update for TFS 2010

I fumbled around with the order a bit - was doing #2 before I realized I don't even have team explorer.  After I worked out what needed to be done, the order makes more sense.