SharePoint Saturdays in Australia

I wanted write about two things.  I still wanted to do a summary of SharePoint Saturday Adelaide 2014, but I will have to do that later, perhaps combine my thoughts after Brisbane.  Right now, I wanted to talk about the upcoming SharePoint Saturday Brisbane 2014, as well as SharePoint events in general in Australia.


SharePoint Brisbane is May 31st

Will be upon us very soon in two weeks.  There’s a strong call for additional local speakers.  If you are in Brisbane – you really should consider presenting a topic.  It can be a simple topic.  If you feel you don’t have enough content, prepare for 30-40 minutes, and let your audience ask questions.  You’ll be surprised how quick a session is.


Attending a SharePoint Saturday

There are several great reasons to attend a SharePoint Saturday event:

  • SharePoint Saturday events are free.  We will bribe you with food.  Additionally, there’s usually good sponsor prizes.
  • You get to hear from your local knowledgeable SharePoint people, on a variety of topics that you can choose.  Sure, you can see them in the monthly user groups, but you don’t always get to choose the topic that’s presented at the user group.  SharePoint Saturday offers that choice.
  • You get to network with your local SharePoint people.
  • We understand and are thankful that you are sacrificing one day of your precious weekend to attend a training event.  Please don’t feel bad at all if you need to leave early, or can only visit for an hour after lunch.  It is still great to see you, so nice of you to make the trip.


Presenting at a SharePoint Saturday

Because there is a larger set of available spots in a SharePoint Saturday event.  There is a lot more room for local speakers to present. 

  • Have you done a particularly cool project and want to talk about it? 
  • Have you did a presentation in your company that you want to test with a wider audience? 
  • Sure, not everyone will agree with your particular approach.  But that’s the best thing about SharePoint – there’s always more than one way to do things.  You way is superior already because you get the stage to explain it to your audience!
  • The perfect springboard to learn what you preach.  It is true.  The best way you learn is if you can teach someone else.  I personally learned so much from talking about what I’m doing.  I stop and write this blog, because it helps me document and digest what I’m doing.  I write an event summary, because it wraps up my thoughts, preparation and the aftermath.
  • The person that benefits the most from a SharePoint Saturday event, is the presenter.


Whether attending or presenting, I hope to see you at SharePoint Saturday in Brisbane, or in a SharePoint Saturday event in your city soon!

IE11 (+Win8.1.1) F12 Developer Tools for the SharePoint Dev


This blog post is about all the new nifty features I'm finding in the latest IE11 F12 developer tools.  I updated my Windows to 8.1 update 1, and IE11 was updated.  I started seeing a few cool new features, and went on Twitter to find the official documentation.

http://msdn.microsoft.com/en-us/library/ie/dn641599(v=vs.85).aspx

Was supplied by @AdamTReineke

https://twitter.com/AdamTReineke/status/454678702169677824


Rather than bore you with a list of features, which is on MSDN.  I want to just quickly share how I'm using some of them.

Disclaimer - I had just watched LEGO movie.  So EVERYTHING IS AWESOME!


DOM Explorer


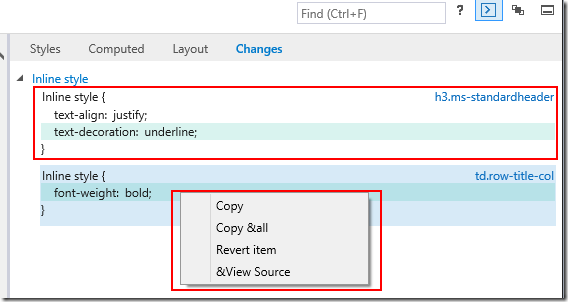
1. CSS Changes


  • When you "touch up" CSS in SharePoint to get the exact look you want.  You often forget which rule you had applied.
  • The DOM Explorer's "Changes" tab tracks all the individual changes, and you can revert an individual rule, or copy them all and paste to your CSS file.
  • Copy All.  Awesome!

image


2. Pseudo Rules


  • You know those pesky :hover and :visited CSS rules in SharePoint that can never find to eliminate? 
  • Now you can apply :hover or :visited and see the effect rule without actually trying to catch your mouse hovering.  Haha.  Awesome!

image


The super cool updated Console object


3. Console info, warning, error

  • My "warnings" are currently filtered. 
  • use console.info() console.warn() and console.error() to write to these.

image

image

  • No ribbon button but you can right-click to filter Log messages too.  For those really spammy libraries, which is pretty awesome!


4. Console handles objects, multiple objects and HTML


  • Chrome and Firefox both were able to log objects and inspect them.  IE11 used to just log the [object].tostring which was pretty useless.
  • The update now fixes that, and allow multiple arguments to be logged at the same time.


image


5. Console always available for dev. 


image


  • So you can have all your logs happening without trying to start the debugger before you load the page
  • Remember your end users won't have this on, so TEST before you deploy code.


6. Console can switch target to an iFrame. 


  • Note, I couldn't get this to work in IE8-Compat mode (which my SP2010 runs on).  This works fine for IE9, IE10, Edge.
  • This is awesome for debugging objects in the SP.UI.Dialog

image


Debug


7. Debugger can be attached without reloading the page


  • Not sure if we need a picture to describe how awesome this is.  I imagine the picture will involve unicorns, rainbows and kittens.  AWESOME!


8. Just My code


image

  • Debugger only stops on my code.
  • Note, some libraries can throw error when you call it wrong - so sometimes not so awesome.


9. Pretty Print


  • Oh crap.  Something in sp.runtime.js don't know how to read this...

image

  • Not anymore in 2014!
  • Hit pretty-print - the sp.runtime.js becomes actually readable, and you can set line-based debugging too!

image

  • I didn't switch to sp.runtime.debug.js - this is awesome!


10. Source Maps


  • Now finally we have source map support.  Here is me debugging Typescript in IE11


image


Summary

  • The developer story on IE11 (after this update) is awesome!

The Microsoft MVP Community Camp is happening next Saturday March 22. What is it?


Microsoft APAC is hosting a simultaneous event in multiple cities around Asia and Oceania. 

It is named the Microsoft MVP Community Camp.

http://mvp.microsoft.com/en-us/ComCamp2014.aspx


There are two parts to this event.  All the events are free.  But you need to register.

Firstly it is a week of streaming sessions from March 17~21


The various sessions are in different languages targeting the different markets in Asia Pacific.  There's usually one English session in every time slot.

Different regions have a specific 'theme' to the streaming sessions, in Australia (and New Zealand), the focus is on

Running Small and Mid-Business with Microsoft technologies

This includes lots of discussions on SharePoint, Office 365, One Drive (for Business) and Azure. 

Some sessions are very timely.  A number of sessions in Japan focuses on Azure - since they got their Azure datacenter earlier this month.


Concluding on a Saturday of local "in person" sessions on March 22


Now this one is important.  Because even though this is free, you need to register.  Also, there's not much time left.  So you really need to register now.

For Sydney, our schedule and registration link is here.

For other cities in Australia


There are several sessions on Azure, Web Development, OneDrive as well as other related technologies such as Dynamics CRM.

Links for other cities - not just the ones in Australia, but also around Asia are available from the main event link at the top of this post.


I am not presenting at the event, but I'll be attending and attempting to field any SharePoint or Office 365 related questions.

I hope to see you guys there.

Building a 2013 No Code webpart for XKCD.com/now

Last week, XKCD (of nerd comic fame) produced this most excellent comic http://xkcd.com/now/

Now


This complex looking image describes essentially an outer ring and an inner ring.  The outer ring is the current time on your machine.  The inner ring is the regions of the world.  The chart tells you quickly what time it is for someone living in another part of the world.

Being the SharePoint lover that I am, you know what I'm thinking.

Time for a fun toy Web Part

Step 0.  Environment.
Step 1.  Create a SharePoint Sandbox Solution, add Client Web Part (Host Web)
Step 2.  Create the assets (images, HTML and CSS)
Step 3.  Plug in the javascript code.
Step 4.  Permissions.
Step 5.  Create a test page.  Add the App Part to play.  Change web.regional settings - see webpart change.


Step 0.  Environment

My Environment setup is very simple:

  • Office 365 with Developer site, at: https://sharepointgurus365.sharepoint.com/sites/Developer/
  • Visual Studio 2013
  • Running on Windows 8.1
  • I do not have SharePoint installed on this client PC
  • I have a paint program Paint.NET which is an excellent developer's tool when you don't have Photoshop


Step 1. Create a SharePoint Sandbox Solution, add Client Web Part (Host Web)
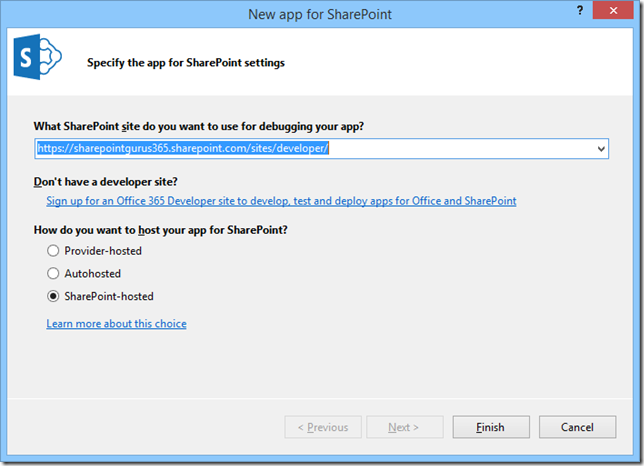

image

Select SharePoint-Hosted.  This App Part will be hosted by Office 365.


image


Step 2.  Create the images.

imageimage


I split the image into two layers.  Because I want to rotate them separately.  I also change the text labels for the time 6PM, Midnight and 6AM on the Time-Ring.  Since when it's upside down it still needs to be readable.

I add these to the Project, under Images

image

I also modify the App Part html

image

I added CSS for the two rings.  Position:fixed so that they overlap. 

<body>
    <style>
        .timezone-ring {
            background: url(../Images/xkcd-now-land.png) no-repeat top left;
            width:706px;
            height:705px;
            position:fixed;
            top:0px;
            left:0px;
        }
        .time-ring {
            background: url(../Images/xkcd-now-time.png) no-repeat top left;
            width: 706px;
            height: 705px;
            position:fixed;
            top: 0px;
            left: 0px;
        }
    </style>
    <div style="position:relative;">
        <div class="timezone-ring">
        </div>

        <div class="time-ring">
        </div>
    </div>
</body>

image

<ClientWebPart Name="xkcd-clock" Title="xkcd-clock" Description="Clock based on xkcd.com/now the outer ring rotates to current machine time.  The inner ring rotates to web region." DefaultWidth="720" DefaultHeight="720">

  • Note: tidy up the ClientWebPart definition.  Set the default width and height.


Step 3.  Plug in the javascript code.


There is very little JavaScript,  So I wrote them inline.  In practice, this made the debugging a lot more difficult.  I recommend always writing your Javascript in a separate file.


<script type="text/javascript">
    //'use strict';  // have to turn off 'use strict' because I use eval() later :-P

    // Set the style of the client web part page to be consistent with the host web.
    (function () {
        var hostUrl = '';
        if (document.URL.indexOf('?') != -1) {
            var params = document.URL.split('?')[1].split('&');
            for (var i = 0; i < params.length; i++) {
                var p = decodeURIComponent(params[i]);
                if (/^SPHostUrl=/i.test(p)) {
                    hostUrl = p.split('=')[1];
                    document.write('<link rel="stylesheet" href="' + hostUrl + '/_layouts/15/defaultcss.ashx" />');
                    break;
                }
            }
        }
        if (hostUrl == '') {
            document.write('<link rel="stylesheet" href="/_layouts/15/1033/styles/themable/corev15.css" />');
        }

/*** John's code starts here ***/

        function turn() {
            var hour = (new Date()).getHours() + 12; // clock faces up so need 12hr offset
            var degrees = -((hour % 24) * 15); // turn anti-clockwise so negative
            var rotate = "rotate(" + degrees + "deg)";

            $(".time-ring").css("transform", rotate);

            setTimeout(turn, 1000 * 60 * 15); // 15mins
        }

        var ctx = SP.ClientContext.get_current();
        var hostCtx = new SP.AppContextSite(ctx, hostUrl);
        var timezone = hostCtx.get_web().get_regionalSettings().get_timeZone();
        ctx.load(timezone);
        ctx.executeQueryAsync(function () {
            // has current timezone

            var description = timezone.get_description();
            var m = /UTC(.*\d+):/.exec(description);
            if (m) {
                var offset = eval(m[1]) -2;
                // map is aligned with Egypt (UTC+2) so need a 2hr offset.

                var degrees = -(offset * 15); // turn anti-clockwise so negative
                var rotate = "rotate(" + degrees + "deg)";

                $(".timezone-ring").css("transform", rotate);
            }

            turn();  // call turn

        }, function () {
            // failed.
        })

/*** JOHN'S CODE ENDS HERE ***/

    })();
</script>


Few quick notes here:

  • turn() function calculates the rotation degree for the outer ring, based on the current machine time.  See comments for all the offsets.
  • the clientContext query needs to get the App Host Web settting.  Otherwise it will return you the regional setting for the App Web which would be pretty pointless.
  • finally, once we have the timezone information from the regional setting, it looks like (UTC+10: Sydney).  I take the +10 and do more offset for the inner ring.
  • I only request region information once on page load.  But I put turn() on a timeout call every 15minutes.  So if you leave the webpart on a screen it'll keep checking and turn every 15mins.


Step 4.  Permissions.


image

By default, the App has no permissions to read from the Host Web.  We need to set up the permission to Read from the Host Web.

image

When deployed via VS.NET you'll see this pop up in the browser.  You'll also get this when you activate the App.


Step 5.  Create a test page.  Add the App Part to play. 


image


Results


image

I'm in Australia (AEST UTC+10).  Which is pointing up.  My current time is 11:40pm

image

Change the Host Web's region to (Pacific Time UTC-8).

image

Web Part still shows 11.45PM - that's my current time.  But the map has rotated to point to the West Coast.


Downloads

I did not test this on any other machine but it should work.  Let me know if it works for you.

And if you really enjoy using this in your company, please buy something from the XKCD gift shop.
Using SharePoint Designer 2013 Workflow to copy file via REST on Office 365

This is a bit of trial and error, but works very well at the end, so I want to publish this and share the syntax.


Related References:


I will tackle the next step.  How do you call a POST REST service, with the CopyTo function on SPFile.  http://msdn.microsoft.com/en-us/library/ms455020.aspx

The flexibility is that you can easily tweak the urls and essentially allow your workflow to copy files anywhere.


Step 1.  Understand the correct URL


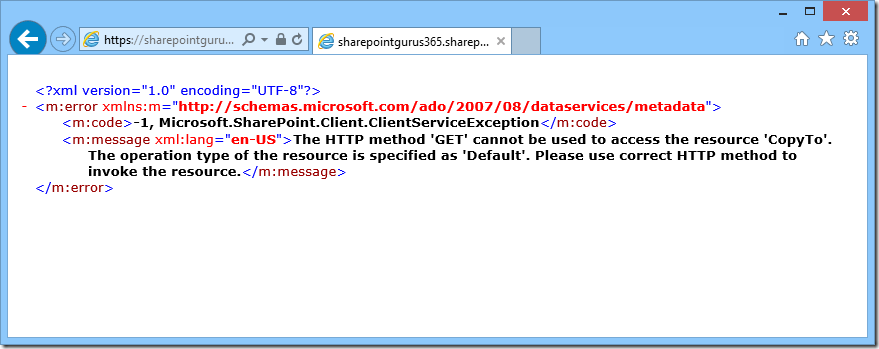
Put this into your browser's address bar (this executes a GET request):

image

No good.  Need POST.


Step 2.  Make that SharePoint Designer 2013 Workflow


  1. First step, with the POST call, we need to add a Request Header for Accept: application/json; odata=verbose
    Put this in a dictionary variable.

    image
  2. Second step.  Call Web Service!
    image

    You need to set up Request Headers as well.  This has to be done via the Properties, since it's not a link that's shown.  Set this to the dictionary created in the previous step.
    This step is the same as mentioned in Adrian Fiechter's blog.

    image
  3. You should capture the ResponseContent, and add an additional action to log it to History
    The Stage ends.  Go to End of Workflow.

    image

  4. The whole thing, in 3 lines:

    image

Step 3.  Run it.


image

Here's me starting the workflow on the top1.png file.


image

The top1.png is copied to top2.png!  Interestingly, it's copied the Call Workflow "workflow status" column.  Both links (which is a lookup field) go to the same workflow.


image

This is the workflow history. 

Notice that the CopyTo method returned void (null) in this case.  Should there be an error, you'll see it logged here.


That's all!  Hope you find these steps useful.