Modifying CSS Styles based on InfoPath field without code

This is an article expanding on a comment I made previously on the Microsoft InfoPath forums.

http://social.msdn.microsoft.com/Forums/en-US/sharepointcustomizationprevious/thread/4a8dbae1-4641-4ee2-b034-3768ebda5a47

The Problem

How do we modify the margin of a column based on a field within InfoPath. 


Solution

Invoking dark magics of XSL (you have read the disclaimer).  This is totally unsupported, but fun.

  1. Create a new form, add a number field "n1".
  2. Put this field onto the design area within a section
  3. Create a rule on the section, "if n1 > 0", make the background red.
    (these steps are useful to set up the form to a stage where we can add additional rules).
  4. save your form as "MarginForm.xsn", we're about to do unsupported magic. 
  5. go to File | Publish | Export | Export Source Files - save the component files of your form into a blank folder, e.g. "C:\Temp\MarginForm\"
  6. close InfoPath designer, go to your folder, and look for the XSL file for your view, typically, it's <view name>.xsl.  For me, this is: C:\Temp\MarginForm\view1.xsl
  7. Open the xsl in a text editor - preferably one that understands XSL to give you syntax highlighting.
  8. Find our formatting rule, it looks like this:
    <xsl:attribute name="style">BORDER-BOTTOM: 0pt; BORDER-LEFT: 0pt; WIDTH: 100%; MARGIN-BOTTOM: 0px; BORDER-TOP: 0pt; BORDER-RIGHT: 0pt;<xsl:choose>
    <xsl:when test="../my:n1 &gt; 0">BACKGROUND-COLOR: #ff6600; caption: Rule 1;</xsl:when>
    </xsl:choose>
    </xsl:attribute>
  9. add additional formatting for margin-left, like this:
    <xsl:attribute name="style">BORDER-BOTTOM: 0pt; BORDER-LEFT: 0pt; WIDTH: 100%; MARGIN-BOTTOM: 0px; BORDER-TOP: 0pt; BORDER-RIGHT: 0pt;<xsl:choose>
    <xsl:when test="../my:n1 &gt; 0">BACKGROUND-COLOR: #ff6600; caption: Rule 1; MARGIN-LEFT: <xsl:value-of select="../my:n1"/>px;</xsl:when>
    </xsl:choose>
    </xsl:attribute>
  10. save your XSL, close it.  Open  the whole thing back in InfoPath designer from manifest.xsf
  11. test it and save it back into MarginForm.xsn file.
  12. Once you are comfortable and understand what's going on, clean up the rule in xsl (don't use the designer) and get rid of the rule for "red".

The Results

 

Download Files


A site maintenance notice.  I've removed all back references on the site - they were being spammed like crazy and I wasn't doing a good job of cleaning them up.  If you need a back reference, please leave a comment and I'll verify them.

Windows 8 - Export Google Reader OPML for Bing News

Let the hacks begin!

Windows 8's Bing News app was updated in the last few days and with this new version, an ability was added to allow us to add our own Sources.  RSS sources.

A number of my favourite news sites proceed to discuss this is a good direction to eventually be a viable Google Reader replacement.

http://winsupersite.com/windows-8/windows-8-tip-add-rss-feeds-news-app

http://www.liveside.net/2013/04/15/bing-news-app-a-google-reader-replacement-not-yet-but-its-a-start/


My lament is that it doesn't seem to accept OPML, a common XML-based description of my RSS feed collection.


Inspiration

Hmm, I wonder how does Bing News store the RSS feeds that a user has chosen.


Hack

Windows Apps data are stored within the user's App data.  In my case, it is right here.

C:\Users\John.Liu\AppData\Local\Packages\Microsoft.BingNews_8wekyb3d8bbwe\

Having a quick look around, the custom Source feeds are stored in

\RoamingState\state.json

JSON format is a simple javascript format.  So really, the hack is not even a hack, just converting OPML (XML) to JSON.

A powershell script, like this opml-to-bing-news-json.ps1, could do it.


Steps


  1. Download your Google Reader files from Google TakeOut.
    image
  2. Open the ZIP file and copy the subcriptions.xml file to the same folder as the Powershell script
  3. My region market is "en-au" - check your state.json file to see if you have a different market.  Change it in your powershell script ps1.

    Run it like so...

    image
  4. You should have these files now:
    image

  5. Overwrite the state.json file in AppData with mine...
    image
  6. Restart Bing News

    image
  7. Bonus.  When I launch my Surface RT, all my feeds are already synchronized there too :-)

Retrospective - Australian SharePoint Conference Sydney 2013

I had planned to post this as soon as I finish my session - but you know, conference.  Lots of friends come visit during these events and the evenings do a lot of damage to your hair, and possibly liver.  I don't often get opportunities to chat with so many SharePoint experts in such a short span of time.  Lots of catch up, lots of thoughts, A LOT of ideas.


As for my session, Building SharePoint Solutions with Microsoft's TypeScript: how and why.  I think it went well.  I really wanted to thank the audience for being so kind, and stayed awake through the presentation.  As promised, here is my presentation:

Presentation:


Downloads:

A huge thanks to the organisers, speakers, vendors and attendees for such a fantastic conference.  I hope to see you guys again soon.

InfoPath - reading template.xsd in code for type checking

InfoPath is the world's most advanced XML-based form system.  Each InfoPath document is a fully structured XML file, and the template contains the XSD schema definition for the XML file.  This includes a bunch of information such as min/max occurrences, as well as the type information for each of the elements.

Because the information for the element's type is stored separately in the xsd file, it isn't possible at runtime to workout what the type of each element is supposed to be. 
When we are given:

  • my:value1

If we can't read the template.xsd file, we don't know if that's a number, a string, a datetime nor do we know if the field is nillable.  Some fields in InfoPath, such as the boolean and the datetime fields, can't be blank.  They have to be set to nil.


Here's how you can read the template.xsd in code

An InfoPath Form


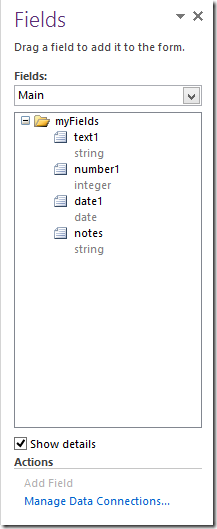
Here is an InfoPath form with a few fields

image


The XML File Connection


Add a XML File Data Connection to an existing file in the template, I use "template.xml"

image

Save the template, and now drop into the code behind.


Code

public void InternalStartup()
{
    EventManager.FormEvents.Loading += new LoadingEventHandler(FormEvents_Loading);
}

public void FormEvents_Loading(object sender, LoadingEventArgs e)
{
    FileQueryConnection file = this.DataConnections["template"] as FileQueryConnection;
    file.FileLocation = "template.xsd";
    file.Execute();
    XPathNavigator template = this.DataSources["template"].CreateNavigator();
    string notes = "";

    foreach (XPathNavigator nav in this.CreateNavigator().Select("//*", this.NamespaceManager))
    {
        string localname = nav.LocalName;

        XPathNavigator element = template.SelectSingleNode("//*[@name='" + localname + "']", template);
        if (element != null)
        {
            notes += string.Format("{0} is of type {1} {2}; ", localname, element.GetAttribute("type", ""), element.GetAttribute("nillable", ""));
        }
    }

    this.CreateNavigator().SelectSingleNode("/my:myFields/my:notes", this.NamespaceManager).SetValue(notes);
}

  • The interesting part is at the top, where we bait and switch the FileQueryConnection to read the template.xsd schema file instead.  Because it is a valid XML file, InfoPath will read it happily.
  • We can then map any field in the main datasource to the corresponding definition in the template, and pull out the additional metadata such as type or nillable.


Result

image


Download

3-step fix Nintex WorkflowDesigner.aspx with your custom system masterpage

Scenario

  • You have created a wonderful, responsive-design, HTML5 MasterPage for your SharePoint 2010.  It works really well. 
  • You even did a variation for the system pages.  Those also work very well.
  • Until you try to use Nintex's Workflow Designer.  That page bombs out.   Most of the panels don't work, the scrollbars don't work.  The hovers go off screen. 
  • Your heart sank.


Your choices

  1. Easiest choice, if you don't have time, is to use v4.master for your system pages.  The biggest problem with this choice is the jarring experience your advanced users will get when they inevitably ends up on a system page and suddenly they are dropped into Vanilla SharePoint zone.
  2. Hardest choice, if you do have the time, is to butt your head against Nintex's WorkflowDesigner page until you win.  I have done this twice in the last two years.  In general, if you start with http://startermasterpages.codeplex.com/ you aren't too bad.  You'll need to pull a few ContentPlaceHolder panels out of hiding, and add a few elements with very specific ID's into your current navigation menu. 
    This will take you...  about 2 days. I won't go into the details of what you will face.
  3. Oh, and God have mercy on your soul.
  4. This blog entry is about an Interesting third choice.  You can hack Nintex's WorkflowDesigner.aspx file to use v4.master, while all your existing system pages will continue to use your new custom masterpage.


Consequences

  • Nintex's WorkflowDesigner.aspx is an application page that resides in _layouts folder on each Web Front End.  You will need to apply this change across all your WFE manually.
  • When Nintex updates Nintex Workflow, you may need to re-apply this hack.
  • This hack applies to ALL nintext solutions across the entire WFE.  For all  web applications, site collections.


How to fix (hack)


Understand the consequences, the hack is actually REALLY simple

  1. Browse to C:\Program Files\Common Files\Microsoft Shared\Web Server Extensions\14\TEMPLATE\LAYOUTS\NINTEXWORKFLOW\
    Copy this file and make a backup:  WorkflowDesigner.aspx
  2. Open it and find the masterpage reference: 
    <%@ Page Language="C#" AutoEventWireup="true" CodeBehind="WorkflowDesigner.aspx.cs" Inherits="Nintex.Workflow.ApplicationPages.WorkflowDesigner,Nintex.Workflow.ApplicationPages, Version=1.0.0.0, Culture=neutral, PublicKeyToken=913f6bae0ca5ae12" DynamicMasterPageFile="~masterurl/default.master"  %>
  3. Change DynamicMasterPageFile to MasterPageFile="../v4.master"
    The v4.master sits in \LAYOUTS\v4.master by default making this hack really easy.


Result

  • Your custom system masterpage
    image
  • Nintex WorkflowDesigner running on v4
    image