SharePoint and Reporting Services Integration, the good, the bad, and the ugly


Benefits of using Reporting Services in SharePoint integrated mode

  1. Version Control in SharePoint (vs. BIDS project saved in TFS).  Having version control for reports is critical, especially if you allow end users to use Report Builder.  Using BIDS with TFS is fine.  But if you are directly using Report Builder with Report Server native mode is terrifying.
  2. Check-in / check-out
  3. Draft/publish versions
  4. Alerts (when someone updates reports)
  5. Workflows (though to be honest - I have yet to see a business reason to use workflow for .rdl)
  6. If you are using SharePoint to surface your reports, the integrated webparts makes sense.  Though with reporting server in native mode you can still use a Report Viewer webpart via IFrame.

Same / Similar functionality

  1. Report Subscriptions are handled by RS
  2. URL: Report Server or SharePoint document library
  3. Permissions control either in Report Server, or in SharePoint

Problem / suggestions

  1. To use integrated mode you _do_ need to have SharePoint somewhere.  Sometimes a company may only have a database and don't even have IIS on the database server.
  2. But if you use native mode, and need some sort of source control, you'll need TFS.  So may be install SharePoint is more useful than TFS for a power user / BI Expert.
  3. A reporting service can only connect to one SharePoint - you can't join two different farms (e.g. dev sp and prod sp).  This was a concern during migration to SP2010 - some reports are for intranet and some for public…  can't move one or another.
  4. Report database cannot switch modes between native and integrated - so migrating reports is a pain in the butt - you need to export old reports, create a new report database and choose integrated mode, then add them back in.  A bit painful I think.
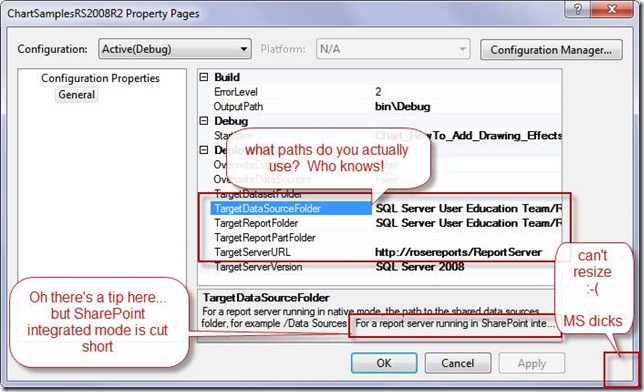
  5. The UI for setting up BIDS project to export to SharePoint integrated mode is REALLY crap.  I have no mercy for this crap dialog:

clip_image002

clip_image004


The trick

Native mode

  • TargetServerURL: http://Server/ReportServer
  • TargetDataSourceFolder: /Data Sources                           <- OK.  Deploy no problems.

SharePoint mode

  • TargetServerURL: http://server
  • TargetDataSourceFolder: /Documents/Data Sources           <- wrong!  
  • TargetDataSourceFolder: http://server/documents/Data Sources/   <- correct.  Need entire URL.  WHO THE HECK KNOWS THIS WITHOUT THE TOOLTIP?

If you don't set up the folder properly as per example.  BAM deploy fail no proper errors.  Just says no permission to path or some irrelevant rubbish - sends you in circles thinking you stuffed up SharePoint…
Automatic Relink InfoPath Forms Event Receiver

I’ve been working on an InfoPath solution that requires both Offline and Online capabilities.

Problem and Background

An InfoPath form has two components – the XML describing the data in the form, and the template, describing the layout of the form.

In the Offline scenario, when a user opens an InfoPath form – it looks for a template definition that’s stored offline (in a file server). 

In the Online scenario via Forms Services, the Form template is stored in SharePoint (as the template of a document library / content type).  InfoPath Forms Services then renders the form as a web page to the user.

In the MIXED scenario, where you fill out a form offline, then submit and store it Online, we have a situation where the Offline form is submitted to the Forms Library, but it still wants the template that’s stored in the Network Share.

Manual Solution

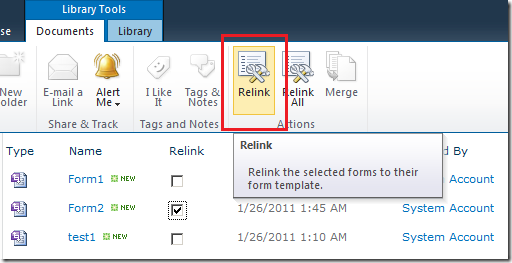
SharePoint provides a manual solution, in the form of a Relink page that’s available on all Form Libraries. 

image

Figure: Form2’s template link is still pointing to the file system.  Not SharePoint.

Select and choose Relink from the Ribbon to fix this.

image


The Automatic Way…


Enter the SharePoint Gurus Relink Forms Template sandbox solution.

The idea is simple:

  1. Build an Event Receiver, listen to Add/Update events on the Forms Library. 
  2. Fix the form’s template URL to that of the Form library.
  3. Bonus: Sandbox solution so you don’t need to be administrator.


Installation:

  1. Grab SharePoint Gurus Relink Forms Template sandbox solution
  2. Upload to Solutions Gallery

    image

  3. Activate Sandbox Solution
  4. Activate Web Feature

    image

Test


Upload files to Forms Library

image

Fixed!


Code Below


public override void ItemAdding(SPItemEventProperties properties)
{
    base.EventFiringEnabled = false;
    RelinkFormTemplate(properties);
    base.ItemAdding(properties);
}


public override void ItemUpdating(SPItemEventProperties properties)
{
    base.EventFiringEnabled = false;
    RelinkFormTemplate(properties);
    base.ItemUpdating(properties);
}
private string GetTemplateURL(SPContentTypeId contentTypeId, SPList spList, SPWeb spWeb, string strSolutionURL)
{
    // this code is mostly modified from Microsoft.SharePoint.ApplicationPages.SubmitRepair, repackaged as an Event Receiver

    SPContentType type = spList.ContentTypes[contentTypeId];
    if (type == null)
    {
        return strSolutionURL;
    }
    string documentTemplate = type.DocumentTemplate;
    if (documentTemplate.StartsWith("http://", StringComparison.Ordinal) ||
documentTemplate.StartsWith("https://", StringComparison.Ordinal))
    {
        return SPHttpUtility.UrlPathEncode(documentTemplate, true);
    }
    if (documentTemplate.StartsWith("/", StringComparison.Ordinal))
    {
        return SPHttpUtility.UrlPathEncode(spWeb.Site.MakeFullUrl(documentTemplate), true);
    }
    return SPHttpUtility.UrlPathEncode(spWeb.Url + '/' + spList.RootFolder + '/' + documentTemplate, true);
}

public void RelinkFormTemplate(SPItemEventProperties properties)
{
    // this code is mostly modified from Microsoft.SharePoint.ApplicationPages.SubmitRepair, repackaged as an Event Receiver

    SPList spList = properties.List;
    object property = properties.AfterProperties["ContentTypeId"];
    if (property == null)
    {
        // publishing template from InfoPath?
        return;
    }
    string contentTypeId = property.ToString();

    SPWeb spWeb = properties.Web;
    SPDocumentLibrary spLibrary = (SPDocumentLibrary)spList;
    string strSolutionURL = SPHttpUtility.UrlPathEncode(spWeb.Url + "/" + spLibrary.DocumentTemplateUrl, true);

    string newTemplateUrl = this.GetTemplateURL(new SPContentTypeId(contentTypeId), spList, spWeb, strSolutionURL);
    if ((properties.AfterProperties["TemplateUrl"] != null) &&
(!string.Equals(newTemplateUrl, properties.AfterProperties["TemplateUrl"].ToString(), StringComparison.CurrentCultureIgnoreCase)))
    {
        properties.AfterProperties["TemplateUrl"] = newTemplateUrl;
    }
}

Silverlight + SharePoint - add to web part gallery

This article covers how to go about packaging a webpart for the Silverlight XAP file and deploy it to Web Part Gallery.

In the previous article I described the steps to create a SharePoint project and deploy the XAP file via a site feature.

Silverlight + SharePoint 2010 - package XAP file in a sandbox WSP Solution

But the user still needs to manually:

  1. Find the XAP file URL
  2. Manually insert a Microsoft out of box Silverlight Web Part
  3. Paste the XAP URL
  4. Save the Silverlight Web Part (may have to configure InitParams too).

Let's simplify this a little.

Go back to the <Elements> Module, and lets add a webpart

<?xml version="1.0" encoding="utf-8"?>
<Elements xmlns="http://schemas.microsoft.com/sharepoint/">
  <Module Name="SilverlightCamera">
    <File Path="SilverlightCamera\SilverlightCamera.xap" Url="Style Library/SilverlightCamera.xap" />
    <File Path="SilverlightCamera\SilverlightCamera.webpart" Url="_catalogs/wp/SilverlightCamera.webpart" />
  </Module>
</Elements>


The webpart file itself is very simple: go to Web Parts Gallery, find and export Microsoft's Silverlight.webpart

<?xml version="1.0" encoding="utf-8"?>
<webParts>
  <webPart xmlns="http://schemas.microsoft.com/WebPart/v3">
    <metaData>
      <type name=
"Microsoft.SharePoint.WebPartPages.SilverlightWebPart, Microsoft.SharePoint, Version=14.0.0.0, Culture=neutral, PublicKeyToken=71e9bce111e9429c" />
      <importErrorMessage>Cannot import this Web Part.</importErrorMessage>
    </metaData>
    <data>
      <properties>
        <property name="Title" type="string">Silverlight Camera Web Part</property>
        <property name="Description" type="string">A web part to display a Silverlight Camera.</property>
        <property name="Url" type="string">~sitecollection/Style Library/SilverlightCamera.xap</property>
        <property name="Height" type="int">300</property>
      </properties>
    </data>
  </webPart>
</webParts>


You may have noticed that the Url is a SiteCollection relative (~sitecollection/) path, so that no matter whether it's a root site collection or a managed path, we want the user's experience to be perfect.

Unfortunately - that syntax doesn't work, not without one extra hack via the Feature Event Receiver.

Feature Activated Event Receiver


Right click on the feature and add a new event receiver.  VS.NET will generate the CS file.

clip_image002

Figure: right click on the feature (.feature) and add an event receiver. 


Waldek has a magical event handler code that fixes this problem

http://blog.mastykarz.nl/inconvenient-content-query-web-part-server-relative-urls/

So I'll just post my bit of code here

public override void FeatureActivated(SPFeatureReceiverProperties properties)
{
    // one day when I meet Waldek in person I will buy him beer
    // http://blog.mastykarz.nl/inconvenient-content-query-web-part-server-relative-urls/
    SPSite site = properties.Feature.Parent as SPSite;
    if (site != null)
    {
        SPList webPartsGallery = site.GetCatalog(SPListTemplateType.WebPartCatalog);
        SPListItemCollection allWebParts = webPartsGallery.Items;
        SPListItem webPart = (from SPListItem wp in allWebParts
                              where wp.File.Name == "SilverlightCamera.webpart"
                              select wp).SingleOrDefault();
        if (webPart != null)
        {
            string siteCollectionUrl = site.ServerRelativeUrl;
            if (!siteCollectionUrl.EndsWith("/"))
            {
                siteCollectionUrl += "/";
            }
            string fileContents = Encoding.UTF8.GetString(webPart.File.OpenBinary());
            fileContents = fileContents.Replace("~sitecollection/", siteCollectionUrl);
            webPart.File.SaveBinary(Encoding.UTF8.GetBytes(fileContents));
        }
    }
}


During Feature Activated - find the webpart and fix the ~sitecollection marker with the real site collection URL.


Deploy and activate the feature again.

clip_image002[5]


Success!  Our .webpart now appearing in the web part gallery.

Silverlight + SharePoint 2010 - package XAP file in a sandbox WSP Solution

This is a long series of blog posts on developing, debugging and deploying Silverlight and SharePoint solutions.

/blog/2010/6/18/develop-and-deploy-silverlight-sharepoint-2010-solutions.html
/blog/2010/6/22/develop-and-deploy-silverlight-sharepoint-2010-solutions-par.html
/blog/2010/6/28/develop-and-deploy-silverlight-sharepoint-2010-solutions-par.html
/blog/2010/10/18/silverlight-sharepoint-2010-did-you-just-deploy-customizatio.html


Assuming by this point, you have built a XAP file from a Silverlight project, and can deploy it manually to SharePoint by uploading to a SharePoint document library and link up Microsoft's Silverlight web part to "play" your XAP file.

Now let's see how we can build a WSP package.

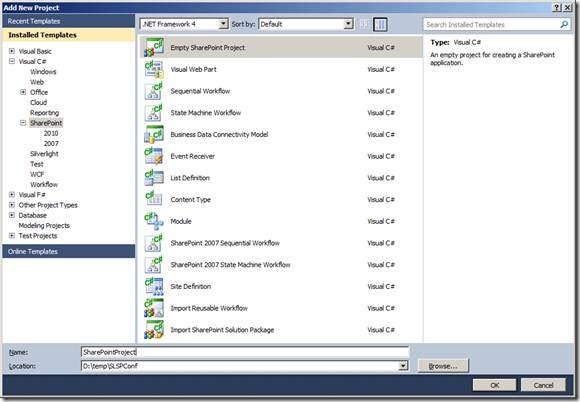
Create a SharePoint Project in your solution


clip_image002

Figure: Add a new Empty SharePoint Project


clip_image002[5]\

Figure: Provide a debug site, and choose Sandboxed solution


clip_image002[7]

Figure: Add a module to this project - you should give it a good name


clip_image002[9]

Figure: Select Properties of this module…


The following is very special.  If you blink you will miss this!


From the Module's properties, find Project Output References and open this dialog.
Then from the dialog

  • select "ElementFile" for deployment type
  • select the project output of your Silverlight project

This step ensures that the Silverlight project output (XAP file), is automatically included as an element file in your SharePoint module. 

Magical!  But very well hidden UI.  Most people don't know it's there!

clip_image002[11]

Figure: Add the Project Output to this module.


Open up the module.xml file and check:

<?xml version="1.0" encoding="utf-8"?>
<Elements xmlns="http://schemas.microsoft.com/sharepoint/">
  <Module Name="Module1">
    <File Path="Module1\SLSPConf.xap" Url="Style Library/SLSPConf.xap" />
  </Module>
</Elements>

I set the destination URL to be Style Library.  You can put it elsewhere but you'll need somewhere where people can actually have read-access.


Deploy to Solution Gallery


clip_image002[13]
Figure: Deploy the Silverlight solution to Solutions Gallery - you can activate the sandbox solution here.


clip_image002[15]

Figure: Activate the site feature


VS.NET debugging tip


Go to the properties for the SharePoint project.  Select the SharePoint tab, and scroll right down.

  • Tick "Enable Silverlight debugging"
  • Untick "Auto-retract after debugging" - this one makes VS.NET deploy and activate when F5.  But as soon as you stop debugging VS.NET will retract the solution - so your Silverlight stops working!


clip_image002[17]

Figure: VS.NET SharePoint project settings.

InfoPath - external data from SharePoint List error

I had this error "The operation could not be completed" when trying to connect to a SharePoint List as an external data connection in InfoPath today.

Show Details just says "Unable to connect to the SharePoint site."

image

Figure: The message box really doesn't tell you anything.

Turned out, I was testing with a new managed path on http://server/sites/TravelFunds/  But the web application did not have a site at the root path.  So the quick fix was to create a new team site (blank site might work too) at the root path http://server/ and then come back to InfoPath, and http://server/sites/TravelFunds/ will now work as expected.


This was one of many posts that I read regarding similar problems, and the one that actually applied to me.  http://vspug.com/ssa/2010/03/15/infopath-2010-cannot-connect-to-sharepoint-2010/