Silverlight - code behind back to MVVM

Philosophical difference between code-behind and the ViewModel

Because VS.NET is firstly a visual tool, it tries very hard to give developers an easy starting point where you can create your layout and easily add code to various events.

The problem this creates, is that the end result code in the events is a mixture of two type of code:

  • Data access, relating to service calls, maintaining in memory state of the object.
  • Updates to the UI.

The former is what we’re trying to test, whereas the UI is always difficult to test, especially if compounded with animation or frequent changes to the UI.


Why do we need to do this?

  • Code-behind is part of the View, application logic doesn't belong here
  • Prolonged mixing of application logic WITH UI login in the code-behind leads to spaghetti code, the main issue is maintenance cost
  • Unable to easily separate and test functionality


Refactor and take control - bring Code Behind back into MVVM

I tackle this problem in stages, without stages the problem is too big and you may not be able to stop halfway.

Stage 1 - creating a ViewModel

A ViewModel is a model for a view.  So in your ViewModel you should have any information that is necessary for the UI (view) to render properly.  Remember to implement INotifyPropertyChanged

public class MainViewModel : INotifyPropertyChanged
{
}


Add the ViewModel to your View - this can be done in the XAML

 <UserControl.Resources>
    <ViewModel:MainViewModel x:Key="MainViewModelInstance"/>
  </UserControl.Resources>

You can reference the ViewModel in your code behind this way:

var resourceMainViewModel = this.Resources["MainViewModelInstance"];
_mainViewModel = resourceMainViewModel as MainViewModel;


Stage 2 - moving application state variables to ViewModel

A typical sign of a lot of code-behind is when we have a lot of member variables in the View.

  1. A majority of them can be moved directly into the ViewModel.
  2. Provide property get/set on the ViewModel and re-wire the Code-behind logic to use the ViewModel for now.

Exercise some judgement here - not all variables should go to the ViewModel, references to UI elements for example, should remain in the code-behind (view).


Stage 3 - moving application methods to ViewModel, hooking UI events

Once you've moved your variables to the ViewModel - then you can start looking at moving the methods to the ViewModel.

The trickiest part here, if you have started with code-behind, is that there will be methods that have a mixture of application logic along with UI update calls.

An easy, intermediate way to handle these UI calls is to have the VM raise an event at the specific time, and have the View bind to those events and make the UI updates.

Change any UI update code to UI binding syntax - this should be the normal for most VM entity or collections.


Stage 4 - you can start creating Silverlight Unit Tests

By stage 3 - you should have more and more application logic moved back to the ViewModel.  Add a Silverlight Unit Testing project and start instantiating the ViewModel and test the collections and entities can be populated correctly.

From this point onwards because you have the unit tests available you can start to do a lot more refactoring with the methods without worrying that you'll be breaking stuff. 


Stage 5 - calling application methods via Commands

Create a DelegateCommand class - unfortunately one isn't provided with Silverlight (I don't know why)

public class DelegateCommand : ICommand
{
    Func<object, bool> canExecute;
    Action<object> executeAction;
    bool _canExecuteCache;

    public DelegateCommand(Action<object> executeAction, Func<object, bool> canExecute)
    {
        this.executeAction = executeAction;
        this.canExecute = canExecute;
    }

    public DelegateCommand(Action<object> executeAction)
        : this(executeAction, null)
    {
    }
    #region ICommand Members

    public bool CanExecute(object parameter)
    {
        if (canExecute == null)
        {
            return true;
        }

        bool temp = canExecute(parameter);
        if (_canExecuteCache != temp)
        {
            _canExecuteCache = temp;
            if (CanExecuteChanged != null)
            {
                CanExecuteChanged(this, new EventArgs());
            }
        }
        return _canExecuteCache;
    }

    public event EventHandler CanExecuteChanged;

    public void Execute(object parameter)
    {
        executeAction(parameter);
    }

    #endregion
}

In the ViewModel - change the direct method call from the view into a property DelegateCommand, then in the View, change the Click event handler to Command property via Binding to the ViewModel.DelegateCommand


Stage 6 - break UI event hooks by binding storyboards via triggers

This is by far the most trickiest - depending on what sort of UI updates you had in the code-behind, it may be very tricky to convert them into storyboards.

Do your best, but don't go overboard on this one - I don't have a good all-round-fix for this one yet.

SharePoint ClientContext.List is missing?

The SharePoint Object Model has:

  • SPContext Members
  • SPContext.Current (static)
  • SPContext.Site
  • SPContext.Web
  • SPContext.List

By comparison, the SharePoint Client Object Model only has:

  • ClientContext Members
  • ClientContext.Current (static)
  • ClientContext.Site
  • ClientContext.Web
  • ClientContext.List (AWOL missing!)

Here's one trick I've started using - the current list exists on the page in javascript (ctx.listName)

So using Silverlight's Javascript bridge I'm able to test and pull that value back into Silverlight - without any looping through the ClientContext.Web.Lists.

string listName = string.Format("{0}", HtmlPage.Window.Eval("ctx.listName"));
// using string.Format to take care of null problems
// the ctx.listName looks like a guid

List list = _clientContext.Web.Lists.GetById(new Guid(listName));


So taking a step back, this would be the first time I wrote something that uses both client object model at once!

SharePoint 2010 and Silverlight 4.0 Webcam

Tonight's Silverlight play involves Silverlight 4 Web Cam API, and SharePoint 2010 Client Object Model.

SILVERLIGHT 4 WEBCAM API

Silverlight 4's WebCam API is relatively simple:

_captureVideoDevice = CaptureDeviceConfiguration.GetDefaultVideoCaptureDevice();
_captureSource = new CaptureSource();
VideoBrush brush = new VideoBrush();
brush.SetSource(_captureSource);

WebCameraCapture.Fill = brush; // fill rectangle "render" area

var device = _captureVideoDevice.FriendlyName; // check device name during debug
if (CaptureDeviceConfiguration.AllowedDeviceAccess || CaptureDeviceConfiguration.RequestDeviceAccess())
{
    _captureSource.Start();
}

The most interesting part is probably the RequestDeviceAccess call. This call must be initiated in an UI event (click) and will raise the following dialog

clip_image002


TAKING SNAPSHOTS

Once the camera is rolling, clicking the button takes a snapshot and saves it back to the document library.

WriteableBitmap bmp = new WriteableBitmap(WebCameraCapture, null);
MemoryStream stream = new MemoryStream();
// didn't want to save as bitmap - convert to JPEG first
EncodeJpeg(bmp, stream);

var fileCreationInfo = new FileCreationInformation();
fileCreationInfo.Content = stream.ToArray();
fileCreationInfo.Url = string.Format("pic_{0}.jpg", DateTime.Now.Ticks);
var _documentLibrary = _clientContext.Web.Lists.GetByTitle("ListName");
var uploadFile = _documentLibrary.RootFolder.Files.Add(fileCreationInfo);
_clientContext.Load(uploadFile);
_clientContext.ExecuteQueryAsync(delegate{}, delegate{});

In this screenshot I've added the Silverlight web part on top of the asset library list.

clip_image004


WHAT ABOUT VIDEO?

This is where we'll probably get stuck. Silverlight 4 has API to access camera, and we're able to save bitmap data from the camera, but Silverlight 4 lacks the client side encoding libraries capable of saving the bitmap stream back into any meaningful format such as MPEG.

Until Microsoft provides one, or some 3rd party writes one, saving video back to SharePoint document library is going to get put on hold.

REFERENCE

The code for converting to JPEG I copied from http://stackoverflow.com/questions/1139200/using-fjcore-to-encode-silverlight-writeablebitmap.

DOWNLOAD

The Silverlight Camera XAP binaries are in this XAP file 

The Silverlight Camera Sandbox Solution and read me file 


INSTALLATION

  1. Upload the XAP file to a document library, copy the URL to this XAP file.
  2. Create a document library to host all the pictures, open the web part zones on the view page and insert a Silverlight Web Part - use the URL to XAP from step 1.
  3. Remember to refresh the page to see new pictures - the list doesn't refresh automatically.  You can switch on async properties in the web part editor for the pictures and it will update itself on a timer basis.

UPDATE

20 July - Added sandbox solution WSP and a simple read-me file

SharePoint 2010 - Update All List Items SharePoint Designer Workflow Action

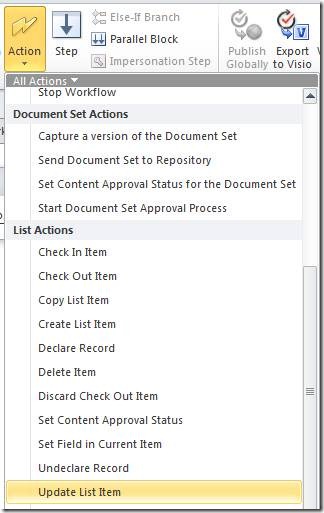
Out of the box - SharePoint provides quite a few different Workflow Actions, but strangely missing was a Workflow action that can loop through and update all items within a list.

clip_image002

Figure: Update List Item (but only works with one item)

Further to my shock was that someone out there (cough Codeplex) hasn't written one yet. So last night I sat down and start to code.  There will be another article about coding and packaging a SharePoint Workflow Activity, but right now, I need to shove my baby out the door.

UPDATE LIST ITEMS v1.0 INSTALLATION

Everything in one WSP file: grab it here

The package includes 3 objects:

  • WorkflowActivity.dll - goes in the GAC
  • WorkflowActivity.ACTIONS - goes into <SharePointRoot>\TEMPLATE\1033\Workflow\WorkflowActivity.ACTIONS
  • <authorizedType> entry needed in Web.Config - I've included a Web Application feature that will do this

To activate the web application feature

clip_image004


UPDATE LIST ITEMS v1.0 USERS GUIDE

clip_image006

In SharePoint Designer, select the "Update All List Items" action from the menu

clip_image008

Or just do the inline typing

clip_image010

There is only 1 dialog for this action - I cheated and reuse the dialog from Update Item Workflow Action

clip_image012

Unfortunately, because I cheated and use Microsoft's dialog - it won't let us finish without specifying a List Item - hence I use the sentence "Update all items in this list (ignore list item)" - sorry - hope that was clear.

clip_image014

OK and trigger the workflow

clip_image016


SUMMARY NOTES

  1. In SharePoint, a workflow can not trigger itself. So even though I have the workflow set against this list - it is only run on the last item.
  2. And because this is version 1 (v1.0) there's some really complex looking code for setting "People or Group" values. So I'm not sure if this works 100% in my implementation.
  3. Obviously, if your list is extremely large you are on your own :-)
  4. One other scenario this opens up is the facility to have a site workflow "trigger" a second workflow set on a particular list (remember - workflow can't trigger itself).

Silverlight - merging detached object back to the attached data context

This is a short post on something that we did in the days of Silverlight 2~3, before we have RIA services.

Consider two method signatures on the service:

  1. public EntityPerson GetPerson(object key);
  2. public void SavePerson(EntityPerson person);

Silverlight gets an EntityPerson object, exposes it via the ViewModel for databinding.  The user hits the save button, and the data is coming back through the wire.

It comes back to SavePerson, but the object is disconnected.

The way we've always done this is this way:

//Update or Insert person:
if (entityPerson.PersonID > 0) //update 
{
    EntityKey key = entities.CreateEntityKey("tblPerson", entityPerson);
    object originalItem;
    if (entities.TryGetObjectByKey(key, out originalItem))
    {
        // merge changes from the client back to the dataset
        entities.ApplyPropertyChanges(key.EntitySetName, entityPerson);
    }
}
else//insert new 
{
    entities.AddObject("tblPerson", entityPerson);
}

ApplyPropertyChanges works very well and takes a lot of the work out of our hands.  You can attach a very simple conflict detection if you have a Timestamp field, and by setting the ConcurrencyMode=Fixed.

Saving Changes and Managing Concurrency
How to: Manage Data Concurrency in the Object Context
Flexible Data Access With LINQ To SQL And The Entity Framework

I was recently involved in a short discussion on this topic, and was intrigued to go digging and get to the bottom of it all.  Hope these links help someone :-)