Silverlight 5 was quietly released to the world to very little fanfare, considering the looming Windows 8 launch with WinRT next year, and the world (at least, Microsoft)'s shift to HTML5.
Still, there are a few gems in this version over Silverlight 4, in particular, you can now run trusted mode in browser, and trusted mode now has access to platform invoke.
That's right, repeat after me: Silverlight, in browser, unmanaged code.
And I just happened to have the perfect problem I've been wanting to solve forever.
Problem
One thing that has always peeved me when using the Rich HTML control in SharePoint is when it comes to imbedding images. You can't easily add a picture to your Rich HTML, you need to open a different browser window, upload the picture, then find a link to that picture and insert it back in the HTML.
CTRL-V
Wouldn't it be nice if you could just paste a picture directly to SharePoint, like you could in Word, or Windows Live Writer. The end user doesn't need to figure out where the picture will go. SharePoint will do that. Such a thing isn't possible with mere HTML since it doesn't support access to binary clipboard, but with Silverlight 5 we can now provide a solution.
Steps
- Configure in browser trusted mode
- Setting up Silverlight with native p/invoke calls to access the clipboard
- Using GDI to convert clipboard bitmap to a temporary PNG image file
- Upload PNG to SharePoint, using SharePoint client object model
- Insert HTML image reference in Silverlight Rich Text editor
- Update SharePoint page content from Silverlight Rich Text editor
1. Configure In Browser Trusted Mode
The easy step. Head over to Silverlight project properties in VS.NET
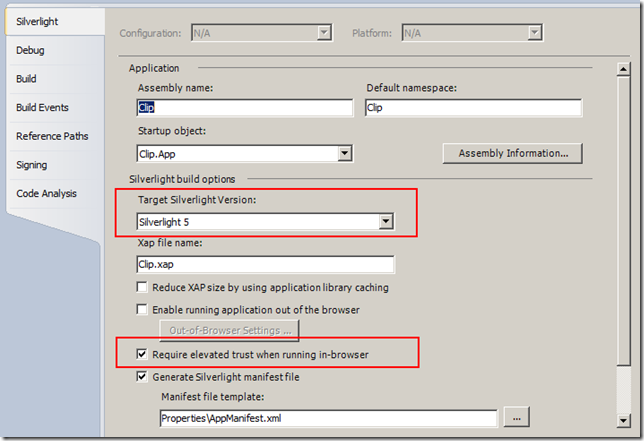
Figure: Silverlight 5 specialty, elevated trust running in-browser.
2. Setting up Silverlight with native p/invoke and talk to the clipboard natively.
internal class Native
{
[DllImport("user32.dll", EntryPoint = "CloseClipboard", SetLastError = true)]
[return: MarshalAs(UnmanagedType.Bool)]
public static extern bool CloseClipboard();
[DllImport("user32.dll", EntryPoint = "GetClipboardData", SetLastError = true)]
public static extern IntPtr GetClipboardData(ClipboardFormat uFormat);
[DllImport("user32.dll", EntryPoint = "IsClipboardFormatAvailable", SetLastError = true)]
[return: MarshalAs(UnmanagedType.Bool)]
public static extern bool IsClipboardFormatAvailable(ClipboardFormat format);
[DllImport("user32.dll", EntryPoint = "OpenClipboard", SetLastError = true)]
[return: MarshalAs(UnmanagedType.Bool)]
public static extern bool OpenClipboard([In] IntPtr hWndNewOwner);
}
In my paste function:
private void Paste()
{
if (!Application.Current.HasElevatedPermissions)
{
MessageBox.Show("No Elevated Permissions - can't do p/invoke :'-(");
return;
}
IntPtr p = IntPtr.Zero;
bool opened = Native.OpenClipboard(p);
if (!opened)
{
return; //unhappy
}
try {
if (Native.IsClipboardFormatAvailable(ClipboardFormat.CF_BITMAP))
{
IntPtr p4 = Native.GetClipboardData(ClipboardFormat.CF_BITMAP);
// GASP. We have a pointer to our bitmap!
}
}
finally
{
Native.CloseClipboard();
}
}
3. Using GDI to convert clipboard bitmap to a temporary PNG image file
It's awesome we have a pointer, but what do we do with it? This next part eluded me for months, I had to stop work, and go on the Internet to ask for help. 3 months later, at the end of 2011 a reply came through. Use GDI+ to convert the pointer to a file! Genius! Bravo!
Note that in the GDI+ GdipSaveImageToFile call, I use the PNG Encoder - so the bitmap is saved in PNG format in my temporary file.
Oh, right, more native p/invoke, different DLL this time.
internal class Native
{
... <snip earlier clipboard p/invoke>
[DllImport("gdiplus.dll", CharSet = CharSet.Unicode)]
public static extern int GdipCreateBitmapFromHBITMAP(IntPtr hbitmap, IntPtr hpalette, out IntPtr bitmap);
[DllImport("gdiplus.dll", CharSet = CharSet.Unicode)]
public static extern int GdipSaveImageToFile(IntPtr image, string filename, ref Guid classId, IntPtr encoderParams);
[DllImport("gdiplus.dll", CharSet = CharSet.Unicode, ExactSpelling = true)]
public static extern long GdiplusStartup(out IntPtr token, ref GdiplusStartupInput gdiplusStartupInput, out IntPtr gdiplusStartupOutput);
[DllImport("gdiplus.dll")]
public static extern void GdiplusShutdown(IntPtr token);
}
IntPtr gdipToken = IntPtr.Zero; ;
string fileName = string.Empty;
try
{
IntPtr gdiplusStartupOutput;
GdiplusStartupInput input = new GdiplusStartupInput(1);
long num0 = Native.GdiplusStartup(out gdipToken, ref input, out gdiplusStartupOutput);
IntPtr zero = IntPtr.Zero;
IntPtr palette = IntPtr.Zero;
int num = Native.GdipCreateBitmapFromHBITMAP(p4, palette, out zero);
if (num != 0)
{
return;
}
// JPG Encoder {557CF401-1A04-11D3-9A73-0000F81EF32E}
// PNG Encoder {557CF406-1A04-11D3-9A73-0000F81EF32E}
Guid classId = Guid.Parse("{557CF406-1A04-11D3-9A73-0000F81EF32E}");
fileName = System.IO.Path.GetTempFileName();
int img = Native.GdipSaveImageToFile(zero, fileName, ref classId, palette);
if (img != 0)
{
return;
}
}
finally
{
Native.GdiplusShutdown(gdipToken);
}
4. Upload PNG to SharePoint, using SharePoint client object model
using(FileStream fs = File.OpenRead(fileName))
{
SP.ClientContext ctx = SP.ClientContext.Current;
SP.Web web = ctx.Web;
SP.List library = web.Lists.GetByTitle("Images");
byte[] content = new byte[fs.Length];
var newFile = new SP.FileCreationInformation();
int dummy = fs.Read(content, 0, (int)fs.Length);
newFile.Content = content;
newFile.Url = string.Format("paste_{0}.png", DateTime.Now.Ticks);
var uploadFile = library.RootFolder.Files.Add(newFile);
ctx.Load(uploadFile);
ctx.ExecuteQueryAsync(
delegate {
this.Dispatcher.BeginInvoke(() =>
{
// update our rich text editor in step 5!
});
},
delegate { // our code don't fail!
});
}
5. Insert HTML image reference in Silverlight HTML Text editor
I'm using the wonderful free VectorLight.NET Liquid HTML Editor control. Need free registration. Supports converting between Rich XAML and HTML formats. Here I'm inserting a <Xaml><Image /></Xaml>
ctx.ExecuteQueryAsync(
delegate {
this.Dispatcher.BeginInvoke(() =>
{
this.listBox1.Items.Add(uploadFile.ServerRelativeUrl);
InlineUIContainer container = new InlineUIContainer();
Uri server = new Uri(ctx.Url);
string path = string.Format("{0}://{1}{2}", server.Scheme, server.Host, uploadFile.ServerRelativeUrl);
this.richTextBox1.Insert(string.Format("<Xaml><Image Source=\"{0}\" /></Xaml>", path));
});
},
delegate {
});
5.1 Pictures - just to prove it works

Figure: Pasting picture into HTML Editor within Silverlight.

Figure: My SharePoint image library, filled with pasted images :-)

Figure: Dumping Editor's HTML to MessageBox - you can see the <img> HTML is inserted properly.
6. Update SharePoint page content from Silverlight Rich Text editor
This part is the most ugly bit of the code. Heavily nested since I keep using anonymous delegates, and it's pretty late so I'm not going to clean it up tonight.
The Save button click.
private void buttonSave_Click(object sender, RoutedEventArgs e)
{
var ctx = SP.ClientContext.Current;
var library = ctx.Web.Lists.GetByTitle("Site Pages");
var items = library.GetItems(SP.CamlQuery.CreateAllItemsQuery());
var filepath = this.autoCompleteBox1.Text; // I store a list of pages in the dropdown...
ctx.Load(items);
ctx.ExecuteQueryAsync(
delegate
{
// switch back to UI thread
this.Dispatcher.BeginInvoke(() =>
{
SP.ListItem page = null;
foreach (var item in items)
{
// super ugly code - should filter the files in the CamlQuery above - but too tired to write Caml
if (item["FileLeafRef"].ToString() == filepath)
{
page = item;
}
}
page["WikiField"] = this.richTextBox1.HTML;
page.Update(); // update SPListItem, then ExecuteQuery to push the update back through ClientService.svc
ctx.ExecuteQueryAsync(
delegate
{
// switch back to UI thread
this.Dispatcher.BeginInvoke(() =>
{
// refresh browser
HtmlPage.Document.Submit();
});
},
delegate { });
});
},
delegate
{
});
}

Figure: The Silverlight webpart pushing HTML back into a Wikipage
There are some notes on security, which I leave right at the end, but this is important.
Trusted mode / In Browser
- When running under http://localhost/ SL5 skips checking this (easy for debug)
- For normal operation, requires Silverlight XAP file to be signed with a code trust certificate. You can generate one yourself, just make sure you add it to the right store.

Figure: Yes... Trusted Root Certification Authorities. Yep sounds about right!
- And requires a registry key to be present for Silverlight

FIgure: OMG #1, Registry, really!?
- You will need to deploy this to your uses via a group policy, or a click once application if your user has permissions to write to their own registry.
This bit I think is the part that makes the solution safe, but also very difficult to deploy. But if you want the nice editing experience with paste functionality, here you go!
Downloads
- XAP file (Contact me for the XAP file - it needs a bit of cleaning up, and I need to test the certificate)
- SPClip cert
And here we go, first big post of the year. Have a great 2012 everyone!
