Two ways to convert SharePoint files to PDF via Flow

This blog post is divided into three sections: The easy, The Auth and The Complete parts.

Microsoft Flow released a new power to Convert Files to PDF.  This made my October.  So of course we have to play with this.

Part 1. The Easy

Now this work well, but raises a few questions: 

  1. Why do I have to copy to OneDrive for Business?
    Because the Convert File action is also available for OneDrive for consumer, but not SharePoint
     
  2. Can I do this without copying to OneDrive for Business
    Not with the default Actions for now.  There's no Convert File for SharePoint Connector.  And SharePoint Connector's Get File Content action doesn't allow a format parameter.
convert-file-actions.png

And this is the simplest solution.

Warning: Next be dragons (Auth and API)

We are going to dive in to see what API this uses.  And whether we can call the same API on SharePoint library document directly without copying the file to OneDrive first.

This next part is good for you.  But it is heavy and will look complicated.  Brace yourselves.

...So what API does this use?

https://docs.microsoft.com/en-us/onedrive/developer/rest-api/api/driveitem_get_content_format

GET /drive/items/{item-id}/content?format={format}
GET /drive/root:/{path and filename}:/content?format={format}

Specifically, this uses the Microsoft Graph

Part 2. The Auth

Disclaimer - OAuth looks familiar, but steps are always tricky.  Easy to mess up.  So if you are following this through, walk carefully.

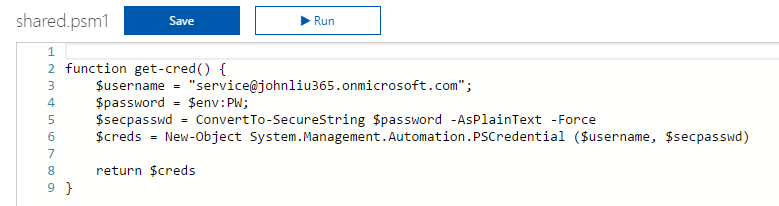
For the next part, we need to connect to MS Graph with AppOnly permissions

In Azure Portal - under Azure AD - create an App Registeration (I'm reusing a powershell-group-app one I had previously baked)

client-id.png

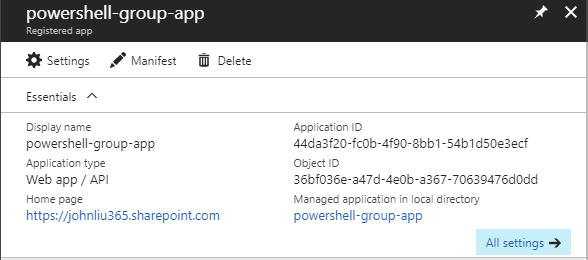
We will be accessing files - so make sure Application Permissions for read files is granted.  This requires admin consent.

client-perms.png

Via the Azure AD portal - hit Grant Permissions to perform admin consent directly.

client-grant.png

Now we are going to write the Flow with HTTP requests

hit the token endpoint for our tenant with a POST message.  The Body must be grant_type=client_credential with client_id, client_secret and the resource is https://graph.microsoft.com

this request if successful will give us back a JSON.  Parse JSON with this schema:

{
    "type": "object",
    "properties": {
        "token_type": {
            "type": "string"
        },
        "expires_in": {
            "type": "string"
        },
        "ext_expires_in": {
            "type": "string"
        },
        "expires_on": {
            "type": "string"
        },
        "not_before": {
            "type": "string"
        },
        "resource": {
            "type": "string"
        },
        "access_token": {
            "type": "string"
        }
    }
}

This gives Flow a variable for access_token for the remainder of the steps to use to call Microsoft Graph

Test this by calling the MS Graph endpoint for SharePoint site

token-test.png

This HTTP request with the Bearer access_token successfully returns SharePoint site data from Microsoft Graph.


Part 3.  The Complete Solution to fetch SharePoint document as PDF

Call /content?format=PDF

get-content-format-redirect.png

A few things going on in this result.  

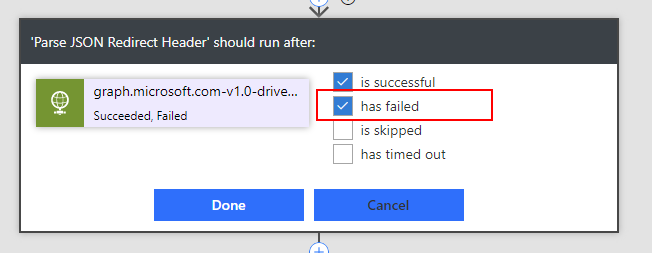
  1. Flow thinks this request has failed - because it doesn't return a 2xx status.  It returns a 302 redirect.
  2. The Response header contains the Location of the redirect, which is where the PDF file is

Parse JSON again on the Response header.  

{
    "type": "object",
    "properties": {
        "Transfer-Encoding": {
            "type": "string"
        },
        "request-id": {
            "type": "string"
        },
        "client-request-id": {
            "type": "string"
        },
        "x-ms-ags-diagnostic": {
            "type": "string"
        },
        "Duration": {
            "type": "string"
        },
        "Cache-Control": {
            "type": "string"
        },
        "Date": {
            "type": "string"
        },
        "Location": {
            "type": "string"
        },
        "Content-Type": {
            "type": "string"
        },
        "Content-Length": {
            "type": "string"
        }
    }
}

We just want Location.  We also need to configure Continue on previous HTTP error.

redirect-continue.png

And finally, retrieve the file via GET again

fetch-return.png


When ran, the flow looks like this:

run.png


Summary

The complete solution uses HTTP to call MS Graph directly and pulls back the PDF file after a 302 Response.  This is a fairly complex example so please evaluate whether you want the Correct Way or the Easy Way.

Note also that Microsoft Flow has a Premium connector for Azure AD Requests - which will negate the middle part of this blog post re: Auth and let you dive right into MS Graph REST endpoints without worrying about access_tokens.  

Call this Flow request and it downloads the PDF file, converted from a DOCX document in SharePoint team site.


Review Special Techniques Invoked:

  • MS Graph Auth
  • The Continue on Error configuration
  • Parse JSON on Response Header


Auto-Classify Images in SharePoint Online library via Flow for Free

Microsoft Flow's most recent update added ability to query and update SharePoint File property.  This is actually really timely, as I wanted to combine this with a few other techniques and built a Document Library Image Auto-Classifier Flow.

Is that a clickbait headline?  Well it's totally real, and we'll build it in a moment.

result-1.png

Steps:

  1. Set up your cognitive service account (understand the free bucket)
  2. Set up a SharePoint Online document library with Categories
  3. Set up the Flow file loop
  4. Do a fancy JSON array to concatenated string projection operation with Select and Join
  5. Viola, no code.  And pretty much *free*

This is part of a series on Microsoft Flow

Set up your Azure Cognitive Service instance

Follow these simple steps to create an Computer Vision API Cognitive Service in your Azure.  Computer Vision API has a free tier.

1. Create Computer Vision API

1. Create Computer Vision API

2. Scroll down and hit Create

3. Give this service a name, set up the region and select Free pricing tier

4. You need the endpoint url here

4. You need the endpoint url here

5. Also, copy the Name and key 1

5. Also, copy the Name and key 1

You will need the "Name" and a "Key" for the next step.

The free tier of Computer Vision API - first 5000 transactions free per month.

Note the service isn't available in all regions.  Most of my stuff is in Australia East, but for the Cognitive Service API it has to be hosted in Southeast Asia.  YMMV.

Then we need to set up the connection in Flow

1. Find the Computer Vision API action

1. Find the Computer Vision API action

2. Enter service name, key and the root site url to set up the initial connection

3. Created correctly, you get an action like this


Set up the SharePoint Document Library

My SharePoint document library is very simple - it is just a basic document library, but I added an extra site column "Categories". This is an out of the box field, and is just a simple text field.

This is a simple step

This is a simple step

Set up the Flow

I trigger the flow with a Scheduled Recurrence that runs once per day.
Using the new Get Files (properties only), I grab a list of all the files in a document library.
I then run for-each on the list of files.

Inside the for-each, I have a condition that checks if the Categories field is null.  If you type null directly into the field, you will get the string 'null'. 

Tip: To actually get the formulat/expression null, select Expressions and type null there.

If the Categories is null, then we proceed.

Grab the file content via Get file content
Call Computer Vision API with the image content.  Select the Image Source to binary, instead of URL.

Tip: I use a compose to see the debug results

I'll explain the array projection in the next section.

Select projection: JSON array to String array

We have an array of JSON objects:

[{
     'name': 'foo'
},
{
    'name': 'bar'
}]

flow-project-1.png

This default UI maps to:

tags -> [{ specified properties }…]

The result is that we would end up with a new array of (simpler) JSON objects.
Hit advanced text mode.

flow-project-2.png

Here, we can use Expression to say item('Tag_Image')?.name

flow-project-3.png

In this case the UI is smart enough to show Tag.Name as a dynamic content (as well as the Tag.ConfidenceScore property).  So we can select that.

This performs a projection of

tags -> [ names… ]

We now have an array of strings.  Combine them via Join with a comma (,) separator.
Update the file properties with this string.

flow-project-4.png

Lets see the results

I uploaded a few images to the library.
Note the categories field is blank.

result-2.png

Running the Flow

When it finishes, I'm checking the JSON - the picture is identified with a "person" with 99% confidence.
The combined string "person,young,posing" is updated into the File property.

The documents are updated.  When Flow runs tomorrow it will skip them.


The Final Flow

Building Binary output service with Cognitive Services and Microsoft Flow

We covered how to do binary webservices with Microsoft Flow.  A question then lingers in my mind.  If you can push binary data into a Flow, and within the Flow you can pass it around...  Can you output a binary file from Flow?

This question bothered me so much in my sleep, I decided to test it and write this blog.  And thus, we have probably the simplest example of the series.

  1. So we will first build a service endpoint that can return binary data.
  2. Then we will send it through cognitive services and tag some data as we go.

This is a post in a series on Microsoft Flow.

  1. JSON cheatsheet for Microsoft Flow
  2. Nested-Flow / Reusable-Function cheatsheet for Microsoft Flow
  3. Building non-JSON webservices with Flow 
  4. One Connection to Proxy Them All - Microsoft Flow with Azure Functions Proxies
  5. Building Binary output service with Cognitive Services and Microsoft Flow

Build a Flow to output non-text Output

The method needs to be set to GET.  Take a image that's authenticated in SharePoint, and set that to be the response output.

Test this with Postman

A few things to note:

  1. The request is a GET request.
  2. It replies with image/png (content type was automatically worked out)
  3. ... and that's it, there's not a lot to say

Add Cognitive Services - Computer Vision

You'll need to create a Cognitive Services in your Azure Subscription.  The free tier offers 5000 images per month, at 20/minute.

We are taking the output of the tag action and adding that to the tags header in the service response.

And here we have the same image, but now with tags in the output.

Smart dogs.


Why do we need this?

  1. This means - we can post image in, and we can get image out
  2. May be you need to proxy a resource within SharePoint that is authenticated - but you want to use it directly as a file.  If you use a SharePoint Sharing link it'd take you to a page.
  3. With this direct link to the file, you can use this as an anchor within HTML, or use this to upload a file to an external system (via URL).
  4. May be this isn't a file, but a generated ZIP file that you want to copy somewhere else.  Or it is a docx file.
  5. Or perhaps you want to send a picture to a Flow, then resize it or run it through cognitive services before getting back the result.
  6. May be you are just mad and want to auto-tag every image in your SharePoint?
    That actually sounds amazing.

Because Microsoft Flow lets us push binary through actions, I think there's a bunch of interesting scenarios for this.

Also, I think assistant branch manager and branch manager are awesome.


Speaking at Digital Workplace Conference Australia 2017

I'll be speaking at the Digital Workplace Conference Australia!  23-24 August in Sydney.


This is a conference that's near and dear to me - and I've had several opportunities in the past to present at this conference, where I covered Silverlight, JavaScript, TypeScript, Modern Office App-ins and now this year - I plan to present a supercharged talk on running Serverless with Office 365.

Parts of the talk - especially how to get started - may seem familiar to many of you that has started down this journey. 

I wanted to focus a bit less on the technical, and more about how this has changed people. 

Azure Functions democratized 'I need to run a bit of code' to everyone.  Suddenly, the cloud is not this scary place where there are a hundred things we don't know, and don't know where to start.  Suddenly, the toys that seems far out of reach are ours.  Suddenly, a cloud subscription that costs less than a coffee per month is something I don't even think about.

To me, that is the power of AzureFunctions and why Serverless is a game changer. 

Do you know there are now brand new categories of design patterns specifically rewritten for the Serverless world.

I will of course still cover the technical bits - but to see all 20+ demos I have with me, you'll have to come find me in the speaker area for a personal demo :-)

In Digital Workplace Conference 2017, I want to talk about Serverless.

And I want to talk about humans.  Us.

I think the future will be amazing.  I hope to see you at the DWC Australia.  Come and grab me and say hello!

Reusing functions in PowerShell AzureFunctions

This is a pretty simple blog.  Take one of the examples I've been using often: 

https://github.com/johnnliu/azure-functions-o365/blob/master/sharepoint-list-email.ps1

This PowerShell uses PnP-PowerShell to:

  • Connect to SharePoint Online
  • Pulls a list from Document Library
  • Format as HTML Table
  • Send to an email with SPO SendMail utility endpoint

One of the most common, repeated step I do in almost every Function is to get credential and authenticate.  So I decided to put it into a shared function.

Refactor this into a separate function

Use the file navigator on the right hand pane - add a new file, call it "shared.psm1" this is a PowerShell Module file.

Create a function get-cred() and put the 4 lines of getting $username and encode PSCredential into this function, then return $creds

Finally, reference the module via:

Import-Module "D:\home\site\wwwroot\get-list-and-email\shared.psm1"

# call get-cred inline here
Connect-PnPOnline -url $siteUrl -Credentials (get-cred)

The path is the name of the function, that points to the current directory.
From now on, in every other function, you can just import that module to share the function.

If you use a separate shared directory under the wwwroot\shared level - that's a good place to put these shared modules too.  But note that you can't access that area via the Files right-hand pane.  You'll need to go there via the Kudu interface.


I consider putting get-cred away as a preparation step for one day in the future where I would replace that function with a call to Azure KeyVault to obtain the PSCredential object. When that refactoring happens, I will only need to update one place.