InfoPath - managing lots of tooltip in your browser form
/This is an idea that I've been brooding for a long time. Finally got a prototype implemented.
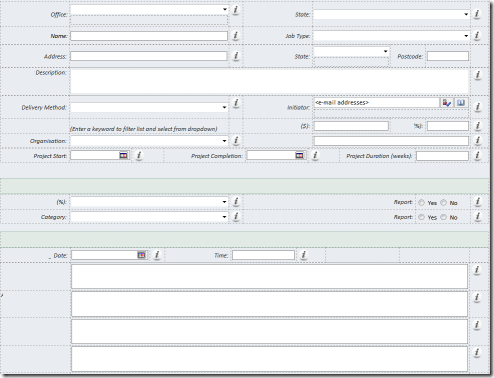
We have a complicated looking InfoPath form. We've always wanted to have lots of help (i) tooltips. The picture below alone has 24 information tips.
The original plan is to use an Picture button, set the image to the image resource (so that they all share the same resource), and manually add tooltips to each button.
This approach works OK, but is very tedious. Each one of our views are massive, and we have about 10 of them. Some fields re-appear on different views and need to have the same tooltip. This is also not very manageable - we can't modify the tooltip easily without republishing the InfoPath form.
An idea begin brewing by combining an external XML file along with the Rich HTML control, something that I've experimented recently.
/blog/2011/5/30/infopath-2010-embed-html-for-rich-and-web-forms.html
/blog/2011/10/12/infopath-an-example-of-using-an-xml-file-for-special-charact.html
Idea!
- Produce an XML file that has all our tooltips.
- Store this file in SharePoint
- In InfoPath, connect to this XML file as an external datasource, always load it from server
- Bind the XML fields to Rich HTML controls
1. My tooltip XML file.
My XML file, with 2 entries in it for "office" and "state".
Note the content of the two entries is essentially a HTML IMG tag. With the source pointing to an image stored in SharePoint, and a tooltip.
<?xml version="1.0" encoding="utf-8"?>
<html>
<office>
<img xmlns="http://www.w3.org/1999/xhtml" src="/Style Library/Images/info.png" border="0" title="Select the Office that will administer this project" />
</office>
<state>
<img xmlns="http://www.w3.org/1999/xhtml" src="/Style Library/Images/info.png" border="0" title="Select the State that this project will report to" />
</state>
</html>
2. Store this file in SharePoint
I store this in SharePoint, on /Style Library/html-tooltip.xml.
3. Add secondary data source in InfoPath
Add XML datasource.
Select "Access the data from specified location"
Always retrieve data
Result data connection
4. Bind to Rich HTML controls
Switch to the secondary data source in the Fields tool pane.
Drag my new entry for "State" with the right click contextual menu.
Select Rich Text Box
There's quite a bit of clean up to do:
- Remove the label
- Set the background shade to No Fill
- Set border to 1px solid white - you must keep 1px border, otherwise when you hover over the picture the Rich Text box will shift as InfoPath adds a focus to the box.
- Set the height and width to 25px (size of my images).
- Select Read-Only in the ribbon
- The result:
Extra Note
You must show the web form Ribbon, otherwise the Rich Text is rendered differently in an iFrame, and the IMG tooltip won't show up. Sorry, this behaviour is so weird, I do have an ugly workaround but I won't publish it - really ugly.
See it in action:
And if you need to change the text, open up the XML file in SharePoint designer, change it, and save the XML file again.
Summary
- A technique to use one XML file in SharePoint to specify many HTML tooltip elements to be used within an InfoPath form
- This allows tooltips to be updated independently of templates, and multiple elements in the InfoPath form can share and reuse the same tooltip


