Angular 4, SharePoint On-Premises, localhost development and SP-REST-Proxy

We've been running Angular 4 (via ng-cli) on our SharePoint On-Premises environment for a while, I wanted to just take a short time and jog down our battle notes. 

Especially, as a thank you to @AndrewKoltyakov who built https://github.com/koltyakov/sp-rest-proxy

If there are areas that are unclear, let me know in the comments and I'll try to clarify.

package.json

  "scripts": {
    "ng": "ng",
    "hmr": "ng serve --hmr --environment=hmr --verbose --proxy=proxy.conf.json",
    "debug": "ng serve --environment=hmr --verbose --proxy=proxy.conf.json",
    "prod": "ng serve --env=prod --verbose --proxy=proxy.conf.json",
    "serve": "ng serve -e=source --verbose --proxy=proxy.conf.json",
    "build": "ng build --env=prod --aot ",
    "bundle-report": "webpack-bundle-analyzer dist/stats.json"
  },

We added additional scripts to our package.json.  This just means we can easily switch to different modes without forgetting which arguments we messed up.

"serve" was the basic one that says run localhost.  We don't use this one now as much, as we love hot module reloading (hmr).

We use "--proxy" to set up Angular/Webpack-Dev-Server's proxy settings via a separate proxy.conf.json file.

https://github.com/angular/angular-cli/blob/master/docs/documentation/stories/proxy.md

"debug" was the same as "prod" except it doesn't have Angular's production flag.  This makes things faster somehow.  In reality, if you want Angular to be blinding fast, use --aot

"hmr" is nearly the same as "serve, and runs out of localhost".  Use the Angular --proxy 

"build" compiles everything with --prod and --aot.  Does not run locally.

We use different Angular environment settings to set up mock proxies, and apply a slightly different header CSS so we know at a glance which environment we are in.

I'm going to hear the question: Why so many different variations?!  That's so confusing.

Well, they are all different.  And nobody can decide which one is the best for which scenario.  So we keep writing new ones!  

Deal with it :-)

environment.ts

A quick note on our Angular environment, before we get into the proxy configurations.

// environment.hmr.ts
export const environment = {
  production: false,
  source: true,
  hmr: true,
  mock: require("../app/core/testData.json"),
  jquery: require("jquery")  
};

Depending on which --env=hmr is used, the corresponding environments/environment.hmr.ts is loaded.  

We put variables that affect different code execution in this environment file.  We also find this to be a good place to load big mock json files.

Sometimes you want to run the application locally and you aren't in office, so even the proxy won't work - we will then fall back to local mock json data sources.

hot module reloading (HMR)

HMR needs a separate blog post to describe it.  We followed this:

https://medium.com/@beeman/tutorial-enable-hrm-in-angular-cli-apps-1b0d13b80130#.2p0n6oo34

// main.ts
const bootstrap = () => {
  return platformBrowserDynamic().bootstrapModule(AppModule);
};

if (environment.hmr) {
  if (module['hot']) {
    hmrBootstrap(module, bootstrap);
  } 
  else {
    console.error('HMR is not enabled for webpack-dev-server!');
    console.log('Are you using the --hmr flag for ng serve?');
  }
} 
else {
  bootstrap();
}

When HMR is enabled via environment variable, we have a slightly different bootstrap mechanism.

proxy.conf.json

{
    "*/_api/**": {
        "target": "http://localhost:8080",
        "secure": false,
        "changeOrigin": true
    },
    "/style%20library/**": {
        "target": "http://localhost:8080",
        "secure": false,
        "changeOrigin": true
    },
    "/Style%20Library/**": {
        "target": "http://localhost:8080",
        "secure": false,
        "changeOrigin": true
    },
    "*/sp2016/**": {
        "target": "http://localhost:8080",
        "secure": false,
        "changeOrigin": true
    }
}

We re-route several localhost calls in Webpack-Dev-Server to the SP-REST-Proxy  
We also send relative URL asset requests through SP-REST-Proxy.

SP-REST-Proxy

// serve.js
const RestProxy = require('sp-rest-proxy');
const path = require('path');
const settings = {
    configPathpath.join(__dirname'/_private.conf.json'), // Location for SharePoint instance mapping and credentials 
    port8080,                                              // Local server port 
    staticRootpath.join(__dirname'/static')                 // Root folder for static content 
};
 
const restProxy = new RestProxy(settings);
restProxy.serve();

This is the main starting server.js 

{
    "siteUrl": "http://sp2016",
    "domain": "SPG",
    "username": "jliu",
    "password": "********" 
}

This is _private.conf.json, everything is routed to SharePoint On-Premises as me.

Images and CSS we place in a static subfolder which mirrors the SharePoint root web style library.

\static
    \style library
        \cloud.jpg
        \main.css
\server.js
\_private.conf.json

Start SP-REST-Proxy and it will bind all localhost:8080 calls over to SharePoint, or to its static file system.

localhost development

And that's pretty much how we set up Angular 4, WebPack-Dev-Server (with --proxy), SP-REST-Proxy, various different environment variables and wire everything to different npm run scripts.

Our main favourites:

npm run hmr
This option runs localhost, with SP-REST-PROXY to real on-premises server.

npm serve
This option runs localhost with mock data.  Also uses SP-REST-PROXY for static resources.  But Angular data services does not make real calls - just mock ones.

npm build
This option builds with -production and --aot
We chain this with SP-SAVE to upload this into our on-premises development environment.

npm run bundle-report
This runs a bundle report check and is fun eye candy to help us understand what the hell got webpacked.
 

Gaps between PowerBI streaming tiles and SharePoint

So I spend an evening playing (I actually have a lot of fun exploring these things) and figuring out how the pieces of SharePoint, PowerBI and Flow are supposed to work together.

In my head - they already connect.  But I have never seen anyone blog them.  So I decided to give it a stab.

Turns out there are some gaps.

The Idea

The Idea is simple.  We can create a PowerBI that uses SharePoint List as a datasource.  But instead of configuring scheduled refresh, we want to use the PowerBI Rest Dataset to push data in a streaming way.  And since Microsoft Flow has an action to do this, as well as the triggers to listen to SharePoint List.  We can get SP List-push-to PowerBI without needing schedule refresh.  That is a crazy fun idea.

The Reality

The reality is that there are several gaps.  These are probably solvable, but I just want to list them first, and we'll tackle them in the future.

Gap 1.  SharePoint List dataset != Push-enabled REST dataset

PowerBI makes a distinction between what's a REST/Pushable Dataset vs normal datasets like external lists.  In fact, Flow can not connect to a non-REST dataset.

So we need to create a REST dataset in PowerBI Service (it is not a feature of PowerBI Desktop), and then use the REST dataset as a live connection in a PowerBI Report.

Gap 2.  The only way to create a PowerBI REST dataset is via the REST API. 

There is no UI.  Ouch.  That pretty much makes this a developer task.  OK that's fine, we create a REST dataset via REST endpoint and a JSON schema (double ouch).  

Now we can build our PowerBI report, connect the REST dataset from PowerBI Service.  We save and publish this report to PowerBI Service and then insert the PowerBI Report in an SPFx webpart (PRO license needed for embed) into a SharePoint modern page.

This part is actually really seamless.  Don't worry, we have more gaps.

Gap 3. PowerBI report does not livestream REST dataset results.  

So I'm staring at my PowerBI visual in a SharePoint modern page.  In a separate window, I update the source SharePoint List.  In yet another separate window, I can see the Flow ran and push the new list item into the streaming dataset.

Excellent.  Except, the SPFx PowerBI Report Visual isn't updating.  It doesn't update.  I waited 15mins for it to do nothing!

If I F5, then I immediately see the new value.  But it doesn't do live streaming refresh :-(

It turns out, to see live stream results we need a PowerBI Dashboard or PowerBI Tile (streaming tile).

PowerBI Dashboard can only be created in the PowerBI Service.  We take an existing report and pin the visual.  This asks us to add the visual as a tile in a PowerBI Dashboard.

Gap 4. SPFx PowerBI report webpart does not show PowerBI dashboard embed.

So I create a PowerBI Dashboard and I go back to the SPFx PowerBI Preview webpart.  Only to find it doesn't do dashboard embed.

It only does Report embed.  So we will need to build our own SPFx that let us do dashboard embed.  This requires a embed token from MSGraph - but we should be able to piggyback the graph-util helper in SPFx to do our token exchange.

There's potentially one more issue.

Gap 5.  Does embed PowerBI Dashboard or Tile actually connect to streaming datasets?

I don't know the answer to this yet.

Gap 6. PowerBI REST Dataset endpoint can only add rows, not update them

The REST API lets us add rows to a REST dataset easily, or clear the table.  But there's no way to update an existing row.

The use case for the streaming REST dataset is like a ongoing stock ticker or temperature meter.  You don't update a record that's streamed past.  You only care about new records.

Flow only has an action to add row to PowerBI Dataset.

Gap 7. Flow does not have an action to Clear the dataset

The REST API lets us clear the dataset table, so technically, I could clear the table each time and repopulate it with the entire list again.

But unfortunately, Flow only has one PowerBI Action - add row to a REST dataset.  It does not have a clear rows action.

More work to do, more exploration to be had

Parts of the puzzle works really well.  Flow pushes data freely from SharePoint list changes into the streaming dataset.  If the dashboard or tile is shown on a webpage by itself, we immediately see it update like magic.

But if we want the dashboard/tile embedded within a SharePoint modern page.  There's still work to be done.

Ultimately, if we want live streaming data capability, it might be easier to use PowerBI LiveQuery against Azure SQL, and have Flow push data into that, instead of PowerBI REST streaming Dataset.


Auto-Classify Images in SharePoint Online library via Flow for Free

Microsoft Flow's most recent update added ability to query and update SharePoint File property.  This is actually really timely, as I wanted to combine this with a few other techniques and built a Document Library Image Auto-Classifier Flow.

Is that a clickbait headline?  Well it's totally real, and we'll build it in a moment.

result-1.png

Steps:

  1. Set up your cognitive service account (understand the free bucket)
  2. Set up a SharePoint Online document library with Categories
  3. Set up the Flow file loop
  4. Do a fancy JSON array to concatenated string projection operation with Select and Join
  5. Viola, no code.  And pretty much *free*

This is part of a series on Microsoft Flow

Set up your Azure Cognitive Service instance

Follow these simple steps to create an Computer Vision API Cognitive Service in your Azure.  Computer Vision API has a free tier.

1. Create Computer Vision API

1. Create Computer Vision API

2. Scroll down and hit Create

3. Give this service a name, set up the region and select Free pricing tier

4. You need the endpoint url here

4. You need the endpoint url here

5. Also, copy the Name and key 1

5. Also, copy the Name and key 1

You will need the "Name" and a "Key" for the next step.

The free tier of Computer Vision API - first 5000 transactions free per month.

Note the service isn't available in all regions.  Most of my stuff is in Australia East, but for the Cognitive Service API it has to be hosted in Southeast Asia.  YMMV.

Then we need to set up the connection in Flow

1. Find the Computer Vision API action

1. Find the Computer Vision API action

2. Enter service name, key and the root site url to set up the initial connection

3. Created correctly, you get an action like this


Set up the SharePoint Document Library

My SharePoint document library is very simple - it is just a basic document library, but I added an extra site column "Categories". This is an out of the box field, and is just a simple text field.

This is a simple step

This is a simple step

Set up the Flow

I trigger the flow with a Scheduled Recurrence that runs once per day.
Using the new Get Files (properties only), I grab a list of all the files in a document library.
I then run for-each on the list of files.

Inside the for-each, I have a condition that checks if the Categories field is null.  If you type null directly into the field, you will get the string 'null'. 

Tip: To actually get the formulat/expression null, select Expressions and type null there.

If the Categories is null, then we proceed.

Grab the file content via Get file content
Call Computer Vision API with the image content.  Select the Image Source to binary, instead of URL.

Tip: I use a compose to see the debug results

I'll explain the array projection in the next section.

Select projection: JSON array to String array

We have an array of JSON objects:

[{
     'name': 'foo'
},
{
    'name': 'bar'
}]

flow-project-1.png

This default UI maps to:

tags -> [{ specified properties }…]

The result is that we would end up with a new array of (simpler) JSON objects.
Hit advanced text mode.

flow-project-2.png

Here, we can use Expression to say item('Tag_Image')?.name

flow-project-3.png

In this case the UI is smart enough to show Tag.Name as a dynamic content (as well as the Tag.ConfidenceScore property).  So we can select that.

This performs a projection of

tags -> [ names… ]

We now have an array of strings.  Combine them via Join with a comma (,) separator.
Update the file properties with this string.

flow-project-4.png

Lets see the results

I uploaded a few images to the library.
Note the categories field is blank.

result-2.png

Running the Flow

When it finishes, I'm checking the JSON - the picture is identified with a "person" with 99% confidence.
The combined string "person,young,posing" is updated into the File property.

The documents are updated.  When Flow runs tomorrow it will skip them.


The Final Flow

Flow to MS-Todo, then all your tasks to Flow

I'm in a celebrating mood - Flow released Export and Import.  This is a great day.  https://flow.microsoft.com/en-us/blog/grow-up-to-logic-apps/

So I'm going to write about something that I've built in the last week, because I've been looking at a simple Todo app - and Flow has started to really streamline the way I work.

This is part of a series on Microsoft Flow

Microsoft Todo, the app that's just damn simple

I don't really want to get into why I choose Todo instead of Wunderlist or Todolist or Google Keep.  I think I just want a really simple Todo app that I'll complete every day.  

In a nutshell, this is how I use Todo:

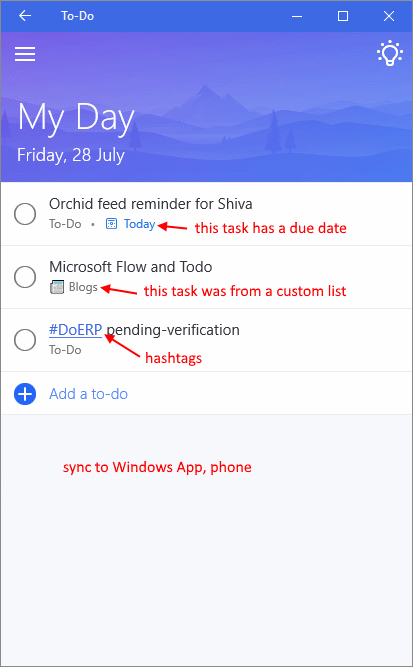
Every time you open Todo, you see Today.  This starts every day blank, like a clean slate

Hit suggestions, and it shows you tasks from three categories that you can add to "today"

todo4.png

Sync everywhere

Knock out those tasks in today

Todo doesn't have an API

But it sync with Outlook Tasks - which gives me the idea for this Flow.  (Actually, I'm pretty sure Todo just uses Outlook Tasks as the source).

  1. Set up a Web Request
  2. Calculate today - NOTE don't include quotes " and "
  3. Create Outlook Task with title, description and today as due date

Test with Postman

Remember to set the content-type to application/json 

And we see this in Todo, almost instantly.

todo6.png

What's next?

I now have a web service that takes a simple JSON and I can add tasks anywhere into my Todo.  I'm playing with the idea that different Flows can put tasks into this API, which will populate tasks that I can add into "today".

  • Bills from Emails
  • Notable Twitter that spun off a crazy blog idea
  • SharePoint project tasks
  • OneNote tasks
  • Planner (? this one I may leave in the Planner app)

I'm also thinking to create different lists for different sources, and watch task changes to write back to source system.  That will make this a really good end to end solution for me.


Building Binary output service with Cognitive Services and Microsoft Flow

We covered how to do binary webservices with Microsoft Flow.  A question then lingers in my mind.  If you can push binary data into a Flow, and within the Flow you can pass it around...  Can you output a binary file from Flow?

This question bothered me so much in my sleep, I decided to test it and write this blog.  And thus, we have probably the simplest example of the series.

  1. So we will first build a service endpoint that can return binary data.
  2. Then we will send it through cognitive services and tag some data as we go.

This is a post in a series on Microsoft Flow.

  1. JSON cheatsheet for Microsoft Flow
  2. Nested-Flow / Reusable-Function cheatsheet for Microsoft Flow
  3. Building non-JSON webservices with Flow 
  4. One Connection to Proxy Them All - Microsoft Flow with Azure Functions Proxies
  5. Building Binary output service with Cognitive Services and Microsoft Flow

Build a Flow to output non-text Output

The method needs to be set to GET.  Take a image that's authenticated in SharePoint, and set that to be the response output.

Test this with Postman

A few things to note:

  1. The request is a GET request.
  2. It replies with image/png (content type was automatically worked out)
  3. ... and that's it, there's not a lot to say

Add Cognitive Services - Computer Vision

You'll need to create a Cognitive Services in your Azure Subscription.  The free tier offers 5000 images per month, at 20/minute.

We are taking the output of the tag action and adding that to the tags header in the service response.

And here we have the same image, but now with tags in the output.

Smart dogs.


Why do we need this?

  1. This means - we can post image in, and we can get image out
  2. May be you need to proxy a resource within SharePoint that is authenticated - but you want to use it directly as a file.  If you use a SharePoint Sharing link it'd take you to a page.
  3. With this direct link to the file, you can use this as an anchor within HTML, or use this to upload a file to an external system (via URL).
  4. May be this isn't a file, but a generated ZIP file that you want to copy somewhere else.  Or it is a docx file.
  5. Or perhaps you want to send a picture to a Flow, then resize it or run it through cognitive services before getting back the result.
  6. May be you are just mad and want to auto-tag every image in your SharePoint?
    That actually sounds amazing.

Because Microsoft Flow lets us push binary through actions, I think there's a bunch of interesting scenarios for this.

Also, I think assistant branch manager and branch manager are awesome.