Silverlight - sharing a common class between Silverlight and .NET

Because Silverlight is compiled against a separate set of Silverlight runtime, we can not reference or share a common library between a Silverlight project and a normal .NET project.

One very common and simple workaround is then to create a common project for .NET, and a common project for Silverlight, and then add the files as existing links from the .NET project to the Silverlight project.  This ensures that the same files are shared by the two sides and we have our matching class definitions.


With RIA, there is a new way.

image

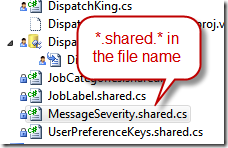
In the .NET project, name your extra files with xxx.shared.cs

Compile your .NET project.  This triggers the RIA toolkit to run and generate some files for us:

image


So you no longer need to share a file via external link.

Silverlight - the magic of Silverlight RIA Toolkit


I checked in some code.  Moments later, my colleague asked me:

"did you check in the service reference for this ServiceReference.DispatchKing.Web.Services.RunboardDuplexService"

I pondered, and answered:

"no need - it was generated for me"

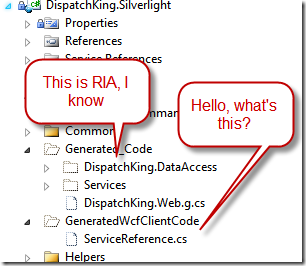
In deed - my Silverlight project started to do something magical for me.  It was creating GeneratedWcfClientCode\ServiceReference.cs

Because this was generated like RIA services, it was not included in the project, and thus - if you didn't have the right tools installed, it appears that your colleague has forgotten to check in files!
 

image


Memory Lane

In the old days before RIA services, we rolled out WCF Service and added our own Service Reference via the Silverlight project.  This generated all sorts of service reference proxy classes.

The biggest downside, is that each time we updated the service, we had to regenerate the service reference, otherwise they'd become out of sync and Silverlight will crash and burn.  (or in the case where it didn't crash… we got really scared).


In Silverlight 3 we got RIA and the DomainService, having Silverlight project linked to a Web Project meant that Visual Studio automatically started generating all the RIA/DomainService code, as well as the data objects (or entity) required, and making sure everything's available and synchronized between the Web (service) and Silverlight (client).  There was much rejoicing.

What's this magic?

What made this case really special then, is that I'm not using only Domain Services.

image


Hmm it doesn't work for my colleague.  We quickly compared out installed Programs and Features, and found out why:

image


You can grab this via Web platform installer, or directly from:

http://www.microsoft.com/downloads/en/details.aspx?FamilyID=7b43bab5-a8ff-40ed-9c84-11abb9cda559&displaylang=en

The RIA Services Toolkit enables the following 5 features:


1. LinqToSql DomainService
2. Soap endpoint - This enables you to expose a soap endpoint for your DomainService
3. JSON endpoint - This enables you to expose a JSON endpoint for your DomainService
4. ASP.net DomainDataSource - This control will enable you to create an ASP.net application that can talk to your DomainService
5. WCF client proxy auto generation/updating for WCF Core Service – This enables you to get up-to-date WCF proxy and configuration each time you build your solution, when you add Silverlight-enable WCF service in your Silverlight application.


The magic, is number 5.
Silverlight - RadScheduler and required field data validation

In my current project I'm having the pleasure of working with the Silverlight RadScheduler control.  While you may read and feel it is a very bloated control, I argue otherwise, it is highly extensible for such a complex control.  I really think the Telerik guys did a very good job.

My particular scenario is interesting.  I need to:

  1. Extend the appointment dialog to support addresses
  2. The addresses aren't always required (so I can't just use RequiredAttribute)
  3. When fields are required, I'd like the validation to kick off and prevent me from saving that appointment

Here we go:

Updating the RadScheduler template:

This is pretty simple - find the EditAppointmentTemplate

  <ControlTemplate x:Key="EditAppointmentTemplate" TargetType="telerik:AppointmentDialogWindow">
  1. Customize the control template, we added additional fields
  2. NotifyOnValidationError and ValidatesOnException are important.
..snip

          <input:ValidationSummary x:Name="ValidationSummary" />

          <TextBlock Text="Suburb" Style="{StaticResource FormElementTextBlockStyle}"/>
          <TextBox Text="{Binding Suburb, Mode=TwoWay, NotifyOnValidationError=True, 
ValidatesOnExceptions=True}" />

Extend the Appointment class:

  1. Create a ValidationEnabled property - sometimes you need to "not validate"
  2. Create a ValidateProperty method - this takes a property name and triggers all validate attributes on that property - Validator.ValidateProperty is the method that will trigger all kinds of fun validation exceptions for us.
  3. Set the appropriate validation attributes on the property e.g. Suburb - I'm using a custom validation property that I've created based on the RequiredAttribute
  4. In the setter, call ValidateProperty.
    public class JobAppointment : Appointment
    {
        private string _suburb;

        public ObservableCollection<ValidationError> Errors { get; set; }

        public bool ValidationEnabled
        {
            get;
            set;
        }

        private void ValidateProperty(string propertyName, object value)
        {
            if (ValidationEnabled)
            {
                var context = new ValidationContext(this, null, null);
                context.MemberName = propertyName;

                Validator.ValidateProperty(value, context);
            }
        }

        [ValidationRequired]
        public string Suburb
        {
            get
            {
                return _suburb;
            }
            set
            {
                ValidateProperty("Suburb", value);

                if (_suburb != value)
                {
                    _suburb = value;
                    OnPropertyChanged("Suburb");
                }
            }
        }

Add our own Validation attributes

  1. This Required attribute checks against our settings to see if "Suburb" happens to be a required field.  If not, then skip the validation and just return success.
 public class ValidationRequiredAttribute : RequiredAttribute
    {
        protected override ValidationResult IsValid(object value, ValidationContext validationContext)
        {
            if (SettingsLifeTimeService.Current != null )
            {
                if (SettingsLifeTimeService.Current.RequiredFields.Contains(validationContext.MemberName))
                {
                    // RequiredAttribute validation
                    return base.IsValid(value, validationContext);
                }
            }
            return ValidationResult.Success;
        }
    }


Stop validation on Scheduler's Appointment_Saving event

  1. In the AppointmentSaving event, grab all the children framework elements from the appointment dialog window
  2. Find their binding expression (e.g., for TextBox I want the binding expression for Textbox.Text)
  3. If exists, I want it to push the values back into the datasource (our customized Appointment class) - this triggers the property setter (which triggers our ValidateProperty, which triggers the custom Required attribute)
  4. Finally, check the validation summary to see if we have any binding errors, if we do, cancel the save.
void _scheduler_AppointmentSaving(object sender, AppointmentSavingEventArgs e)
        {
            JobAppointment jobApp = e.Appointment as JobAppointment;
            AppointmentDialogWindow window = e.OriginalSource as AppointmentDialogWindow;
            var children = window.ChildrenOfType<FrameworkElement>();

            if (children != null)
            {
                foreach (var element in children)
                {
                    BindingExpression binding = null;
                    if (element is TextBox)
                    {
                        binding = element.GetBindingExpression(TextBox.TextProperty);
                    }

                    if (binding != null)
                    {
                        // force control to update databound VM.  This triggers the validation.
                        binding.UpdateSource();
                    }
                }
            }

            ValidationSummary summary = window.FindChildByType<ValidationSummary>();

            if (summary != null)
            {
                if (summary.HasErrors)
                {
                    e.Cancel = true;
                    return;
                }
            }
        }

Finished!


image

SharePoint enable iFilter for TIFF OCR

In some companies, paper documents are scanned into TIFF formats and stored electronically.  To search for them, you'll need to enable the TIFF OCR iFilter to allow SharePoint to index TIFF documents.

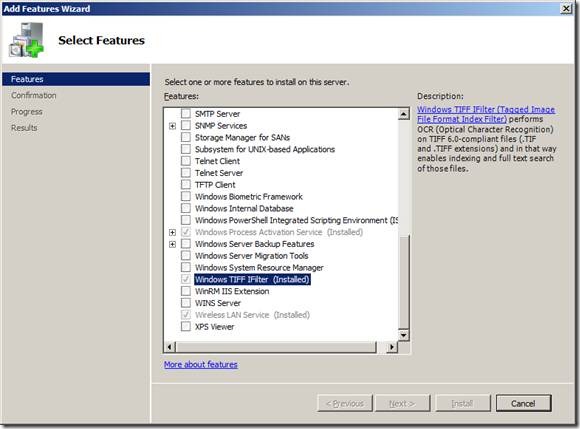
1. Install Windows Server feature Windows TIFF IFilter:

clip_image002


2. Enable OCR filter

clip_image002[7]


clip_image002[10]


3. You may need to restart the machine

4. Force SharePoint to perform a full crawl from Search Administration

5. Search for your file - here, I'm searching for "Therefore"

tiff-ifilter2

SharePoint Saturday Sydney

Hi again.  This is a rather delayed blog post summarizing SharePoint Saturday Sydney #SPSSydney that was held last weekend on 7th August 2010.  This was organized by @BrianFarnhill and Lewis

SILVERLIGHT AND SHAREPOINT APPLICATIONS

Again, I brought along my little demo on Silverlight and SharePoint applications, again heavily tweaked from my previous presentation in the SharePoint user group.

The new agenda was:

  1. SharePoint + Silverlight Application
  2. XAP Deployment and Sandbox Solutions
  3. Debugging
  4. Light up SharePoint - Out of Browser

I never did have enough time - it all finished so fast at 50minutes.  And I didn't get to show my really awesome Silverlight Camera demo. 

The strict timing was actually great - gave me good ideas about re-organizing the content.  I should start quickly onto the demos, and then switch back to the PowerPoint summary points at the end as a summary, after people have seen the demo.  That would have worked really well, and consolidated my time, as well as giving the talk a suitable finishing touch.

SHAREPOINT SATURDAY SYDNEY

With my talk out of the way I juggled the rest of the day between: helping out people wandering around looking slightly lost, or wanted to catch up on some examples of Silverlight applications.  Ducking into sessions (usually at the 10minute mark where there's no one wandering outside anymore), to either learn something new, see how others present, or just to heckle another speaker and cheer them on!  Winking smile

  • @laneyvb - Workflow in SharePoint 2010
  • Roger Carran - The Managed Metadata Service - Exposed!
  • Ishai Sagi - New SharePoint 2010 features for End Users
  • Brian Farnhill - Exploring Office Web Applications and Services
  • Ivan Wilson - Building a public blog on SharePoint 2010
  • Eric Cheng - Developing and Deploying SharePoint Customisations Using Visual Studio 2010

Between different sessions most people managed to stayed on until the very end (to win some prizes), and from the guys that I've talked to most of them are heading home with new ideas of using their SharePoint 2010.

All in all a day full of lots of fun and laughter.  Thanks for organising this.

I took some panorama pictures with my iPhone and stitched them.

MORNING INTRODUCTION

IMG_3206 Stitch


AFTERNOON PANEL


IMG_3212 Stitch

More pictures for SharePoint Saturday Sydney 2010