Generate Any PDF Documents from HTML with Flow

This is a crazy one, and if you have read ALL my Microsoft Flow blog posts, you'll be familiar with all these pieces.

We are going to connect them a different way though, and the result is still awesome.  Lets begin.

In this blog post:

  • Try to convert image files to PDF
  • Use a workaround to convert image files to PDF
  • Ultimate power: create Any HTML and convert to PDF. 
  • Effectively, we arrive at PDF-gen with templating.

Try to convert Image Files to PDF with Flow

  • Get File Content (Binary) from SharePoint. 
  • Write to OneDrive for Business
  • Use Convert to PDF to convert JPG to PDF.

This doesn't actually work.  But it's good to try and see the error.  Not Acceptable.

This isn't the end though, we have workarounds.

Use a workaround to convert image files to PDF

So even though Convert File doesn't work on image files directly, it does work on HTML.  And this is the heart of our workaround.

Remember several blog posts ago we used dataUriToBinary() to convert PowerApps camera image to a Binary file to store into SharePoint?

Today, we are going backwards.  We are taking a SharePoint image (as Binary), and converting that to dataUri format.  Lets put that in a variable dataUriJPG

We then create another string for <img src=variable(dataUriJPG) />.  You'll need concat() expression to combine the string and variable.

concat('<img src="', variable('dataUriJPG'), '" />')

See, browsers can render images with dataUri directly embedded.  Lets write that to a HTML file (pic.html)

  1. Get File Content from SharePoint
  2. Convert to dataUri string
  3. Concat within an HTML IMG tag
  4. Write to a HTML file
  5. Convert File from HTML to PDF

And hit it again with convert-file to PDF

Ta-da!

jpg-to-pdf-around-result.png


End with the ultimate power: create Any HTML and convert to PDF. 

  1. Try multiple headings,
  2. And repeat that image twice.
concat('<html>', '<h1>heading 1</h1>', variables('html'), '<h1>heading 2</h1>', variables('html'), '</html>')

Read and include some live data.

  1. Use SharePoint List Folder action and get a list of all the files
  2. Use Data Operations - Select to remap just the Path and Size properties (this is the same as Array.Map)
  3. Create HTML Table - with automatic columns.  We only have two fields.
  4. Concat into our HTML


Effectively, PDF-gen with templating

In this blog post, we covered some new and old techniques:

  • DataUri is our friend again
  • Convert-File to PDF
  • Select, Create HTML table

I leave the last example as a thought exercise for you, the reader.

  1. Store the HTML template in a HTML file.  You really don't want to be typing HTML in concat within a tiny formula box.
  2. Use Replace expression to replace REPLACE_ME words with values you plan to fill from a live data source.
  3. Insert images as DataUri strings to easily get your logo, headers into the PDF report.
  4. Consider using PDF to snapshot list item upon workflow completion, and then email that as PDF attachment to the manager.

Thank you for reading

I have a favour to ask.  See, I told @paulculmsee sneak peek about this post and he's like oh that's it?
If you think gosh this one's awesome, please tell him he's wrong :-)


Two ways to convert SharePoint files to PDF via Flow

This blog post is divided into three sections: The easy, The Auth and The Complete parts.

Microsoft Flow released a new power to Convert Files to PDF.  This made my October.  So of course we have to play with this.

Part 1. The Easy

Now this work well, but raises a few questions: 

  1. Why do I have to copy to OneDrive for Business?
    Because the Convert File action is also available for OneDrive for consumer, but not SharePoint
     
  2. Can I do this without copying to OneDrive for Business
    Not with the default Actions for now.  There's no Convert File for SharePoint Connector.  And SharePoint Connector's Get File Content action doesn't allow a format parameter.
convert-file-actions.png

And this is the simplest solution.

Warning: Next be dragons (Auth and API)

We are going to dive in to see what API this uses.  And whether we can call the same API on SharePoint library document directly without copying the file to OneDrive first.

This next part is good for you.  But it is heavy and will look complicated.  Brace yourselves.

...So what API does this use?

https://docs.microsoft.com/en-us/onedrive/developer/rest-api/api/driveitem_get_content_format

GET /drive/items/{item-id}/content?format={format}
GET /drive/root:/{path and filename}:/content?format={format}

Specifically, this uses the Microsoft Graph

Part 2. The Auth

Disclaimer - OAuth looks familiar, but steps are always tricky.  Easy to mess up.  So if you are following this through, walk carefully.

For the next part, we need to connect to MS Graph with AppOnly permissions

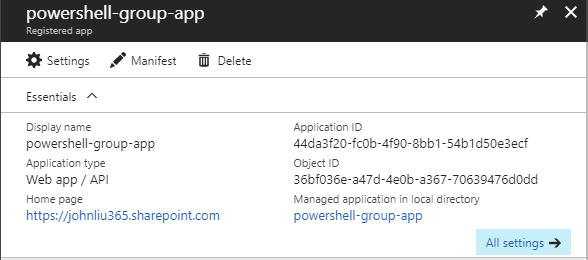
In Azure Portal - under Azure AD - create an App Registeration (I'm reusing a powershell-group-app one I had previously baked)

client-id.png

We will be accessing files - so make sure Application Permissions for read files is granted.  This requires admin consent.

client-perms.png

Via the Azure AD portal - hit Grant Permissions to perform admin consent directly.

client-grant.png

Now we are going to write the Flow with HTTP requests

hit the token endpoint for our tenant with a POST message.  The Body must be grant_type=client_credential with client_id, client_secret and the resource is https://graph.microsoft.com

this request if successful will give us back a JSON.  Parse JSON with this schema:

{
    "type": "object",
    "properties": {
        "token_type": {
            "type": "string"
        },
        "expires_in": {
            "type": "string"
        },
        "ext_expires_in": {
            "type": "string"
        },
        "expires_on": {
            "type": "string"
        },
        "not_before": {
            "type": "string"
        },
        "resource": {
            "type": "string"
        },
        "access_token": {
            "type": "string"
        }
    }
}

This gives Flow a variable for access_token for the remainder of the steps to use to call Microsoft Graph

Test this by calling the MS Graph endpoint for SharePoint site

token-test.png

This HTTP request with the Bearer access_token successfully returns SharePoint site data from Microsoft Graph.


Part 3.  The Complete Solution to fetch SharePoint document as PDF

Call /content?format=PDF

get-content-format-redirect.png

A few things going on in this result.  

  1. Flow thinks this request has failed - because it doesn't return a 2xx status.  It returns a 302 redirect.
  2. The Response header contains the Location of the redirect, which is where the PDF file is

Parse JSON again on the Response header.  

{
    "type": "object",
    "properties": {
        "Transfer-Encoding": {
            "type": "string"
        },
        "request-id": {
            "type": "string"
        },
        "client-request-id": {
            "type": "string"
        },
        "x-ms-ags-diagnostic": {
            "type": "string"
        },
        "Duration": {
            "type": "string"
        },
        "Cache-Control": {
            "type": "string"
        },
        "Date": {
            "type": "string"
        },
        "Location": {
            "type": "string"
        },
        "Content-Type": {
            "type": "string"
        },
        "Content-Length": {
            "type": "string"
        }
    }
}

We just want Location.  We also need to configure Continue on previous HTTP error.

redirect-continue.png

And finally, retrieve the file via GET again

fetch-return.png


When ran, the flow looks like this:

run.png


Summary

The complete solution uses HTTP to call MS Graph directly and pulls back the PDF file after a 302 Response.  This is a fairly complex example so please evaluate whether you want the Correct Way or the Easy Way.

Note also that Microsoft Flow has a Premium connector for Azure AD Requests - which will negate the middle part of this blog post re: Auth and let you dive right into MS Graph REST endpoints without worrying about access_tokens.  

Call this Flow request and it downloads the PDF file, converted from a DOCX document in SharePoint team site.


Review Special Techniques Invoked:

  • MS Graph Auth
  • The Continue on Error configuration
  • Parse JSON on Response Header


Gaps between PowerBI streaming tiles and SharePoint

So I spend an evening playing (I actually have a lot of fun exploring these things) and figuring out how the pieces of SharePoint, PowerBI and Flow are supposed to work together.

In my head - they already connect.  But I have never seen anyone blog them.  So I decided to give it a stab.

Turns out there are some gaps.

The Idea

The Idea is simple.  We can create a PowerBI that uses SharePoint List as a datasource.  But instead of configuring scheduled refresh, we want to use the PowerBI Rest Dataset to push data in a streaming way.  And since Microsoft Flow has an action to do this, as well as the triggers to listen to SharePoint List.  We can get SP List-push-to PowerBI without needing schedule refresh.  That is a crazy fun idea.

The Reality

The reality is that there are several gaps.  These are probably solvable, but I just want to list them first, and we'll tackle them in the future.

Gap 1.  SharePoint List dataset != Push-enabled REST dataset

PowerBI makes a distinction between what's a REST/Pushable Dataset vs normal datasets like external lists.  In fact, Flow can not connect to a non-REST dataset.

So we need to create a REST dataset in PowerBI Service (it is not a feature of PowerBI Desktop), and then use the REST dataset as a live connection in a PowerBI Report.

Gap 2.  The only way to create a PowerBI REST dataset is via the REST API. 

There is no UI.  Ouch.  That pretty much makes this a developer task.  OK that's fine, we create a REST dataset via REST endpoint and a JSON schema (double ouch).  

Now we can build our PowerBI report, connect the REST dataset from PowerBI Service.  We save and publish this report to PowerBI Service and then insert the PowerBI Report in an SPFx webpart (PRO license needed for embed) into a SharePoint modern page.

This part is actually really seamless.  Don't worry, we have more gaps.

Gap 3. PowerBI report does not livestream REST dataset results.  

So I'm staring at my PowerBI visual in a SharePoint modern page.  In a separate window, I update the source SharePoint List.  In yet another separate window, I can see the Flow ran and push the new list item into the streaming dataset.

Excellent.  Except, the SPFx PowerBI Report Visual isn't updating.  It doesn't update.  I waited 15mins for it to do nothing!

If I F5, then I immediately see the new value.  But it doesn't do live streaming refresh :-(

It turns out, to see live stream results we need a PowerBI Dashboard or PowerBI Tile (streaming tile).

PowerBI Dashboard can only be created in the PowerBI Service.  We take an existing report and pin the visual.  This asks us to add the visual as a tile in a PowerBI Dashboard.

Gap 4. SPFx PowerBI report webpart does not show PowerBI dashboard embed.

So I create a PowerBI Dashboard and I go back to the SPFx PowerBI Preview webpart.  Only to find it doesn't do dashboard embed.

It only does Report embed.  So we will need to build our own SPFx that let us do dashboard embed.  This requires a embed token from MSGraph - but we should be able to piggyback the graph-util helper in SPFx to do our token exchange.

There's potentially one more issue.

Gap 5.  Does embed PowerBI Dashboard or Tile actually connect to streaming datasets?

I don't know the answer to this yet.

Gap 6. PowerBI REST Dataset endpoint can only add rows, not update them

The REST API lets us add rows to a REST dataset easily, or clear the table.  But there's no way to update an existing row.

The use case for the streaming REST dataset is like a ongoing stock ticker or temperature meter.  You don't update a record that's streamed past.  You only care about new records.

Flow only has an action to add row to PowerBI Dataset.

Gap 7. Flow does not have an action to Clear the dataset

The REST API lets us clear the dataset table, so technically, I could clear the table each time and repopulate it with the entire list again.

But unfortunately, Flow only has one PowerBI Action - add row to a REST dataset.  It does not have a clear rows action.

More work to do, more exploration to be had

Parts of the puzzle works really well.  Flow pushes data freely from SharePoint list changes into the streaming dataset.  If the dashboard or tile is shown on a webpage by itself, we immediately see it update like magic.

But if we want the dashboard/tile embedded within a SharePoint modern page.  There's still work to be done.

Ultimately, if we want live streaming data capability, it might be easier to use PowerBI LiveQuery against Azure SQL, and have Flow push data into that, instead of PowerBI REST streaming Dataset.


Auto-Classify Images in SharePoint Online library via Flow for Free

Microsoft Flow's most recent update added ability to query and update SharePoint File property.  This is actually really timely, as I wanted to combine this with a few other techniques and built a Document Library Image Auto-Classifier Flow.

Is that a clickbait headline?  Well it's totally real, and we'll build it in a moment.

result-1.png

Steps:

  1. Set up your cognitive service account (understand the free bucket)
  2. Set up a SharePoint Online document library with Categories
  3. Set up the Flow file loop
  4. Do a fancy JSON array to concatenated string projection operation with Select and Join
  5. Viola, no code.  And pretty much *free*

This is part of a series on Microsoft Flow

Set up your Azure Cognitive Service instance

Follow these simple steps to create an Computer Vision API Cognitive Service in your Azure.  Computer Vision API has a free tier.

1. Create Computer Vision API

1. Create Computer Vision API

2. Scroll down and hit Create

3. Give this service a name, set up the region and select Free pricing tier

4. You need the endpoint url here

4. You need the endpoint url here

5. Also, copy the Name and key 1

5. Also, copy the Name and key 1

You will need the "Name" and a "Key" for the next step.

The free tier of Computer Vision API - first 5000 transactions free per month.

Note the service isn't available in all regions.  Most of my stuff is in Australia East, but for the Cognitive Service API it has to be hosted in Southeast Asia.  YMMV.

Then we need to set up the connection in Flow

1. Find the Computer Vision API action

1. Find the Computer Vision API action

2. Enter service name, key and the root site url to set up the initial connection

3. Created correctly, you get an action like this


Set up the SharePoint Document Library

My SharePoint document library is very simple - it is just a basic document library, but I added an extra site column "Categories". This is an out of the box field, and is just a simple text field.

This is a simple step

This is a simple step

Set up the Flow

I trigger the flow with a Scheduled Recurrence that runs once per day.
Using the new Get Files (properties only), I grab a list of all the files in a document library.
I then run for-each on the list of files.

Inside the for-each, I have a condition that checks if the Categories field is null.  If you type null directly into the field, you will get the string 'null'. 

Tip: To actually get the formulat/expression null, select Expressions and type null there.

If the Categories is null, then we proceed.

Grab the file content via Get file content
Call Computer Vision API with the image content.  Select the Image Source to binary, instead of URL.

Tip: I use a compose to see the debug results

I'll explain the array projection in the next section.

Select projection: JSON array to String array

We have an array of JSON objects:

[{
     'name': 'foo'
},
{
    'name': 'bar'
}]

flow-project-1.png

This default UI maps to:

tags -> [{ specified properties }…]

The result is that we would end up with a new array of (simpler) JSON objects.
Hit advanced text mode.

flow-project-2.png

Here, we can use Expression to say item('Tag_Image')?.name

flow-project-3.png

In this case the UI is smart enough to show Tag.Name as a dynamic content (as well as the Tag.ConfidenceScore property).  So we can select that.

This performs a projection of

tags -> [ names… ]

We now have an array of strings.  Combine them via Join with a comma (,) separator.
Update the file properties with this string.

flow-project-4.png

Lets see the results

I uploaded a few images to the library.
Note the categories field is blank.

result-2.png

Running the Flow

When it finishes, I'm checking the JSON - the picture is identified with a "person" with 99% confidence.
The combined string "person,young,posing" is updated into the File property.

The documents are updated.  When Flow runs tomorrow it will skip them.


The Final Flow

Flow to MS-Todo, then all your tasks to Flow

I'm in a celebrating mood - Flow released Export and Import.  This is a great day.  https://flow.microsoft.com/en-us/blog/grow-up-to-logic-apps/

So I'm going to write about something that I've built in the last week, because I've been looking at a simple Todo app - and Flow has started to really streamline the way I work.

This is part of a series on Microsoft Flow

Microsoft Todo, the app that's just damn simple

I don't really want to get into why I choose Todo instead of Wunderlist or Todolist or Google Keep.  I think I just want a really simple Todo app that I'll complete every day.  

In a nutshell, this is how I use Todo:

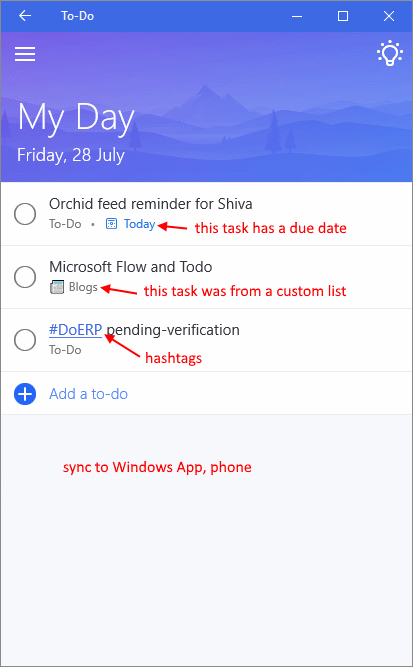
Every time you open Todo, you see Today.  This starts every day blank, like a clean slate

Hit suggestions, and it shows you tasks from three categories that you can add to "today"

todo4.png

Sync everywhere

Knock out those tasks in today

Todo doesn't have an API

But it sync with Outlook Tasks - which gives me the idea for this Flow.  (Actually, I'm pretty sure Todo just uses Outlook Tasks as the source).

  1. Set up a Web Request
  2. Calculate today - NOTE don't include quotes " and "
  3. Create Outlook Task with title, description and today as due date

Test with Postman

Remember to set the content-type to application/json 

And we see this in Todo, almost instantly.

todo6.png

What's next?

I now have a web service that takes a simple JSON and I can add tasks anywhere into my Todo.  I'm playing with the idea that different Flows can put tasks into this API, which will populate tasks that I can add into "today".

  • Bills from Emails
  • Notable Twitter that spun off a crazy blog idea
  • SharePoint project tasks
  • OneNote tasks
  • Planner (? this one I may leave in the Planner app)

I'm also thinking to create different lists for different sources, and watch task changes to write back to source system.  That will make this a really good end to end solution for me.