Do Group By in Microsoft Flow with two simple elegant loops

This is a problem I worked on with Fausto and is a common problem I see when working with rows of data in Microsoft Flow.

Plan

  • Scenario: Group By
  • Doing Group By Elegantly
  • Build it in two parts
  • Run it quickly

Scenario: Group By

Group-by is a common problem - but usually we see this a lot in the form of batching rows of data to some sort of output.  One frequent example is a schedule that looks up a bunch of tasks or messages for the day, and sends only ONE email with a group of tasks to that person.

Doing Group By Elegantly

How do we do Group-By elegantly, and quickly.  Yes, group-by can be done with for-each and append-to-array, but that approach leads to fairly complex looking inner loops and wide-layout if-conditions.

The solution that we got at the end is an elegant one with two for-each loops.  It is easy to follow and easy to test - which means you can easily reconfigure it to your own scenario.

Let's take an example

pivot-this-list.jpg

I have a list here with 6 rows from SharePoint and 3 names.  In the first loop, we want to reduce the array of 6 rows into unique names:

[ "Gandalf", "Boromir", "John Liu" ]

Then in the second loop, we can loop over each of these unique names and built the corresponding list of rows for each name:

[{
  "name": "Gandalf",
  "titles": [ "Wizard", "Remember Password"]
},
{
  "name": "Boromir",
  "items": [ "One Does not Simply", "**SPOILER**"]
},
{
  "name": "John Liu",
  "items": [ "Making up lists", "Ninja"]
}]

First Loop

In each loop, we use the union() expression to combine two arrays.  Union has the special ability that if an element already exists in the array it is omitted.

union( ["Gandalf", "Boromir"], ["Gandalf"] ) => ["Gandalf", "Boromir"]

We do the union in a compose action, and then put that result back into the array variable.

In my example, I'm using SharePoint's people fields - so I'm stepping into item()?['Person']?['Email']

That's first loop.  Easy to test - one expression.

Second Loop

Second loop involves looping through the first array of unique_names, and the first action stores that value into a compose step.

Then use Filter array to select only the rows with that unique name from the original table.
Then use Select to pick only the columns from the original table that we want to see.  (The majority of the second loop looks more busy, because I'm using techniques from my other blog post "using select to simplify your Create HTML Table")

I append the results as an object to a running array of results.  But it is also very easy to just send email at this point.

For each unique name (or email), this sends one email, the email body is a summary HTML table of the items in the list for this person.

Run it quickly

Expression operations like Compose, Filter, Select or Union are fast - most of the time running 0-second.

For Each steps and set variables are slower - because there are global locks being applied.  By reducing use of variables, we can make the loop go much faster.

Elegant and fast.


Summary

Two elegant loops.  No crazy if-conditions and checking if a value already exists in an array during append.

This is a very useful pattern if you are sending daily emails or summary notifications to a user and you want to batch the results.

I wanted to end here on more loops.  Loopity loop.

Microsoft Flow: SharePoint Trigger on specific fields changed via SP HTTP Request

result-nochanged.png

A very common request in Microsoft Flow for SharePoint is a trigger that only runs when a certain field has changed, or when it has changed to a certain value.

With the new SharePoint "Send an HTTP request to SharePoint" action, we can now do this in relatively few steps with the help of List Versioning.


Plan

  • Enable List Versioning

  • Obtain item versions results on item change

  • A conditional fast exit

  • Understand the data formats and how to debug

  • Summary


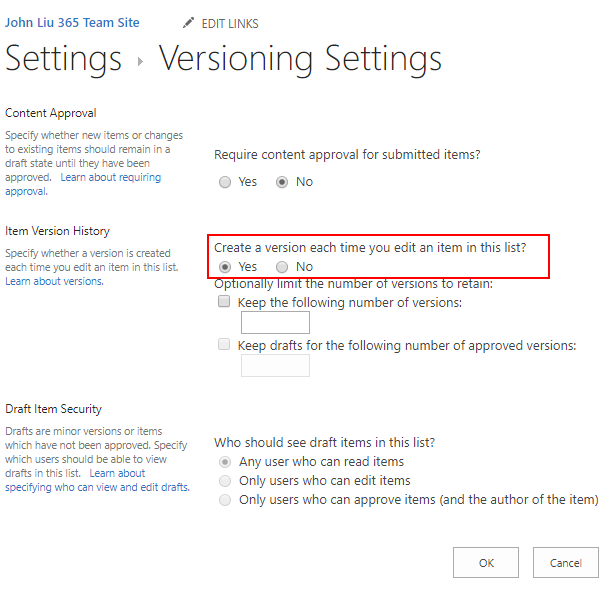
Enable List Versioning

List-Versioning.png

Obtain item versions results on item change 

// SPREST-Versions
"method": "post",
"body": {
  "method": "GET",
  "uri": "_api/web/lists/getbytitle('ListWithHistory')/items(triggerBody()?['ID'])/versions?$top=2",
  "headers": {
    "accept": "application/json; odata=nometadata"
  }
}

// Select
{
  "from": "body('SPREST-Versions')?['value']",
  "select": {
    "ID": "item()?['ID']",
    "VersionLabel": "item()?['VersionLabel']",
    "Title": "item()?['Title']",
    "Demo": "item()?['Demo']",
    "Completed": "item()?['Completed']"
  }
}

Versions returns the latest version first.
But there are a few tweaks we can do here:

  1. If we ONLY ever care about the latest two versions - we use $top=2
    this covers the new version and the previous version.

  2. If we care about the latest versions within the last few minutes - we can filter with $filter=Modified gt 'last-5-minutes-date-expression'

    The expression would be addMinutes(utcNow(), -5) but it should be formed in a separate action above.

  3. I have seen really complex mixed up Flow triggers with a lot of overlapping list item updates - I highly advise designing the workflow to not do that. This pattern here can help decouple those situations.

There are many fields on version endpoint - Select will clean it up to only the specific fields that we care about:

A conditional fast exit

// Condition-SameTitle
equals(first(body('SelectVersions'))?['Title'], last(body('SelectVersions'))?['Title'])

Results

Results for success and failure. 
This check can be performed with ~4 actions, as part of the pre-condition check for whether to continue the Flow.


Understand the data formats and how to debug

Understanding this step is interesting for debugging purposes.  Since we are calling REST and getting back JSON, we need to know how to read it and 

Run this, and we'll see the default output which is

But for our needs - it can be a lot easier if we apply additional header.

See also: https://www.microsoft.com/en-us/microsoft-365/blog/2014/08/13/json-light-support-rest-sharepoint-api-released/

With either method, we end up with one of these expressions to get to the result array of versions:

body('SPREST-Versions')?['d']?['results']
body('SPREST-Versions')?['value']

Summary

  • Tip 1 - use accept header to get simpler result

  • Read the output to understand the return JSON format

  • Tip 2 - using $top=2 is simpler than Tip 3.

  • Tip 3 (advanced) - using $filter to compare whether just the last two versions or changes as a batch

  • Tip 4 (advanced) - on the created event - there will be only one version. So
    first(body('SelectVersions'))?['Title']
    last(body('SelectVersions'))?['Title']
    refers to the same row.

    We can force comparison by:
    body('SelectVersions')?[0]?['Title']
    body('SelectVersions')?[1]?['Title']

    The second row [1] doesn't exist, but ? will replace the query with null.

  • Use expressions to navigate the JSON structure

  • Use Select to simplify the result array

  • Remove complexity in overlapping Flows hitting update on the same list item by making sure Flows exit early when not required - this will simplify a lot of our Flow designs

  • Tip 5 (advanced) - in the SelectVersion step - do not include the VersionLabel then in the comparison step - compare the two JSON objects string(first(body('SelectVersions'))) and string(last(body('SelectVersions'))) directly. This allows us to check all the fields together.


Run Any PnP-PowerShell via Drag and Drop Zip to AzureFunctions

pexels-birthday-box-celebration-45238.jpg

So I previously asked aloud "Can we simplify this further" - It turns out you can.  You can deploy a PnP-PowerShell from scratch in 1 minute.

And since we are targetting completely non-devs.  We do this via dragging and dropping one Zip file.


Plan

In my mind - yes.  Yes that installation could get simpler.  App Services (because of the Kudu backend) supports Zip Deploy.

https://docs.microsoft.com/en-us/azure/azure-functions/deployment-zip-push

But a quick read of the article it targets DevOps doing zipdeploy with Azure CLI, REST or PowerShell.  There's nothing for a yet-to-be-developer.  What I wanted to do was drag and drop zip deploy (so I quickly reached out to Ling Toh and turns out she says she does it all the time).

Steps in Pictures

1. Grab this ZIP file 

https://github.com/johnnliu/azure-functions-o365/blob/master/Run-Any-PnP-PowerShell.zip

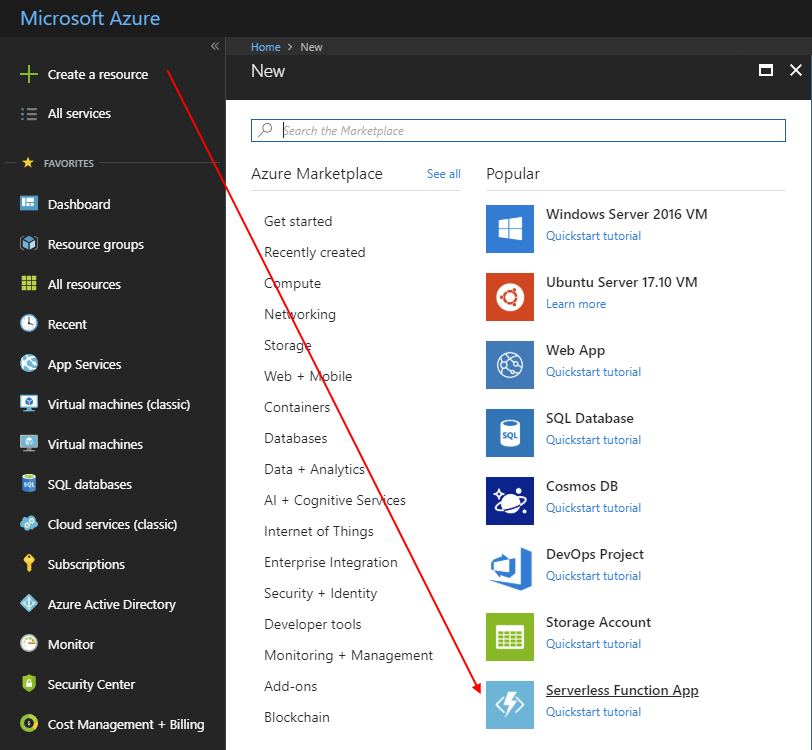
2. Create a new Functions App

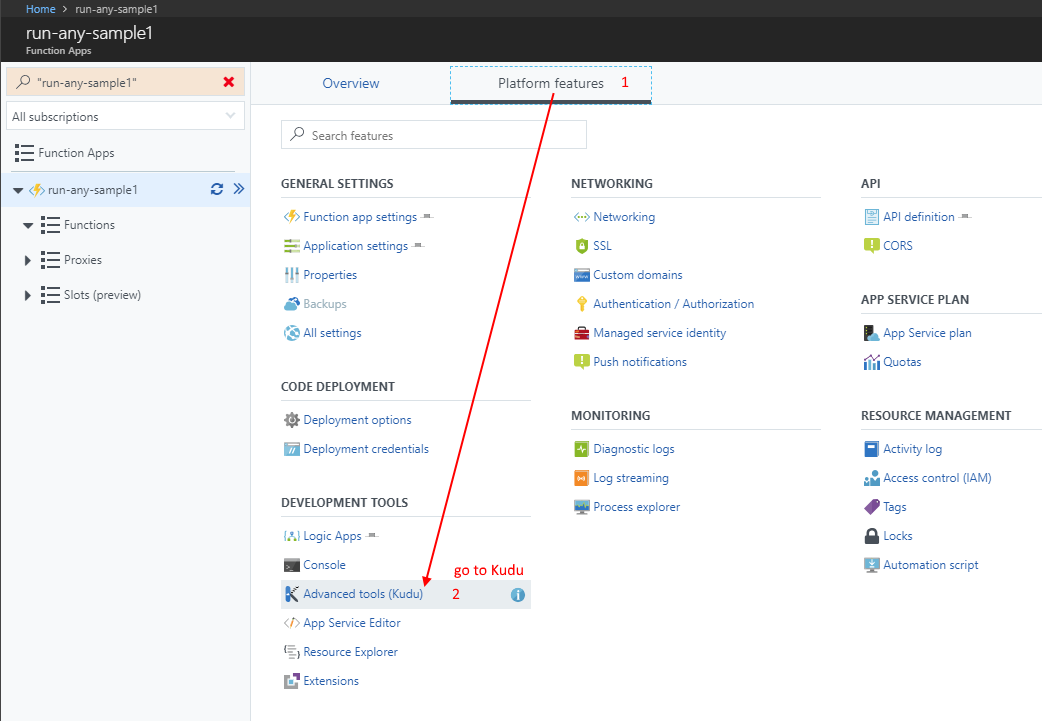
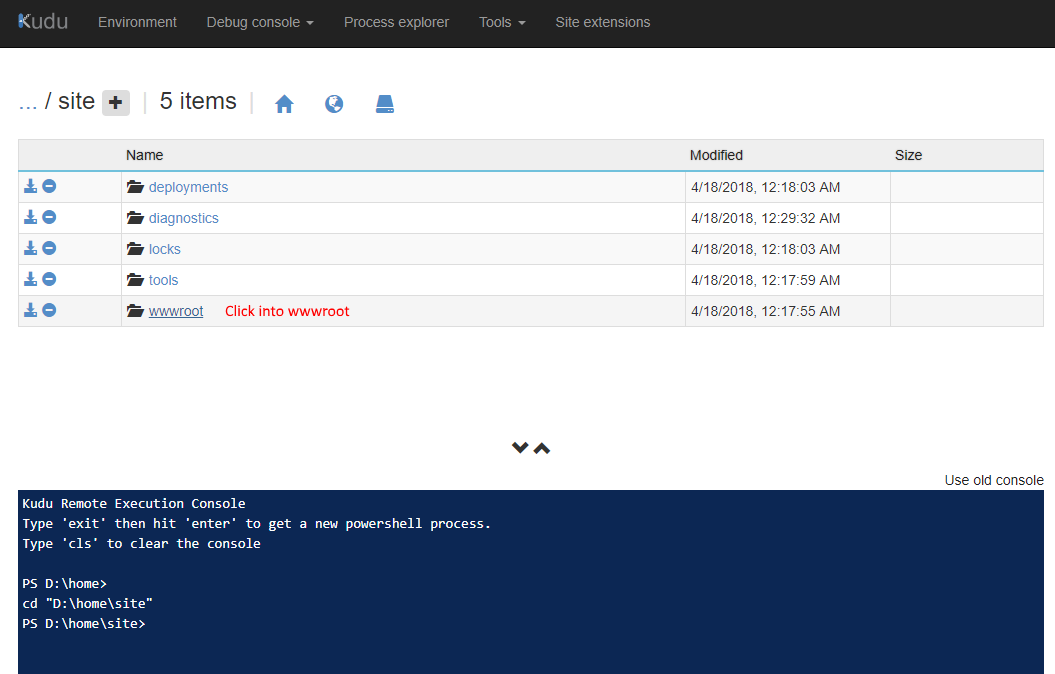
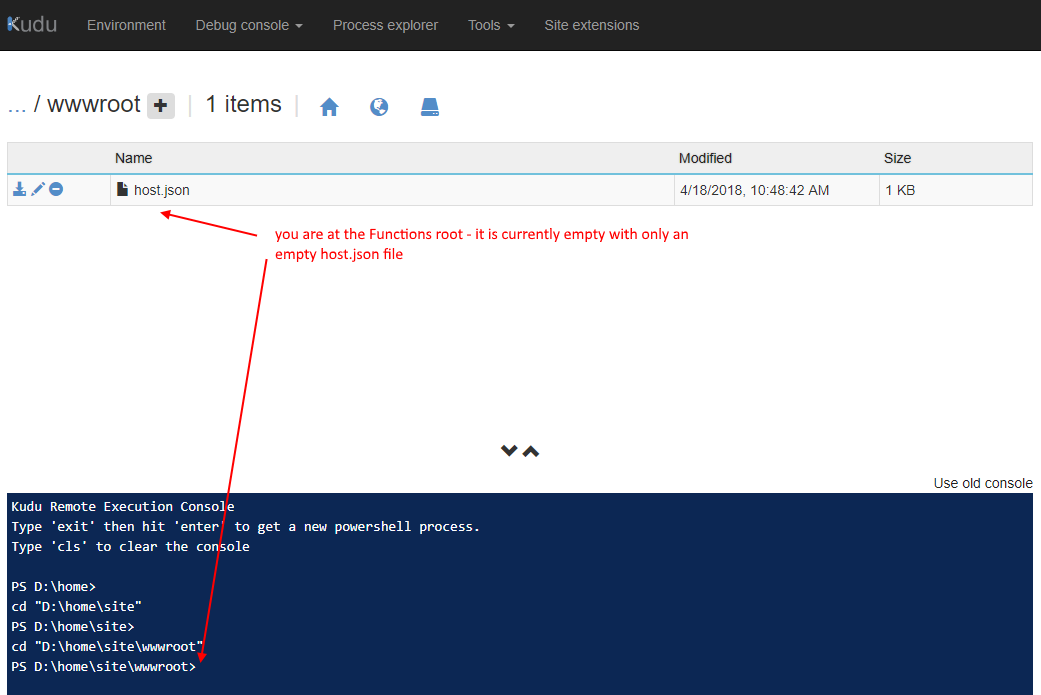
3. Drag and Drop zip file into Kudu

4. Configure App Settings

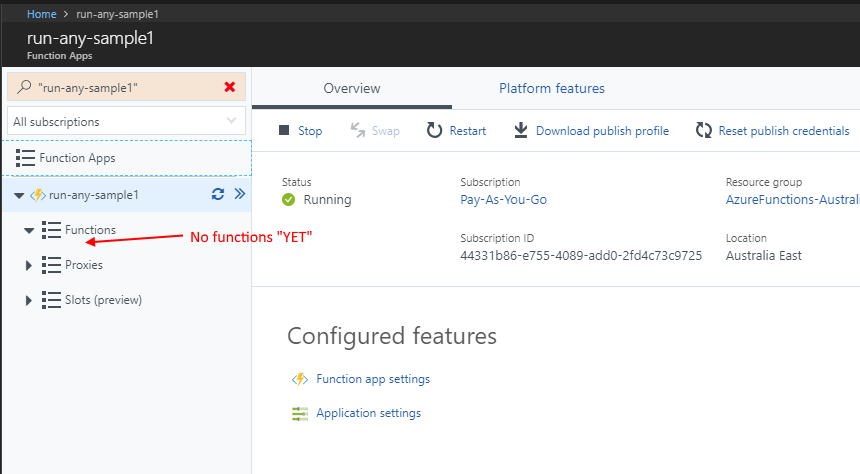
Back to Functions page under Azure Portal.  Refresh and you'll see the function appear.
Go to app settings to set up the USER/PW variables we need for the test.

5. Test it

Summary

That's it really.  Drag and drop deploy of a function via ZIP file.
Feel free to open up the zip and see how all the pieces are laid out, including the entire PnP-PowerShell module dependency.

Run any PnP-PowerShell in one AzureFunction from Microsoft Flow

pexels-photo-tool.jpg

Are you missing a SharePoint connector in Flow?  Do you need that one extra thing that's only in PnP-PowerShell (because there are 300 cmdlets in PnP-PowerShell)?  Frustrated with having to write another AzureFunction just for this one thing?


(Trumpet please) Behold!  I present the last AzureFunction (for PnP-PowerShell) you'll ever need to write.

Run-Any-PnP-PowerShell

And then, we'll call it from Flow.  Hmm wait, I think we can do better with the title...
(Trumpet please) Behold!

Run-Any-PowerShell in Flow

Wait, wait, no, why stop there with the title...
(Trumpet please) Behold!

Run Any Compute You Want in Flow


Plan

  • Create our Run-Any-PnP-PowerShell script
  • Call it from Flow
  • Call it to do some random compute for us

Create our Run-Any-PnP-PowerShell script

First - create an AzureFunctions app.  Install PnP-PowerShell in it. 

https://docs.microsoft.com/en-us/sharepoint/dev/declarative-customization/site-design-pnp-provisioning#upload-the-pnp-powershell-module-for-your-azure-function

I have an old post in 2016 that has similar steps, but the ones from SharePoint PnP Team is much more current.

If you have one already - great, just add another method. 

Select PowerShell from Experimental.  I call it Run-Any-PnP-PowerShell

Write the method.

# we need to import PnP-PowerShell cmdlets
Import-Module "D:\home\site\wwwroot\modules\SharePointPnPPowerShellOnline.psd1"

# POST method: $req
$script = Get-Content $req -Raw

# prepare credentials from environment USER/PW
$securepw = ConvertTo-SecureString $env:PW -AsPlainText -Force
$credentials = New-Object System.Management.Automation.PSCredential ($env:USER, $securepw)

# run the script from POST body
Invoke-Expression $script -OutVariable out | Tee-Object -Variable out

# catch output and send it back
Out-File -Encoding Ascii -FilePath $res -inputObject $out

6 lines of magic.

Call this from Flow

This works because Azure Functions is pretty clever about guessing the output of the Function, and changes the content type to JSON

Call it to do some random compute

Here's the same Function doing complex maths.  It'll also handle XML, JSON, .NET Framework and run any of the existing cmdlets or any extra ones we decide to import.

I think this ASCII module isn't very good.


Security [updated]

The feedback I got immediately was we'll need to secure that.  That's fair.  Here's a bunch of pretty important links to secure such a crazy "weapon of mass scripting".

Guard your AzureFunction activation key

Because you are calling AzureFunction from within a Flow - technically, only people that use the Flow can see the URL.

IP Filtering

Turn on IP Address Filtering for Azure Functions https://docs.microsoft.com/en-us/azure/app-service/app-service-ip-restrictions 
And the list of IP Addresses for your Flow runs from https://docs.microsoft.com/en-us/flow/limits-and-config#ip-address-configuration 

Secure by Azure AD

You can secure the Function with Azure AD https://docs.microsoft.com/en-us/azure/app-service/app-service-mobile-how-to-configure-active-directory-authentication

Your Flow HTTP request will need to authenticate as well before it can call your AzureFunction.  https://twitter.com/johnnliu/status/943761628671090688

Implementing Azure Functions Managed Service Identity

https://docs.microsoft.com/en-us/azure/app-service/app-service-managed-service-identity

This prevents the username/password being stored in the environment which can be read by the script.  With MSI, the credentials are stored in KeyVault.

Switch to Azure Automation

Azure Automation's native integration with KeyVault may offer the extra security you want.  I personally find it slower to start up, and the connector to retrieve the output is one extra step.  But this is definitely possible.

Add Persistent Logging

Because all the scripts has to come through your Flow - add a logging step that ensures scripts that are run are stored away with a log.


Finally

I do apologize I published this initially without talking about some security options.  Over the next day it became pretty clear that we need to secure such a crazy technique.

On the other hand, there was some pretty good discussions - so may be leaving out the security section for one day was a good idea after all.

Design a "Delay until SharePoint File Changed" HTTP+Webhook for MicrosoftFlow

I love challenges - I love hearing people say "We need a Delay until File Changed" action in Microsoft Flow.  I agree.  But those are the same questions that sets one inquisitive mind to wander.

Plan

  • The Special Puzzle Piece
  • The generic nested Flow
  • The parent Flow
  • Results
  • Extend the technique

The Special Puzzle Piece "HTTP + Webhook"

Flows are triggered based on events - we can't easily have "a second trigger" in the middle of a Flow.  But there's a magical action in Flow that does do a 'wait' - and that's the HTTP + Webhook action.

"HTTP + Webhook" sounds like we plan to call someone else' webhook.  But we can use that to call our own webmethods.  So the idea then is that in the parent Flow, where we are building an approval, we'd delegate a 'wait' to a child nested flow and then have a generic Nested Flow that would perform any sort of 'wait'.  When the wait is over, the child Flow calls the callback URL and returns data back to the parent.

I first read about HTTP Webhook can be used this way reading @sp_muser blog post on Actionable Messages with Azure Functions. 
https://spwondering.wordpress.com/2018/01/17/actionable-messages-part-1-add-the-card-to-microsoft-flow/

HTTP Webhook left a very deep impression with me after reading that blog post.  Like a new lightbulb that won't go away.
Sometimes, we adapt new techniques.  This opens doors to new designs.  I hope this will help more people to be creative.

The nested child Flow

This is the child Flow - it uses a HTTP Request trigger and we need two arguments - a callback url, and a filepath to watch for in SharePoint.

We immediately check the file in SharePoint and remember the modified datetime (store this in a variable- modified).

Next, enter a do-until loop, and delay every 5 minutes and then grab the file's metadata again and check if the modified time has changed.  When it has changed, we exit the do-util loop, and call the original callback url with a plain HTTP action.

In your real scenario, think about whether 5 minute wait is too unnecessary, it may be better to check once an hour, or only a few times a day, if you don't want to loop too much.

The Parent Flow

In the parent workflow, where we need to delay until a File has changed - use the HTTP Webhook action, call the URL of the child Nested Flow, pass in the URL of the SharePoint file, as well as the listcallback() from the HTTP Webhook action.

Notice when the parent workflow is running and it enters the HTTP Webhook, the parent Flow enters a long-waiting asynchronous wait, magically.

Result

I go and modify the file that we are watching.

Notice the child Nested Flow wakes up after the next delay and detects the file's modified time has changed.

This exits the do-until loop, and call the callback URL.

Calling the callback URL wakes up and collapses the parent Flow

See the parent "waiting" action completes in some time in the future.  In my example, it was 10minutes.  But in real world this can be days or weeks.  Flow's timeout is 30 days.  So we can build quite complex, long-waiting, asynchronous processes.

Extend this technique

We can use multiple parallel HTTP Webhooks if we are waiting for multiple files or process updates to finish.

The nested Flow may not just check a file - it can be any long running process.

There's also a consideration that a long running HTTP Webhook works very similar to an Approval process and the Flow will happily wait for all these steps to return before collapsing and fan-in.