Do Group By in Microsoft Flow with two simple elegant loops

This is a problem I worked on with Fausto and is a common problem I see when working with rows of data in Microsoft Flow.

Plan

  • Scenario: Group By
  • Doing Group By Elegantly
  • Build it in two parts
  • Run it quickly

Scenario: Group By

Group-by is a common problem - but usually we see this a lot in the form of batching rows of data to some sort of output.  One frequent example is a schedule that looks up a bunch of tasks or messages for the day, and sends only ONE email with a group of tasks to that person.

Doing Group By Elegantly

How do we do Group-By elegantly, and quickly.  Yes, group-by can be done with for-each and append-to-array, but that approach leads to fairly complex looking inner loops and wide-layout if-conditions.

The solution that we got at the end is an elegant one with two for-each loops.  It is easy to follow and easy to test - which means you can easily reconfigure it to your own scenario.

Let's take an example

pivot-this-list.jpg

I have a list here with 6 rows from SharePoint and 3 names.  In the first loop, we want to reduce the array of 6 rows into unique names:

[ "Gandalf", "Boromir", "John Liu" ]

Then in the second loop, we can loop over each of these unique names and built the corresponding list of rows for each name:

[{
  "name": "Gandalf",
  "titles": [ "Wizard", "Remember Password"]
},
{
  "name": "Boromir",
  "items": [ "One Does not Simply", "**SPOILER**"]
},
{
  "name": "John Liu",
  "items": [ "Making up lists", "Ninja"]
}]

First Loop

In each loop, we use the union() expression to combine two arrays.  Union has the special ability that if an element already exists in the array it is omitted.

union( ["Gandalf", "Boromir"], ["Gandalf"] ) => ["Gandalf", "Boromir"]

We do the union in a compose action, and then put that result back into the array variable.

In my example, I'm using SharePoint's people fields - so I'm stepping into item()?['Person']?['Email']

That's first loop.  Easy to test - one expression.

Second Loop

Second loop involves looping through the first array of unique_names, and the first action stores that value into a compose step.

Then use Filter array to select only the rows with that unique name from the original table.
Then use Select to pick only the columns from the original table that we want to see.  (The majority of the second loop looks more busy, because I'm using techniques from my other blog post "using select to simplify your Create HTML Table")

I append the results as an object to a running array of results.  But it is also very easy to just send email at this point.

For each unique name (or email), this sends one email, the email body is a summary HTML table of the items in the list for this person.

Run it quickly

Expression operations like Compose, Filter, Select or Union are fast - most of the time running 0-second.

For Each steps and set variables are slower - because there are global locks being applied.  By reducing use of variables, we can make the loop go much faster.

Elegant and fast.


Summary

Two elegant loops.  No crazy if-conditions and checking if a value already exists in an array during append.

This is a very useful pattern if you are sending daily emails or summary notifications to a user and you want to batch the results.

I wanted to end here on more loops.  Loopity loop.

Save all your Flows to VSTS via HTTP REST in 8 actions

I saw VSTS has "Send an HTTP Request to VSTS" a few days ago, and a quick test had me pulling back repo information in JSON.


My brother visited me on Sunday afternoon, after having Australian BBQ and playing Monster Hunter World, I sent him back via the train station.  On the way, I mentioned to him that Flow has VSTS connector now.  He joked that "Ah so now you can finally check your Flows into a proper source control".

Well... about that.
See...  I believe Flow can do anything.  So as I was pulling into my garage I've got some ideas to try in my head.

Plan

  • The magic of "Send HTTP Request to System" connectors
  • VSTS REST API
  • How to send all our Flow definitions into VSTS

"Send HTTP Request to System" Connectors

I'm a big fan of "Send HTTP Request to System" type of Connectors.  First we saw that with SharePoint - allowing a pre-authenticated action to call any REST API on SharePoint.

Now we see it on VSTS.

How about MSGraph next? :-)  Pretty please.  For delegate access.

VSTS REST API

The VSTS REST API are documented here: 
https://docs.microsoft.com/en-us/rest/api/vsts/?view=vsts-rest-5.0

In particular, v5 is in v5-preview
To perform a "push" via REST, we need the last Commit ID, then a POST Push JSON.

https://docs.microsoft.com/en-us/rest/api/vsts/git/commits?view=vsts-rest-5.0
https://docs.microsoft.com/en-us/rest/api/vsts/git/pushes/create?view=vsts-rest-5.0#add_a_text_file 

How we do it in Flow

The 'trigger' could be anything - a manual button, or a recurrence trigger.
Get all My Flows and loop through them.

To GIT PUSH - we need to have the last Commit Id, so perform a get commits and take the last one.
Then use Compose to pull the commitId from the result JSON.

NOTE - this will fail if you have never commit to the repo.  So just go to that repo and init by commit the README.md manually first.

List My Flows action outside of the For Each doesn't actually return Flow Definition.  So inside the For Each, call Get Flow again with the Flow Name.

Next we compose the GIT PUSH body json.  It needs oldObjectId we got from GIT Commits earlier.  And we are either "add" or "edit" files.  I use the Flow Name.json to be the file name - that is a GUID.  My reasoning is that guids don't change, display names do.  So guid would keep better history.  You may decide display names are better filenames.

Cast the flow.properties.definition (JSON) into a String, and set that as "content" of the PUSH body.

Call VSTS REST again with POST pushes

grant-permissions-as-me.png

Trigger the Flow first time and we'll need to check and grant permissions to the two connectors.  They both run as me.  Auth is Easy and is Done. ;-)

Run Success!

flow-to-vsts-success.png

Run it - success!
Note because the PUSH has to run one after another - the commit must be re-fetched per PUSH.  We can build more complex POST body and have it commit every Flow in one PUSH.

Flow Definition JSON usually is one big long line.  Make sure you do Format Document if you want a human to read it.

Summary

Take regular backups of your Flows.  And then use VSTS's change history to see what changed!

Some may be brave enough to try take Flow definitions from VSTS and patch them into live Flows.  Please tell me if that works well :-O

Building a tool to help everyone with Flows: Flow Studio

So, I've been head-down, deep building a tool to help everyone make better Microsoft Flows

It doesn't have many bells and whistles, it is still in very early alpha.  But it will help makers navigate the Flows we build, and I'm rapidly adding tools to the toolset.  There are near endless ideas of where this can go.

So far, getting a lot of feedback from a few colleagues, I'd love to get more feedback, say from a dozen users.

This app is called Flow Studio, the code name is Kunai (a Ninja dagger, because it helps us slice and dice / sort and filter).

A public alpha version is hosted on Azure Blob Storage and AzureFunctions.  

https://flow-studio.azurewebsites.net/welcome

Please tell me about the bugs, but also tell me about what awesome ideas you'd like to see.

Crazy Version History:

  • 0.0.17 (not yet released) Duplicate Flow
  • 0.0.16 IndexDB caching, remembers settings now
  • 0.0.15 fix URL for run
  • 0.0.14 update to Angular 6
  • 0.0.13 Edit JSON (exercise in opening and saving Flow Definition)
  • 0.0.12 Disable/Enable Flow
  • 0.0.10 ...nested grid, layout, dialog, building out different services, auth, usual headaches

I figure it's the third day of SharePoint Conference North America and it's as good time as any to push this baby into the public.

Please let me know what you think of this.


Microsoft Flow: SharePoint Trigger on specific fields changed via SP HTTP Request

result-nochanged.png

A very common request in Microsoft Flow for SharePoint is a trigger that only runs when a certain field has changed, or when it has changed to a certain value.

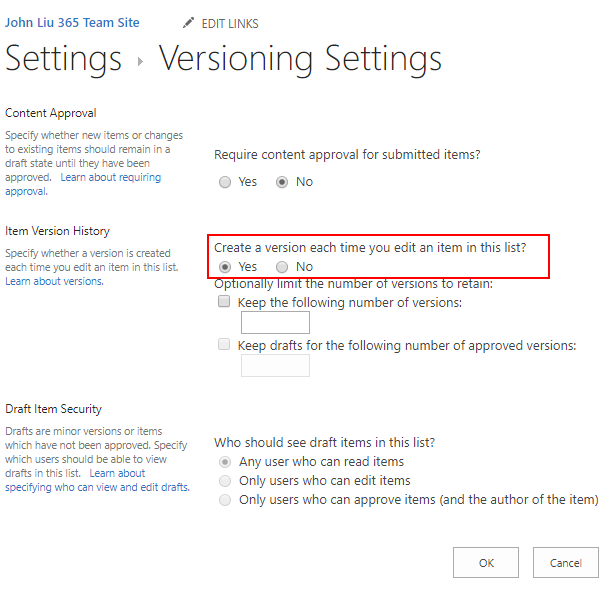
With the new SharePoint "Send an HTTP request to SharePoint" action, we can now do this in relatively few steps with the help of List Versioning.


Plan

  • Enable List Versioning

  • Obtain item versions results on item change

  • A conditional fast exit

  • Understand the data formats and how to debug

  • Summary


Enable List Versioning

List-Versioning.png

Obtain item versions results on item change 

// SPREST-Versions
"method": "post",
"body": {
  "method": "GET",
  "uri": "_api/web/lists/getbytitle('ListWithHistory')/items(triggerBody()?['ID'])/versions?$top=2",
  "headers": {
    "accept": "application/json; odata=nometadata"
  }
}

// Select
{
  "from": "body('SPREST-Versions')?['value']",
  "select": {
    "ID": "item()?['ID']",
    "VersionLabel": "item()?['VersionLabel']",
    "Title": "item()?['Title']",
    "Demo": "item()?['Demo']",
    "Completed": "item()?['Completed']"
  }
}

Versions returns the latest version first.
But there are a few tweaks we can do here:

  1. If we ONLY ever care about the latest two versions - we use $top=2
    this covers the new version and the previous version.

  2. If we care about the latest versions within the last few minutes - we can filter with $filter=Modified gt 'last-5-minutes-date-expression'

    The expression would be addMinutes(utcNow(), -5) but it should be formed in a separate action above.

  3. I have seen really complex mixed up Flow triggers with a lot of overlapping list item updates - I highly advise designing the workflow to not do that. This pattern here can help decouple those situations.

There are many fields on version endpoint - Select will clean it up to only the specific fields that we care about:

A conditional fast exit

// Condition-SameTitle
equals(first(body('SelectVersions'))?['Title'], last(body('SelectVersions'))?['Title'])

Results

Results for success and failure. 
This check can be performed with ~4 actions, as part of the pre-condition check for whether to continue the Flow.


Understand the data formats and how to debug

Understanding this step is interesting for debugging purposes.  Since we are calling REST and getting back JSON, we need to know how to read it and 

Run this, and we'll see the default output which is

But for our needs - it can be a lot easier if we apply additional header.

See also: https://www.microsoft.com/en-us/microsoft-365/blog/2014/08/13/json-light-support-rest-sharepoint-api-released/

With either method, we end up with one of these expressions to get to the result array of versions:

body('SPREST-Versions')?['d']?['results']
body('SPREST-Versions')?['value']

Summary

  • Tip 1 - use accept header to get simpler result

  • Read the output to understand the return JSON format

  • Tip 2 - using $top=2 is simpler than Tip 3.

  • Tip 3 (advanced) - using $filter to compare whether just the last two versions or changes as a batch

  • Tip 4 (advanced) - on the created event - there will be only one version. So
    first(body('SelectVersions'))?['Title']
    last(body('SelectVersions'))?['Title']
    refers to the same row.

    We can force comparison by:
    body('SelectVersions')?[0]?['Title']
    body('SelectVersions')?[1]?['Title']

    The second row [1] doesn't exist, but ? will replace the query with null.

  • Use expressions to navigate the JSON structure

  • Use Select to simplify the result array

  • Remove complexity in overlapping Flows hitting update on the same list item by making sure Flows exit early when not required - this will simplify a lot of our Flow designs

  • Tip 5 (advanced) - in the SelectVersion step - do not include the VersionLabel then in the comparison step - compare the two JSON objects string(first(body('SelectVersions'))) and string(last(body('SelectVersions'))) directly. This allows us to check all the fields together.


How to use Select to simplify Create-HTML-Table and Create-CSV in MicrosoftFlow

pexels-select-sort-complexity.jpeg

This is a blog post about how using Data Operations - Select in Microsoft Flow can dramatically simplify Create HTML Table or Create CSV.

This is mostly inspired by a conversation with @gmfer that I feel needs a bit more explanation for anyone that's curious.

Technically, this is also a blog post about how these three operations are fundamentally the same thing.  They iterate over an array and perform map/reduce.  As a developer as well as a language nut, I love map/reduce.

Plan

  • What is the problem with Create HTML Table (or Create CSV)
  • Why the fix is Select
  • The underlying language expression holds the answers to all the questions

The Data Operations actions

The problem

The problem is hard to explain but becomes very apparent as soon as you try to use Create HTML or Create CSV.

My example list is my Xbox Achievements - I'm pulling them into a HTML Table and a CSV File

html-simple.png

Problem 1 - Sometimes bugs with connectors (like SharePoint)
Problem 2 - Expression Editor does not appear - forcing us to write expression without help (use a compose action as a workaround)

Problem 3 - decide to define headers it wipes out existing columns.

This way is quite tricky, but we can get to the result, which looks great.  The downside is we have to know the expressions.


The Select

Let's see how we do this with Data Operation - Select, and why it is easier because we can use the Expression editor

The expressions are moved into a previous Select operation, that makes create HTML action (or create CSV action) very simple - just use the defaults.


The language

For the curious, the root of all three action lies in the expression.

Create HTML Table

"Create_HTML_table": {
    "type": "Table",
    "inputs": {
        "from": "@body('Get_items')?['value']",
        "format": "HTML",
        "columns": [
            {
                "header": "Title",
                "value": "@item()?['Title']"
            },
            {
                "header": "State",
                "value": "@item()?['progressState']"
            },
            {
                "header": "Unlocked",
                "value": "@formatDateTime(item()?['timeUnlocked'], 'yyyy-MM-dd')"
            }
        ]
    }
}

Create CSV Table

"Create_CSV_table": {
    "type": "Table",
    "inputs": {
        "from": "@body('Get_items')?['value']",
        "format": "CSV",
        "columns": [
            {
                "header": "Title",
                "value": "@item()?['Title']"
            },
            {
                "header": "State",
                "value": "@item()?['progressState']"
            },
            {
                "header": "Unlocked",
                "value": "@formatDateTime(item()?['timeUnlocked'], 'yyyy-MM-dd')"
            }
        ]
    }
}

Create CSV table and HTML table are the same.  If we don't want headers, the JSON changes to:

        "columns": [
            {
                "value": "@item()?['Title']"
            },
            {
                "value": "@item()?['progressState']"
            },
            {
                "value": "@formatDateTime(item()?['timeUnlocked'], 'yyyy-MM-dd')"
            }
        ]

Select and Create Table (with automatic columns) look like this

"Select": {
    "type": "Select",
    "inputs": {
        "from": "@body('Get_items')?['value']",
        "select": {
            "Title": "@item()?['Title']",
            "State": "@item()?['progressState']",
            "Unlocked": "@formatDateTime(item()?['timeUnlocked'], 'yyyy-MM-dd')"
        }
    }
},
"Create_HTML_table_2": {
    "runAfter": {
        "Select": [
            "Succeeded"
        ]
    },
    "type": "Table",
    "inputs": {
        "from": "@body('Select')",
        "format": "HTML"
    }
}

So if we look at the part for the field mappings being defined in Select as well as how they are listed in Create Table - Columns, the syntax of each item property expression is identical.

In a way, understanding the select expression helps us know what to put back inside the Create CSV/HTML Table actions.

Why can't we just use the same Select UI for Create CSV/HTML Table

Ultimately, the UI for Select allows mapping not only to fields but also to complex JSON objects, and goes far further than the header/value fields that Create CSV/HTML table actions need.  So while I love the Select action's UI since it works well with expression editor, that UI can't be used to replace the Create CSV/HTML table actions UI directly.


Summary

  • We looked at how to use Create CSV/HTML Table with expressions (this works, but is hard)
  • I recommend using Select to pick out the fields and the name of the field that you need, and then use automatic columns
  • And we looked at the underlying expressions and see these three are nearly identical.  They all do map reduce of a complex collection of objects and project them into a simpler (or different formatted) result.
  • Thank you @gmfer for the discussion and ultimately the motivation to write all this down.