Flow to MS-Todo, then all your tasks to Flow

I'm in a celebrating mood - Flow released Export and Import.  This is a great day.  https://flow.microsoft.com/en-us/blog/grow-up-to-logic-apps/

So I'm going to write about something that I've built in the last week, because I've been looking at a simple Todo app - and Flow has started to really streamline the way I work.

This is part of a series on Microsoft Flow

Microsoft Todo, the app that's just damn simple

I don't really want to get into why I choose Todo instead of Wunderlist or Todolist or Google Keep.  I think I just want a really simple Todo app that I'll complete every day.  

In a nutshell, this is how I use Todo:

Every time you open Todo, you see Today.  This starts every day blank, like a clean slate

Hit suggestions, and it shows you tasks from three categories that you can add to "today"
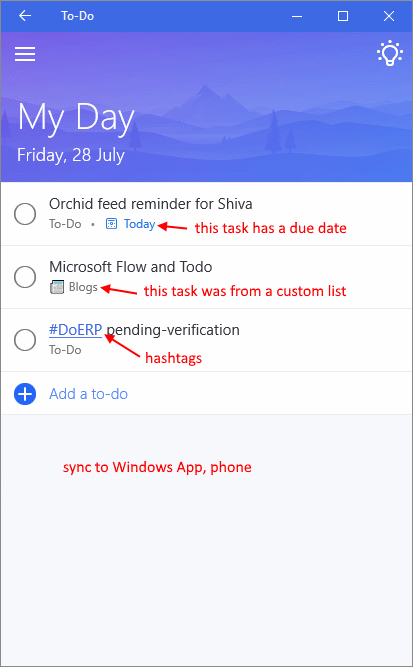
todo4.png

Sync everywhere

Knock out those tasks in today

Todo doesn't have an API

But it sync with Outlook Tasks - which gives me the idea for this Flow.  (Actually, I'm pretty sure Todo just uses Outlook Tasks as the source).

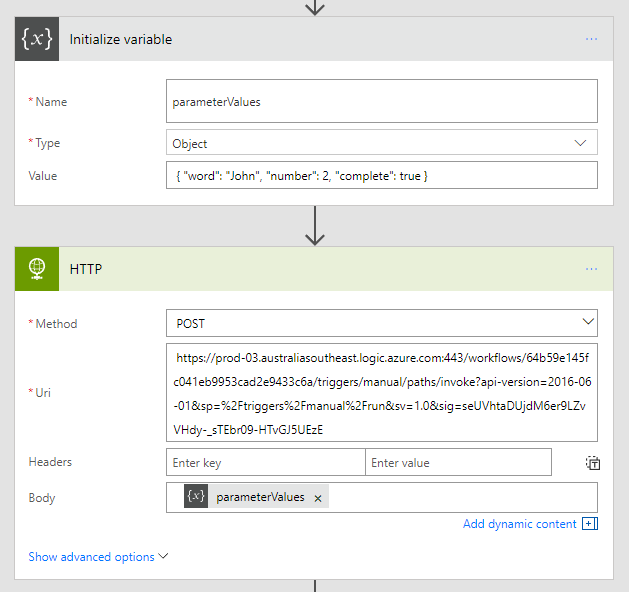
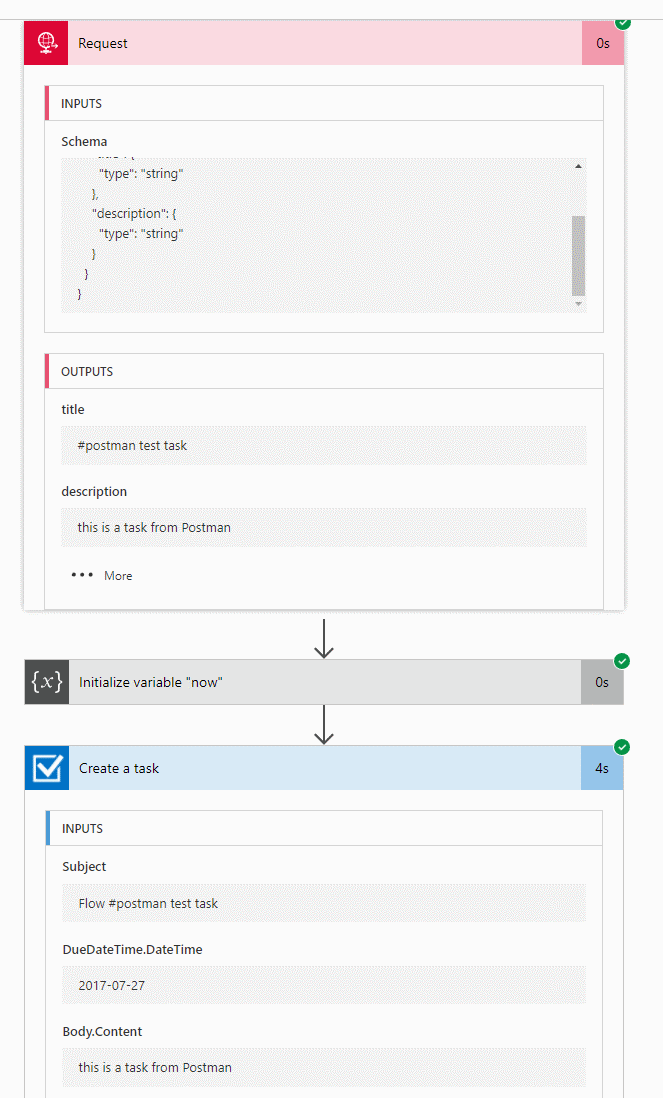
  1. Set up a Web Request
  2. Calculate today - NOTE don't include quotes " and "
  3. Create Outlook Task with title, description and today as due date
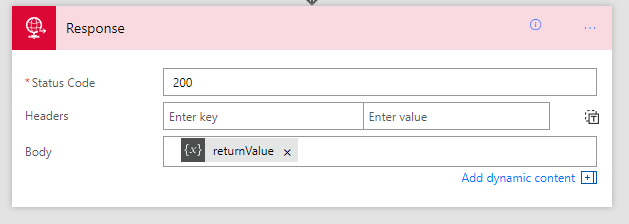
Test with Postman

Remember to set the content-type to application/json 

And we see this in Todo, almost instantly.

todo6.png

What's next?

I now have a web service that takes a simple JSON and I can add tasks anywhere into my Todo.  I'm playing with the idea that different Flows can put tasks into this API, which will populate tasks that I can add into "today".

  • Bills from Emails
  • Notable Twitter that spun off a crazy blog idea
  • SharePoint project tasks
  • OneNote tasks
  • Planner (? this one I may leave in the Planner app)

I'm also thinking to create different lists for different sources, and watch task changes to write back to source system.  That will make this a really good end to end solution for me.


Building Binary output service with Cognitive Services and Microsoft Flow

We covered how to do binary webservices with Microsoft Flow.  A question then lingers in my mind.  If you can push binary data into a Flow, and within the Flow you can pass it around...  Can you output a binary file from Flow?

This question bothered me so much in my sleep, I decided to test it and write this blog.  And thus, we have probably the simplest example of the series.

  1. So we will first build a service endpoint that can return binary data.
  2. Then we will send it through cognitive services and tag some data as we go.

This is a post in a series on Microsoft Flow.

  1. JSON cheatsheet for Microsoft Flow
  2. Nested-Flow / Reusable-Function cheatsheet for Microsoft Flow
  3. Building non-JSON webservices with Flow 
  4. One Connection to Proxy Them All - Microsoft Flow with Azure Functions Proxies
  5. Building Binary output service with Cognitive Services and Microsoft Flow

Build a Flow to output non-text Output

The method needs to be set to GET.  Take a image that's authenticated in SharePoint, and set that to be the response output.

Test this with Postman

A few things to note:

  1. The request is a GET request.
  2. It replies with image/png (content type was automatically worked out)
  3. ... and that's it, there's not a lot to say

Add Cognitive Services - Computer Vision

You'll need to create a Cognitive Services in your Azure Subscription.  The free tier offers 5000 images per month, at 20/minute.

We are taking the output of the tag action and adding that to the tags header in the service response.

And here we have the same image, but now with tags in the output.

Smart dogs.


Why do we need this?

  1. This means - we can post image in, and we can get image out
  2. May be you need to proxy a resource within SharePoint that is authenticated - but you want to use it directly as a file.  If you use a SharePoint Sharing link it'd take you to a page.
  3. With this direct link to the file, you can use this as an anchor within HTML, or use this to upload a file to an external system (via URL).
  4. May be this isn't a file, but a generated ZIP file that you want to copy somewhere else.  Or it is a docx file.
  5. Or perhaps you want to send a picture to a Flow, then resize it or run it through cognitive services before getting back the result.
  6. May be you are just mad and want to auto-tag every image in your SharePoint?
    That actually sounds amazing.

Because Microsoft Flow lets us push binary through actions, I think there's a bunch of interesting scenarios for this.

Also, I think assistant branch manager and branch manager are awesome.


One Connection to Proxy Them All - Microsoft Flow with Azure Functions Proxies

Office 365 licensed PowerApps and Microsoft Flow lets you have 1 custom connection.  I think that's cute.  I also think that limitation is absurd, considering how many times we need to break out of existing capabilities every time we want to do something interesting.  So, custom connections shouldn't be a limit, if the BAP team wants us to innovate the crap out of this platform, this is counter productive.  I hope the team reconsider.

Regardless, it is pointless, because we bypass that right away: Azure Functions has Proxies.

This is a post in a series on Microsoft Flow.

  1. JSON cheatsheet for Microsoft Flow
  2. Nested-Flow / Reusable-Function cheatsheet for Microsoft Flow
  3. Building non-JSON webservices with Flow 
  4. One Connection to Proxy Them All - Microsoft Flow with Azure Functions Proxies
  5. Building Binary output service with Microsoft Flow

In this post, we talk about:

  • Azure Functions proxy for Microsoft Flow connections
  • Azure Functions proxy for itself
  • Azure Functions proxy for bypassing CORS
  • Azure Functions proxy for 3rd party APIs
  • One Simple API for me

So in one Connection to proxy them all, in one Request to Bind them.  And in Serverless something about we pay nothing - hey I'm a blogger not a poet.

Azure Functions Proxy for Microsoft Flow

In an earlier post - I talk about we can turn Microsoft Flow into webservices with the Request trigger.  This is awesome, but it leaves you with an endpoint that looks like sin.

https://prod-18.australiasoutheast.logic.azure.com:443/workflows/76232c77d84d424b8e56ab2f88b672c4
/triggers/manual/paths/invoke?api-version=2016-06-01
&sp=%2Ftriggers%2Fmanual%2Frun
&sv=1.0
&sig=FAKE_KEY_NXpUV_FEyhl1BKgKftQ0-rcOPcE

Lets clean this up with Azure Functions Proxies.  First, enable it.

Create a Proxy: set the name to "uploadBinary" and template to "upload".  Chose your methods (POST only for this one), and paste in the backend URL.

Hit create - our proxy URL is generated.  https://funky-demo.../upload

We had a Swagger OpenAPI file for this binary web request - lets tidy it up 

{
  "swagger": "2.0",
  "info": {
    "description": "",
    "version": "1.0.0",
    "title": "UploadBinary-proxy"
  },
  "host": "funky-demo.azurewebsites.net",
  "basePath": "/",
  "schemes": [
    "https"
  ],
  "paths": {
    "upload": {
      "post": {
        "summary": "uploads an image",
        "description": "",
        "operationId": "uploadFile",
        "consumes": [
          "multipart/form-data"
        ],
        "parameters": [
          {
            "name": "file",
            "in": "formData",
            "description": "file to upload",
            "required": true,
            "type": "file"
          }
        ],
        "responses": {
          "200": {
            "description": "successful operation"
          }
        }
      }
    }
  }
}

We can delete all the additional parameters sp, sv, sig, api-version.  We pretty much say we just care about the formData.

Go back to our PowerApps custom connectors - delete the old one and add this new OpenAPI file.
This is what PowerApps now see: the URL is only /upload
and there are no hidden query parameters - just waiting for the body.

Delete the old connection and recreate a new connection.
The method now on the new connection only takes 1 parameter "file".

The result in PowerApps and SharePoint

This test picture is called "Azure Function is On Fire!"

So in using AzureFunctions Proxy for a Flow WebRequest - we've simplified the query string in the URL and kept the functionality.

Azure Functions proxy for Azure Functions

Some of our connections were to Azure Functions, so let's tidy that up too.

This is a pretty simple example.  /listEmail now is hooked up, and activation code is hidden.

Azure Functions proxy for bypassing CORS

Everything you proxy in Azure Functions can be made available to CORS - just need to turn on Azure Functions CORS with your domain

CORS' design goals are to prevent browser based injection/consumption of a service.  But services are made to be consumed.  So CORS blocks a browser, but never blocks a server-based call.

Azure Function runs server, and proxy works because it doesn't see CORS at all.  Switching on Azure Functions CORS is so that your domain is accepted to call this Azure Function.

Anyway, if you see CORS and got annoyed - just use Azure Functions Proxy to keep going.

Azure Functions proxy for 3rd party APIs

Let's add an external Open Weather API

Azure Functions Proxies has additional means of passing through parameters to the underlying proxied URL.  See Documentation: https://docs.microsoft.com/en-us/azure/azure-functions/functions-proxies

So the call to the SAMPLE open weather API is:

http://samples.openweathermap.org/data/2.5/weather
?lat={request.querystring.lat}
&lon={request.querystring.lon}
&appid=b1b15e88fa797225412429c1c50c122a1

So we are exposing two query string parameters in our end point to be passed down.


One simple API Connection for me

{
    "swagger": "2.0",
    "info": {
        "description": "",
        "version": "1.0.0",
        "title": "One-Funky-API"
    },
    "host": "funky-demo.azurewebsites.net",
    "basePath": "/",
    "schemes": [
        "https"
    ],
    "paths": {
        "upload": {
            ...
        },
        "listEmail": {
            ...
        },
        "weather": {
            ...
        }
    }
}

In all the examples, we clean up the API we are calling to hide away apiKeys and such and make our end point really easy to consume from Flow, PowerApps or JavaScript CORS.

And because both Microsoft Flow and Azure Functions are Serverless, we still don't care about servers ;-)


Building binary (non-JSON) webservices with Flow

This is a short(er) blog post, as I'm packing to get ready to sleep and then wake up early and fly to Brisbane for this weekend's Office 365 Saturday.

We will build upon what we discussed with building Flow as a Service today, and build a non-JSON webservice - we will build it to handle multi-part/form-data which is perfect for handling sending binary files to Flow, from the likes of PowerApps.

This is the third post of the series on Microsoft Flow.

  1. JSON cheatsheet for Microsoft Flow
  2. Nested-Flow / Reusable-Function cheatsheet for Microsoft Flow
  3. Building non-JSON webservices with Flow
  4. One Connection to Proxy Them All - Microsoft Flow with Azure Functions Proxies
  5. Building Binary output service with Microsoft Flow

In this post, we will cover:

  1. Define a Flow service to handle multi-part/form-data
  2. Creating the OpenAPI (Swagger) definition
  3. Call this from PowerApps

History

This is a problem that was set out by Paul Culmsee - as I understood the requirements - he wanted to use PowerApp's Add Media control, which does not provide the image as a dataUri and thus our previous solution of sending dataUri (as string) doesn't work.

The Add Media control sends a blob.  A binary file.
Paul actually did lots of research and dug up lots of reference links: 

The second solution is Solved.  But it requires a C# service.

Define a Flow service to handle multi-part/form-data

First - I recall seeing a @triggerMultipartBody() Logic App Workflow Definition.  We build upon the previous post of creating a Flow Service.

trigger-1.png

First difference - we don't use the body JSON schema.  We assume the body will be multi-part/form-data, so it won't follow a JSON schema.  This is not a JSON service.

Save this Flow, we need the Request URL.

Set up Postman to poke this service

Use the Request URL, set the method to POST, the Body type is form-data.  And for the key value - set it to "File", and select a real picture.

Hit send.

You should see this.  This is quite good.  It means:

  1. The form-data works.
  2. We have the image/png, it looks like it's in base64 string.

We don't really care about all the bits of part 0 of the multi-part form-data.  We just want the $content.
Select that and wrap it in base64StringToBinary()

Send the picture again from Postman.

test-0.png

And the picture is in SharePoint!

Creating the OpenAPI (Swagger) definition

This part is hard and annoying.  But I started with the OpenAPI example from https://community.powerapps.com/t5/PowerApps-Forum/Retrieving-Data-URI-from-an-image-added-via-the-quot-Add-picture/m-p/40247 

At the end, I ended up with this:

{
  "swagger": "2.0",
  "info": {
    "description": "",
    "version": "1.0.0",
    "title": "UploadBinary3"
  },
  "host": "prod-18.australiasoutheast.logic.azure.com",
  "basePath": "/workflows",
  "schemes": [
    "https"
  ],
  "paths": {
    "/76232c77d84d424b8e56ab2f88b672c4/triggers/manual/paths/invoke": {
      "post": {
        "summary": "uploads an image",
        "description": "",
        "operationId": "uploadFile",
        "consumes": [
          "multipart/form-data"
        ],
        "parameters": [
          {
            "name": "api-version",
            "in": "query",
            "default": "2016-06-01",
            "required": false,
            "type": "string"
          },
          {
            "name": "sp",
            "in": "query",
            "default": "/triggers/manual/run",
            "required": false,
            "type": "string"
          },
          {
            "name": "sv",
            "in": "query",
            "default": "1.0",
            "required": false,
            "type": "string"
          },
          {
            "name": "sig",
            "in": "query",
            "default": "Mb25lHIBI6Sq4xXkNXpUV_FEyhl1BKgKftQ0-rcOPcE",
            "required": false,
            "type": "string"
          },
          {
            "name": "file",
            "in": "formData",
            "description": "file to upload",
            "required": true,
            "type": "file"
          }
        ],
        "responses": {
          "200": {
            "description": "successful operation"
          }
        }
      }
    }
  }
}

Arguments such as "api-version", "sp", "sv", "sig" are part of the Request URL.  I specify the default value, and mark them as not required.

The one required parameter is "file", the type is "file" and is in "formData".

Regression Bug / Note on Custom Connections

Changes to the Custom Connections in PowerApps and Flow has prompted me to mention a workaround - if we specify "not required arguments with default" for arguments "api-version", "sp", "sv" and "sig" - they don't seem to be populated properly when calling from PowerApps. This seems to be a regression bug.

Instead, go into your Custom Connections screen in PowerApps/Flow, and set the optional values to "hidden" (keep the defaults). This will clean up the PowerApps connections and keep the webservice working.

Call this from PowerApps

Use the Add media control.  Configure the button to call our OpenAPI-configured connection.  Which shows the correct arguments: file is required, and the others are optional.  You can ignore them.

Final test

Final Thoughts

So this is an end to end example of sending form-data from PowerApps to Flow to SharePoint.  There are some exercises I think would make this a better application.

Flow should take a second parameter, which could be triggerMultipartBody(1) - it should be a string, and should be used as the filename.  Swagger should be adjusted as well.  Alternatively, you can do this in the URL as part of the query string.

We probably can make the multi-part form-data handle more than one file at a time.  And make the first argument required, but subsequent arguments optional.

In the DataUri example we had issues with the Windows application since it didn't use DataUri - it used Blobs.  With this example, we are able to make Windows app work as well.

If I sit back and really consider what this example means - we've built a webservice that can handle binary files, without writing a single line of 'developer' code.  It makes me wonder what sort of product is Flow, and just how powerful the entire platform is.

Everyone needs to understand Flow, it has serious potential.

Nested Flow (Reusable-Function) cheatsheet for Microsof Flow

To build complex, but maintainable Flows, it is important to be familiar with this next step.  The Flow blog calls this Nested Flows, so I will stick with this term.  What this really is in essence, is how to build Flows as a reusable function or service.  I want to then expand on the official blog post and then go far beyond.

This is the second of the cheatsheet series on Microsoft Flow.

  1. JSON cheatsheet for Microsoft Flow
  2. Nested-Flow / Reusable-Function cheatsheet for Microsoft Flow (this article)
  3. Building non-JSON webservices with Flow
  4. One Connection to Proxy Them All - Microsoft Flow with Azure Functions Proxies
  5. Building Binary output service with Microsoft Flow

In this post, we will cover:

  1. Define a function request
  2. Define a function return
  3. Call a function with parameter
  4. Parse a function return 

Part 1. Define a Nested-Flow like a function

function(word: string, number: number, complete: Boolean)
Let's say we want to define a function with a few arguments.  Start with the Request trigger.  This Flow will run when a request is sent to the Request URL.

We will need to provide the JSON schema that defines the arguments we want.  Anytime we see "Use sample payload to generate schema" immediately click it.  Life is way too short to learn JSON schema.

Type in the JSON we want to send to this end point.

{
    "word": "a word",
    "number": 5,
    "complete": false
}

The JSON schema will be generated for us.  Easy.

Define the return value from Nested-Flow

function() -> { word: string, number: number, complete: Boolean }
Our Flow doesn't need to return a response.  But if we want it to, we can use the Response Action to specify what the response is.
Response Action is a terminating action.  We can't add anymore actions afterwards.

response-1.png

There are many ways to set up the response JSON.  Here we use a variable and initialize it to the values from the Request trigger.

Test Nested-Flow

First, save the Flow - the HTTP Request URL will be generated after save.

Poke the URL with Postman

Note: We have to set content-type to JSON (application/json), otherwise Flow will treat the entire body as plain text.

See how the request is sent to Flow, then returned.  The return type is JSON

So far so good.  Our Flow responds to a HTTP call and returns values.

Technically, there's nothing nested about this Flow, not until we call it from another Flow.  Let's do that next.

Part 2. Call a Nested-Flow

The official blog post covered most of this.  So I'm including some pictures with light commentary.  These steps are pretty easy.

We can call HTTP with a literal JSON in the body.  But I find in reality, we will almost never do this.  We are always constructing a JSON to be passed in.  So I would start with an extra variable.

Parsing the return value from the Nested-Flow

When the HTTP action returns, we will have a body text.  This is not strongly typed and we can't work with this easily.  The magic is to use the action "Data Operations - Parse JSON" to force the body json into a JSON schema and extract strongly typed variables we can then rely on.

We will get used to "use sample payload to generate schema" pretty quick.  Every time we see it we should immediately click it.
Since the Nested-Flow wants the same object that we defined in Part 1 above, we will use the same JSON sample.

Flow then understands we have strongly typed properties to work with.

Test the Run Nested-Flow, Flow

The parent Flow calls the Nested-Flow, and gets the return values.

So now we have four patterns:

  1. Define a function request
  2. Define a function return
  3. Call a function with parameter
  4. Parse a function return 

These are the four basic steps in this cheat sheet.  What they unlock.  Is the most powerful workflow product ever.

We need to wrap this up with an ultimate example.

Crazy Example: Fibonnaci Flow

Wait, John, did you say fibonnaci, you mean that recursive function...  

fibonnaci (n)
f(0) => 0
f(1) => 1
f(N) => f(N-2) + f(N-1)

So this is a recursive Flow 

We switch on the 'n' parameter.  If 0,1 we return.  If n, we do n-2/n-1.  
If n is negative, we would be in big trouble ;-)

simple recursion.  fib(2) = 1

deeper recursion.  fib(4) = 3

Always a good reminder that the naive implementation of recursive fibonnaci is very costly in terms of repeated recursion.  fib(4) is 10 runs.

Examining one of the runs - results of fib(3) + fib(2) = 3

Why this is a Game Changer

I hear about how Microsoft Flow is not ready for consumers.  Well, I think they are all wrong really ;-)  Microsoft Flow is amazing.  Yea the UX has bugs.  Sometimes you just need to stand on sharp broken edges to see greatness.  In Australia we say: suck it up princess.

Here's twelve reasons why you need this.  You needed this yesterday, no, I asked for this 5 years ago.

  1. You should put repeated steps into a separate function you can call.  This is like basic functionality. 
  2. e.g. Email someone
  3. e.g. Retrieve an email template from SharePoint then email someone
  4. e.g. Retrieve an email template and recipients list from SharePoint/Azure AD then email someone. 
  5. e.g. Spam the Team's conversation thread with an urgent message
  6. There are concepts very similar to this in various workflow systems I've used - User Defined Actions, WF Custom Workflow Activities, except Nested-Flow just works.
  7. If you are chaining Flow Trigger -> Azure Functions -> Flow Delay -> Azure Function.  This gives you ultimate flexibility.  There is no built in "delay" in Azure Function.
  8. Have you EVER wish you had SharePoint Workflow that could call itself?  Revolutionary.
  9. Your JavaScript can call the Flow - Julie Turner has a great post on this
  10. Because Flow supports unwinding a failed action set - you can put fail handler in a … Flow.  It's Exactly like a Flow - try/catch block.
  11. Because in one Flow you have a top secret connection that only you can use.  But you want other people to be able to reuse the action, which is configured with your top secret connection.  But you don't want to tell other people what your top secret connection is.
  12. Because Flow, on top of LogicApps, belongs to that wonderful category of Azure solutions under the Serverless banner.  Yes no servers.  Few people will care about servers in the future.
  13. Because Flow don't let you copy and paste actions.  Are you really going to manually re-create all those steps?

You tell me!  There's got to be a hundred reasons right here.  I'm literally adding new points as I type because there is just so many possibilities.

If you are doing Flow, you need to master this technique.  No exceptions.
 

References