Using SharePoint Designer 2013 Workflow to copy file via REST on Office 365
This is a bit of trial and error, but works very well at the end, so I want to publish this and share the syntax.
Related References:
- http://blogs.msdn.com/b/sharepointdesigner/archive/2012/09/05/how-to-work-with-web-service-using-call-http-web-service-action.aspx HyongGuk Kim / Microsoft shows how to call a GET REST service
- http://www.fiechter.eu/blog/Lists/Posts/Post.aspx?ID=37&mobile=0 Adrian Fiechter explains how to call a GET service with Request Headers
I will tackle the next step. How do you call a POST REST service, with the CopyTo function on SPFile. http://msdn.microsoft.com/en-us/library/ms455020.aspx
The flexibility is that you can easily tweak the urls and essentially allow your workflow to copy files anywhere.
Step 1. Understand the correct URL
- https://sharepointgurus365.sharepoint.com/sites/john/ the Office 365 site.
- https://sharepointgurus365.sharepoint.com/sites/john/_api/web/folders/GetByUrl('Shared%20Documents')/ the Shared Documents library.
- https://sharepointgurus365.sharepoint.com/sites/john/_api/web/folders/GetByUrl('Shared%20Documents')/Files/getbyurl('top1.png') the file: /sites/john/Shared%20Documents/top1.png
- https://sharepointgurus365.sharepoint.com/sites/john/_api/web/folders/GetByUrl('Shared%20Documents')/Files/getbyurl('top1.png')/copyTo(strNewUrl='/sites/john/Shared%20Documents/top2.png',bOverWrite=true) This calls the CopyTo method on the file, destination is top2.png, overwrite is true.
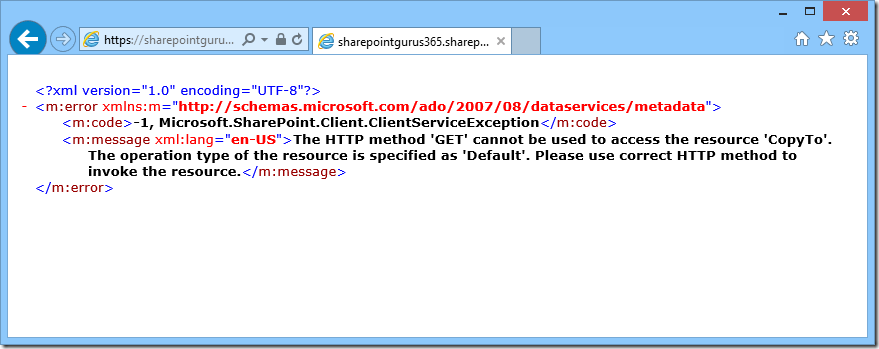
Put this into your browser's address bar (this executes a GET request):
No good. Need POST.
Step 2. Make that SharePoint Designer 2013 Workflow
- First step, with the POST call, we need to add a Request Header for Accept: application/json; odata=verbose
Put this in a dictionary variable.
- Second step. Call Web Service!
You need to set up Request Headers as well. This has to be done via the Properties, since it's not a link that's shown. Set this to the dictionary created in the previous step.
This step is the same as mentioned in Adrian Fiechter's blog.
- You should capture the ResponseContent, and add an additional action to log it to History
The Stage ends. Go to End of Workflow.
- The whole thing, in 3 lines:
Step 3. Run it.
Here's me starting the workflow on the top1.png file.
The top1.png is copied to top2.png! Interestingly, it's copied the Call Workflow "workflow status" column. Both links (which is a lookup field) go to the same workflow.
This is the workflow history.
Notice that the CopyTo method returned void (null) in this case. Should there be an error, you'll see it logged here.
That's all! Hope you find these steps useful.


